OM-263 657 Page 29
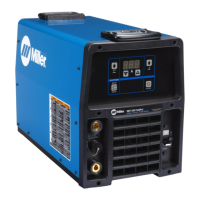
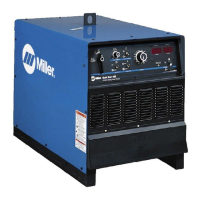
6-2. Welding Power Source And Remote Interface Operation Description
Power Switch Use this switch to power up or power down the welding power source.
. The fan is thermostatically controlled and only runs when cooling is needed.
AMPS Display This display illuminates and shows amperage for either TIG or stick welding process. Measured amperage just
prior to the end of a welding operation will appear on the display for ten seconds after welding operation.
TIG Process Select Button Press and release this button to activate the TIG welding process controls. The TIG text below the button
illuminates. Adjust the amperage to the appropriate setting within a range from 10 to 350 amps. If the TIG
process has been selected and a remote current/contactor control is connected, holding the TIG process select
button for more than two seconds will display the effective amperage command (based on the amperage setting
and the remote current/contactor control setting).
Stick Process Select
Button
Press and release this button to activate the stick welding process controls. The STICK text below the button
illuminates as well as the active stick electrode type text. Select the desired stick electrode type and adjust the
amperage to the appropriate setting within a range from 40 to 350 amps.
Stick Electrode Type
Select Button
Press and release button to select the desired stick electrode type (EXX10 or EXX18). The text above or below
the button will illuminate for the active electrode type. This button is only active with the stick welding process
and only then will text for the electrode type illuminate.
. There may be a “clunk” sound from the power source when switching between Stick and TIG
processes. This is part of normal power source operation.
Adjustable DIG and
Hotstart
Press and hold the STICK button for a few seconds to enter adjustable DIG. The right decimal point will
illuminate on the display to indicate DIG. Once in adjustable DIG, press and release the STICK button again
to enter adjustable Hotstart. The middle decimal point will illuminate on the display to indicate Hotstart.
Pressing and releasing the STICK button a third time will exit the menu. The menu will automatically exit
after 10 seconds of inactivity. Pressing and releasing any button other than the STICK button while in the
menu will also exit the menu.
Amperage Adjustment
Buttons
Use these buttons to set the desired amperage setting for either TIG or stick welding process.
14-Pin Remote Connected
Indicator
The 14-PIN REMOTE text will illuminate when there is a 14-pin accessory connected to the Remote 14
receptacle on the power source.
FieldPro ACCESSORY
Connected Indicator
The FieldPro ACCESSORY text will illuminate when there is a FieldPro accessory connected to and properly
communicating with the power source.
IN USE Button Press and release this button on the power source or FieldPro Remote to illuminate the IN USE text. Press and
release again to turn IN USE text off. This lets others know that the machine is being used.
IN USE Indicator Light automatically turns on when arc is struck. Toggle light using the IN USE button during use. Light will auto-
matically turn off after four hours of inactivity.
CHECK POLARITY
Indicator
The CHECK POLARITY text will illuminate along with an error message (Err) if the work and electrode leads are
reversed. This will light only if a FieldPro accessory is connected. Power down and correct the connections (see
Section 5 for proper connections).
STICK NEGATIVE
Indicator
The DCEN (−) STICK NEG text will illuminate if the polarity is negative while in STICK mode. To activate DCEN
mode, press the STICK button and down arrow at the same time. Press the STICK button to exit this mode. The
DCEN mode can be used for EXX10 and/or EXX18 process setting. The mode has to be set for each electrode
process individually.
NOTICE − Controls on the FieldPro Remote are NOT adjustable during welding. To make adjustments during welding, use the power source controls.
Adjustments can be made if using the RHC-14 remote or wireless remote.
Table 6-1. Recommended Process Selections vs Electrode Type
Electrode Type Suggested Process Setting
EXXX1 EXX10
EXXX2 EXX10
EXXX3 EXX18
EXXX4 EXX18
EXXX5 EXX18
EXXX6 EXX18
EXXX7 EXX18
EXXX8 EXX18
Stainless EXX18