L3
L4
30
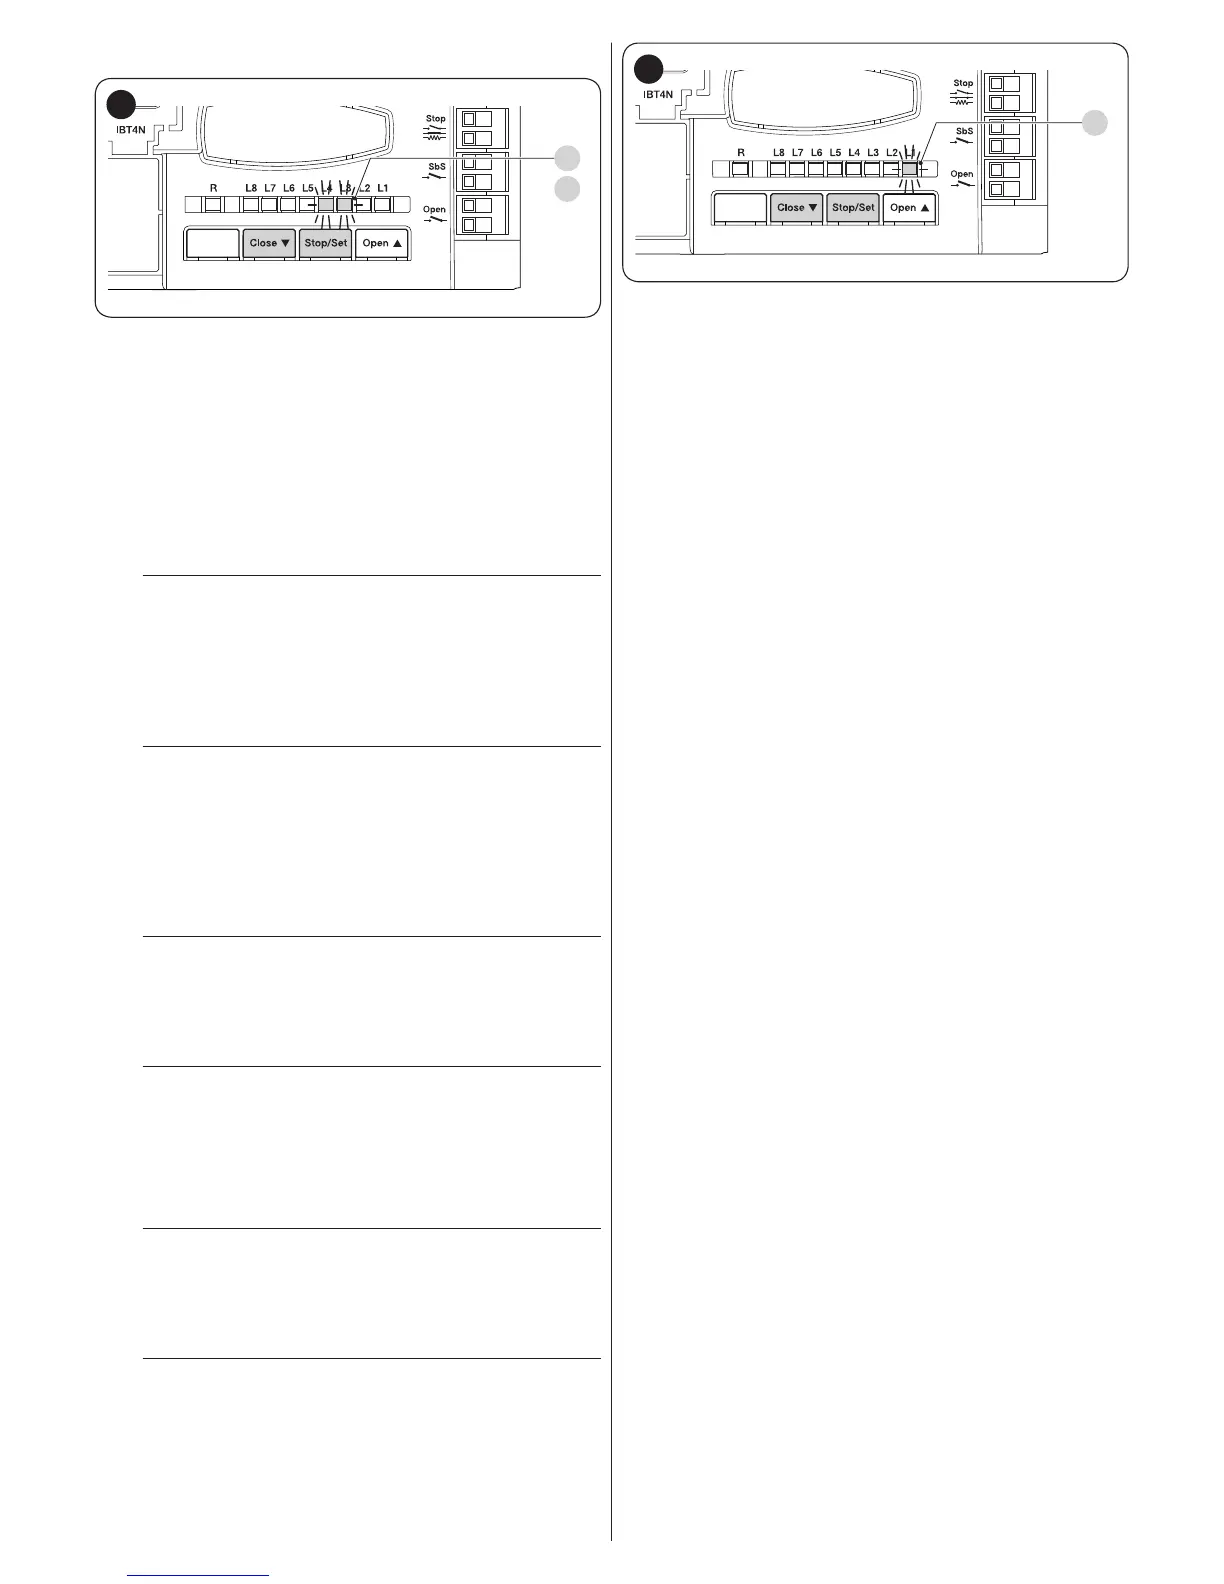
To effect the automatic learning procedure:
1. simultaneously press and hold the and [Stop/Set] buttons
[Close
q
]
2. release the buttons when LEDs “L3” and “L4” start ash-
ing quickly (after roughly 3 seconds)
3. check that the automation carries out the following ma-
noeuvre sequences:
a. closing of motor M1 up to the mechanical stop
b. closing of motor M2 up to the mechanical stop
c. opening of motors M1 and M2 up to the mechanical
stop
d. fast closing of motors M1 and M2.
m
If the rst two manoeuvres (a and b) are not “clos-
ing” but “opening” manoeuvres, press the [Open
p
] or [Close
q
] button to stop the learning phase.
At this point, invert the control wires (external po-
sitions with respect to the terminal) on the motor
that executed the opening manoeuvre and repeat
the self-learning procedure.
m
If the rst “closing” manoeuvre is not commanded
by motor M1, press the [Open
p
] or [Close
q
] but-
ton to stop the learning phase. At this point, switch
the M1 and M2 terminals on the control unit and re-
peat the self-learning procedure.
4. at the end of the closing manoeuvre (d) of the two motors,
LEDs “L3” and “L4” switch off to signal that the proce-
dure was performed correctly.
m
If, during the automatic learning procedure, the
photocells or one of the devices connected to the
“stop” input intervene, the procedure interrupts and
LED L1 starts ashing. In this case, the self-learning
procedure must be repeated from the beginning.
l
The automatic learning procedure can be run again
at any time, even after the installation phase; for ex-
ample, after modifying the position of the mechan-
ical stops.
5.3.2 Learning in manual mode
m
The user has maximum 10 seconds to press the
buttons consecutively during the learning proce-
dure. After this time, the procedure terminates au-
tomatically and memorises the changes made up to
that time.
l
When LEDs "L1..L6" ash, to shift between LEDs
simply press the [Open
p
] or [Close
q
] button brief-
ly (the LED will ash to signal the current position).
STOP SBS OPEN
L1
31
To effect the manual learning procedure:
1. simultaneously press and hold the and [Stop/Set] buttons
[Close
q
]
2. release the buttons when LED “L1” starts ashing (after
roughly 1 second)
3. LED “L1” ashes: position 0 of M1
– to command and move motor 1 to position “0” (“Fig-
ure 31”): press and hold the [Open
p
] o [Close
q
]
button. Once the position is reached, release the button
to stop the manoeuvre
– to memorise the position, press and hold the [Stop/Set]
button for at least 3 seconds then release it (after 2 sec-
onds LED “L1” will remain lit and after the [Stop/Set]
button is released, LED “L2” will start ashing)
4. LED “L2” ashes: position 0 of M2
– to command and move motor 2 to position “0” (“Fig-
ure 31”): press and hold the [Open
p
] o [Close
q
]
button. Once the position is reached, release the button
to stop the manoeuvre
– to memorise the position, press and hold the [Stop/Set]
button for at least 3 seconds then release it (after 2 sec-
onds LED “L2” will remain lit and after the [Stop/Set]
button is released, LED “L3” will start ashing)
5. LED “L3” ashes: position SA of M2
– to command and move motor 2 to position “SA” (“Fig-
ure 31”): press and hold the [Open
p
] o [Close
q
]
button. Once the position is reached, release the button
to stop the manoeuvre
– to memorise the position, press and hold the [Stop/Set]
button for at least 3 seconds then release it (after 2 sec-
onds LED “L3” will remain lit and after the [Stop/Set]
button is released, LED “L4” will start ashing)
6. LED “L4” ashes: position SC of M1
– to command and move motor 1 to position “SC” (“Fig-
ure 31”): press and hold the [Open
p
] o [Close
q
]
button. Once the position is reached, release the button
to stop the manoeuvre
– to memorise the position, press and hold the [Stop/Set]
button for at least 3 seconds then release it (after 2 sec-
onds LED “L4” will remain lit and after the [Stop/Set]
button is released, LED “L5” will start ashing)
7. LED “L5” ashes: position 1 of M1
– to command and move motor 1 to position “1” (“Fig-
ure 31”): press and hold the [Open
p
] o [Close
q
]
button. Once the position is reached, release the button
to stop the manoeuvre
– to memorise the position, press and hold the [Stop/Set]
button for at least 3 seconds then release it (after 2 sec-
onds LED “L5” will remain lit and after the [Stop/Set]
button is released, LED “L6” will start ashing)
8. LED “L6” ashes: position 1 of M2
– to command and move motor 2 to position “1” (“Fig-
ure 31”): press and hold the [Open
p
] o [Close
q
]
button. Once the position is reached, release the button
to stop the manoeuvre
– to memorise the position, press and hold the [Stop/Set]
button for at least 3 seconds then release it (after 2 sec-
onds LED “L6” will remain lit until the [Stop/Set] button
is released).