Do you have a question about the Nice Pro-H and is the answer not in the manual?
Specifies the weight range for the operator.
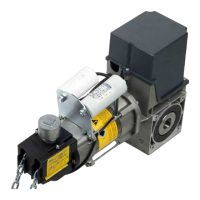
Details motor specifications including RPM, overload protection, and HP.
Describes the primary reduction mechanism (V-belt) and secondary (chain).
States the speed of the output shaft.
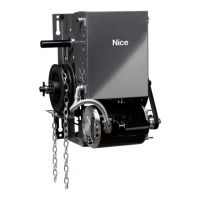
Mentions the optional solenoid-actuated drum and brake shoe system.
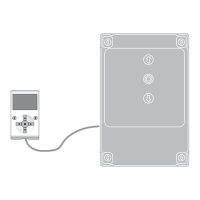
Outlines three different wiring control configurations available for the operator.
Details the 24VAC control circuit transformer specifications.
Mentions the 4 micro switches for controlling door travel via adjustable cams.
Describes the floor-level cable disconnect system for manual operation.
Explains the adjustable friction clutch to minimize damage from obstructions.
Provides dimensional drawings for wall and bracket mounting.
Emphasizes reading and adhering to all safety instructions before use.
Stresses the importance of maintaining balanced doors for safety.
Advises keeping the manual accessible for users to understand safety and operation.
Mandates reading and following all installation guidelines.
Requires installation only on doors that are functioning correctly and balanced.
Instructs to remove or disable door locks before operator installation.
Specifies minimum installation height for operators with exposed moving parts.
Caution against connecting power before the installation is complete.
Provides guidelines for the placement of the control station for safe access.
Requires installing a warning placard near the control station.
Advises instructing end-users on the operation of manual release mechanisms.
Mandates installation of photocells and safety edges for entrapment protection.
States that installation must be performed by a qualified professional.
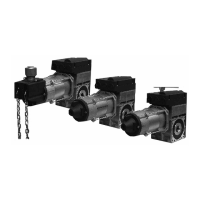
Explains the dual output shafts and mounting options for the operators.
Addresses specific installation considerations for the PRO-H model's chain hoist.
Reiterates placement guidelines for the control station.
Repeats the instruction to install the warning sign.
Provides guidelines for operator positioning relative to the drive shaft.
Details the mounting procedure using bolts and washers.
Guides on aligning the door sprocket with the operator's drive sprocket.
Instructions for installing an optional chain spreader.
Steps for installing and tensioning the drive chain.
Final step to secure the operator mounting bolts.
Instruction to align and secure sprockets with keyway and set screws.
Instructions for installing the hand chain on PRO-H models.
Guidance on installing the chain keeper for the disconnect chain.
Instructions for installing an optional floor level disconnect lever.
Outlines three distinct electrical control configurations for the operator.
Highlights critical points regarding power supply and disconnects.
Emphasizes that electrical connections must be made by qualified personnel.
Warns about comparing power supply voltage to the operator nameplate before connection.
Details how to connect power supply and control stations for this configuration.
Instructions for connecting control wires and stations.
Refers to the limit switch adjustment section for details.
Instructions for connecting a reversing edge device.
Guidance on connecting an external interlock.
Steps for wiring a radio control receiver.
Instructions for wiring a single button open/close device.
Wiring instructions for safety devices like photocells.
How to connect 24 Volt power.
Covers electrical connections and initial start-up for this configuration.
Emphasizes sequential execution of connection and start-up steps.
Instructions for connecting the power supply for single and three-phase.
Details on connecting the push-button station for initial setup.
Steps to verify and correct motor direction if needed.
Notes on factory motor direction and how to reverse it if necessary.
Instructions for correcting motor direction on 3-phase operators.
Guidance on adjusting limit switch cams for proper door travel.
Steps for activating the interface module and connecting specific wires.
Details on connecting primary monitored and secondary non-monitored safety devices.
Explains the requirements and connection for primary monitored safety devices.
Information on connecting secondary non-monitored safety devices.
Specific instructions for connecting a 4-wire electric edge.
Guide to selecting the desired mode of operation (C2 or B2).
Notes the factory default mode and when to adjust it.
Instructions for connecting the power supply to the control box.
Instructions for using the on-board Open/Close/Stop push buttons.
Steps to verify and adjust motor direction for single and 3-phase operators.
Correcting motor direction for 3-phase operators.
Guidance on adjusting limit cam settings.
How to connect external Open/Close/Stop push-button stations.
Explains the logic board's failsafe feature and safety device connections.
Details on connecting primary monitored safety devices for failsafe operation.
Instructions for connecting secondary non-monitored safety devices.
Specific instructions for connecting a 4-wire electric edge.
How to wire an external single-button device.
Overview of available operator modes of operation.
Detailed description of the B2 mode of operation.
Detailed description of the C2 mode of operation.
Detailed description of the D1 mode of operation.
Detailed description of the E2 mode of operation with roll-back.
Detailed description of the T mode of operation.
Further details on the T mode, including timer functions and safety device behavior.
Detailed description of the TS mode of operation.
A warning about replacing the logic board and jumper installation.
General instructions for programming the operator functions.
How to set up the run-timer for the operator.
Instructions for setting up and activating the mid-stop feature.
How to adjust the timer to close function.
Details on setting up the delay on close timer.
Instructions for programming the on-board radio receiver.
Guidance on installing the operator's antenna.
Basic operation of the radio receiver with transmitters.
Steps to erase all programmed transmitters from the receiver.
Instructions for replacing batteries in remote control transmitters.
Explains the function of various dipswitch settings.
Explains the meaning of different LED indicators and their status.
Critical safety warning regarding limit switch adjustments.
Step-by-step guide to adjust door travel using limit cams.
Safety precautions specific to installing photocell systems.
Importance of photo beams or monitored edge for momentary close.
General instruction to read and follow all installation guidelines.
Warning about keeping body parts away from moving components.
Warning to disconnect power before installing photocell systems.
Specific details and installation guide for the NICEN-1 photocell.
Wall installation instructions for NICEN-1 photocells.
Details and installation guide for the NICE N-4 photocell.
Wall installation instructions for NICE N-4 photocells.
Procedure for aligning photo beams.
How the photo system operates and its function in safety.
Steps to test the functionality of the photo system.
Notes the range of the MK00697 photocell system.
Instructions for wall mounting the photocell brackets.
Steps to test the photo system's operation.
Step-by-step instructions for adjusting the clutch.
A caution against overtightening the clutch to avoid damage.
Information on factory brake settings and potential adjustments.
Guidance on adjusting brake tension for proper operation.
Steps for adjusting individual brake shoes.
Critical warning about using the emergency disconnect system.
Instructions for manual operation with a standard chain keeper.
Instructions for manual operation with an optional lever.
Procedure for manual operation of PRO-J operators.
Procedure for manual operation of PRO-H operators using the hand chain.
Critical warning about disconnecting power before servicing.
Recommendation for monthly inspection of manual door function.
Maintenance tasks to be performed every three months.
Maintenance tasks to be performed every six months.
Maintenance tasks to be performed every twelve months.
| Brand | Nice |
|---|---|
| Model | Pro-H |
| Category | Door Opening System |
| Language | English |