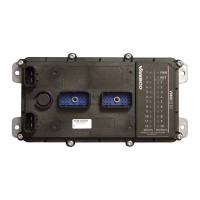
1. Connect the Controller I/O harness to the VMM2404 multiplexing module.
2. Connect the Controller I/O harness to the controller I/O board connectors.
3. Connect the evaluation kit power/CAN harness to the controller I/O board’s
JP3 connector.
4. Do not connect the power wire (RED) from the evaluation kit power/CAN
harness to the power supply (+) terminal at this time.
5. Connect the ground wire (BLACK) from the evaluation kit power/CAN
harness to the power supply (-) terminal.
6. Connect the CAN connector from the evaluation kit power/CAN harness to
the corresponding mating connector and harness on the DLA.
Note: Do not proceed to the next step before the DLA drivers have been
installed. See Install the Data Link Adapter Driver Software on page 6.
7. Connect the DLA to a personal computer via the USB port.
2.4.1. Power Up the Development System
Once the VMM2404 is connected in a development system, you need to power it
up.
To power up the VMM2404 multiplexing module, do the following:
1. Ensure all controller I/O board digital inputs, jumpers, and dip switches are
properly configured for the VMM2404. Refer to the Controller I/O Board
Reference Manual for further details.
2. Connect the power wire (red) from the evaluation kit power/CAN harness to
the power supply (+), and turn the power supply on.
3. Turn on the controller I/O board switch that corresponds with the power
control input on the VMM2404 (refer to the Controller I/O Board Reference
Manual for details). The VMM2404 will power up.
Note: If the module does not power up and you are unsure if a power control
input is set on the VMM2404, try switching all the inputs on the controller I/O
board to high, and then to low. If you continue to have problems, consult the
Troubleshooting/FAQ section in the Controller I/O Board Reference Manual
for help.