EASYTOUCH
®
PL4/PSL4 Control System Installation Guide
EASYTOUCH
®
PL4/PSL4 Control System Installation
7
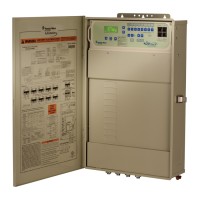
Connecting AC Power to the Power Center
Before installing electrical conduits and connecting AC power to the Power Center enclosure, read
the following recommended guidelines:
TOAVOIDANELECTRICALHAZARDANDEQUIPMENTDAMAGETOTHEENCLOSURE
ANDINTELLICHLORCELL:FIRSTDISCONNECTACPOWERTOTHEENCLOSUREBEFORE
CONNECTINGTHEINTELLICHLORCOMMUNICATIONCABLE.
• DeterminethenumberoflowandhighvoltagecircuitsbeingusedinthePowerCenter.The
conduitsizeandrunsneededbasedontheconductorsize,andthenumberofconductors
withintheconduit.Theenclosureconduitknockoutssizesare1¼”,1”,¾”and½”.
• EnclosureconduitknockoutsforACpowerarelocatedonthesides,bottomandback
oftheenclosure.ConduitknockoutssizesforACpowerare:1¼”,1”,½”and¾”.Itis
recommended to use 1¼” x 1” conduit for the main AC power conductors.
• ThePowerCenterenclosuremustbelocatedaminimumof5ft.(1.5m),(Canada3m
(9.75ft))fromtheinsidewallofpoolorspa.
Remove the enclosure conduit knockouts as needed:
• Lowvoltageracewayhastwo½”x¾”conduitknockoutslocatedontheleftsideandrearofthe
enclosure.
• Highvoltagecompartmenthastwelve½”x¾”,ve¾”x1”andtwo1¼”x1”conduitknockouts
located on the bottom of the enclosure.
• ToavoidobstructionintothePowerCenter,whenusingelectricalconduitcompletethe
installation of the conduit before concrete is poured. Also, underground conduit should be
positioned in well compacted soil. Ensure that all conduit joints are well sealed and watertight.
Installing Conduit and Conductors to the Power Center
Before installing electrical conduit to the enclosure, read the following recommended guidelines:
NOTE:All electrical installation, including electrical wiring methods and materials used to complete
the electrical installation of the EasyTouch PL4/PSL4 Control System MUSTBEPERFORMED
BYASERVICEPROFESSIONALAND/ORUNDERDIRECTSUPERVISIONOFAQUALIFIED
ELECTRICIANin accordance with the National Electrical Code or the Canadian Electric Code, as
well as any local electrical codes in effect at the time of installation.RefertoNEC680(b)orCEC
687-060,062,and066forfurtherdetails.
• DeterminethenumberoflowandhighvoltagecircuitsbeingusedintheEasyTouchPL4/
PSL4ControlSystem.Theconduitsizeandrunsisbasedontheconductorsize,and
the number of conductors within the conduit. The number of pieces of equipment to be
controlled will dictate the size of the conduit. DO NOT RUN HIGH VOLTAGE AND LOW
VOLTAGE CONDUCTORS IN THE SAME CONDUIT.
• Use14AWGminimumto6AWGmaximum140°/158°F(60°/70°C)orbettercopper
conductors for relay circuits depending on the load requirement. Be sure to follow all NEC
regulationsafetycodesforthenumberandsizeofconductorsthatcanbeinstalledin
varioussizesofconduit.
• Supplyconductormustbesizedtosupportallloads.Themaximumsupplycurrentmust
NOTexceed150AMPat120VAC/240VAC.
• Supplycircuitmustbeprotectedbysuitablebreakerratednohigherthan150AMP.Ifone
relay is used for more than one device, verify that the total current draw (all equipment)
does not exceed the current rating of the circuit.
• TheEasyTouchPL4/PSL4ControlSystemcircuitboardrequires120VAC,3Apowerto
operate the control logic circuits. The optional IntelliChlor
®
Salt Chlorine Generator must be
poweredfromit’sownexterrnalPowerCenter(providedwiththeIntelliChlorSCGcell).
 Loading...