1110
9
877
6
5
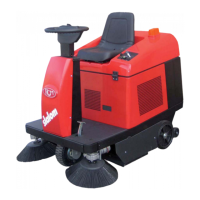
A
B
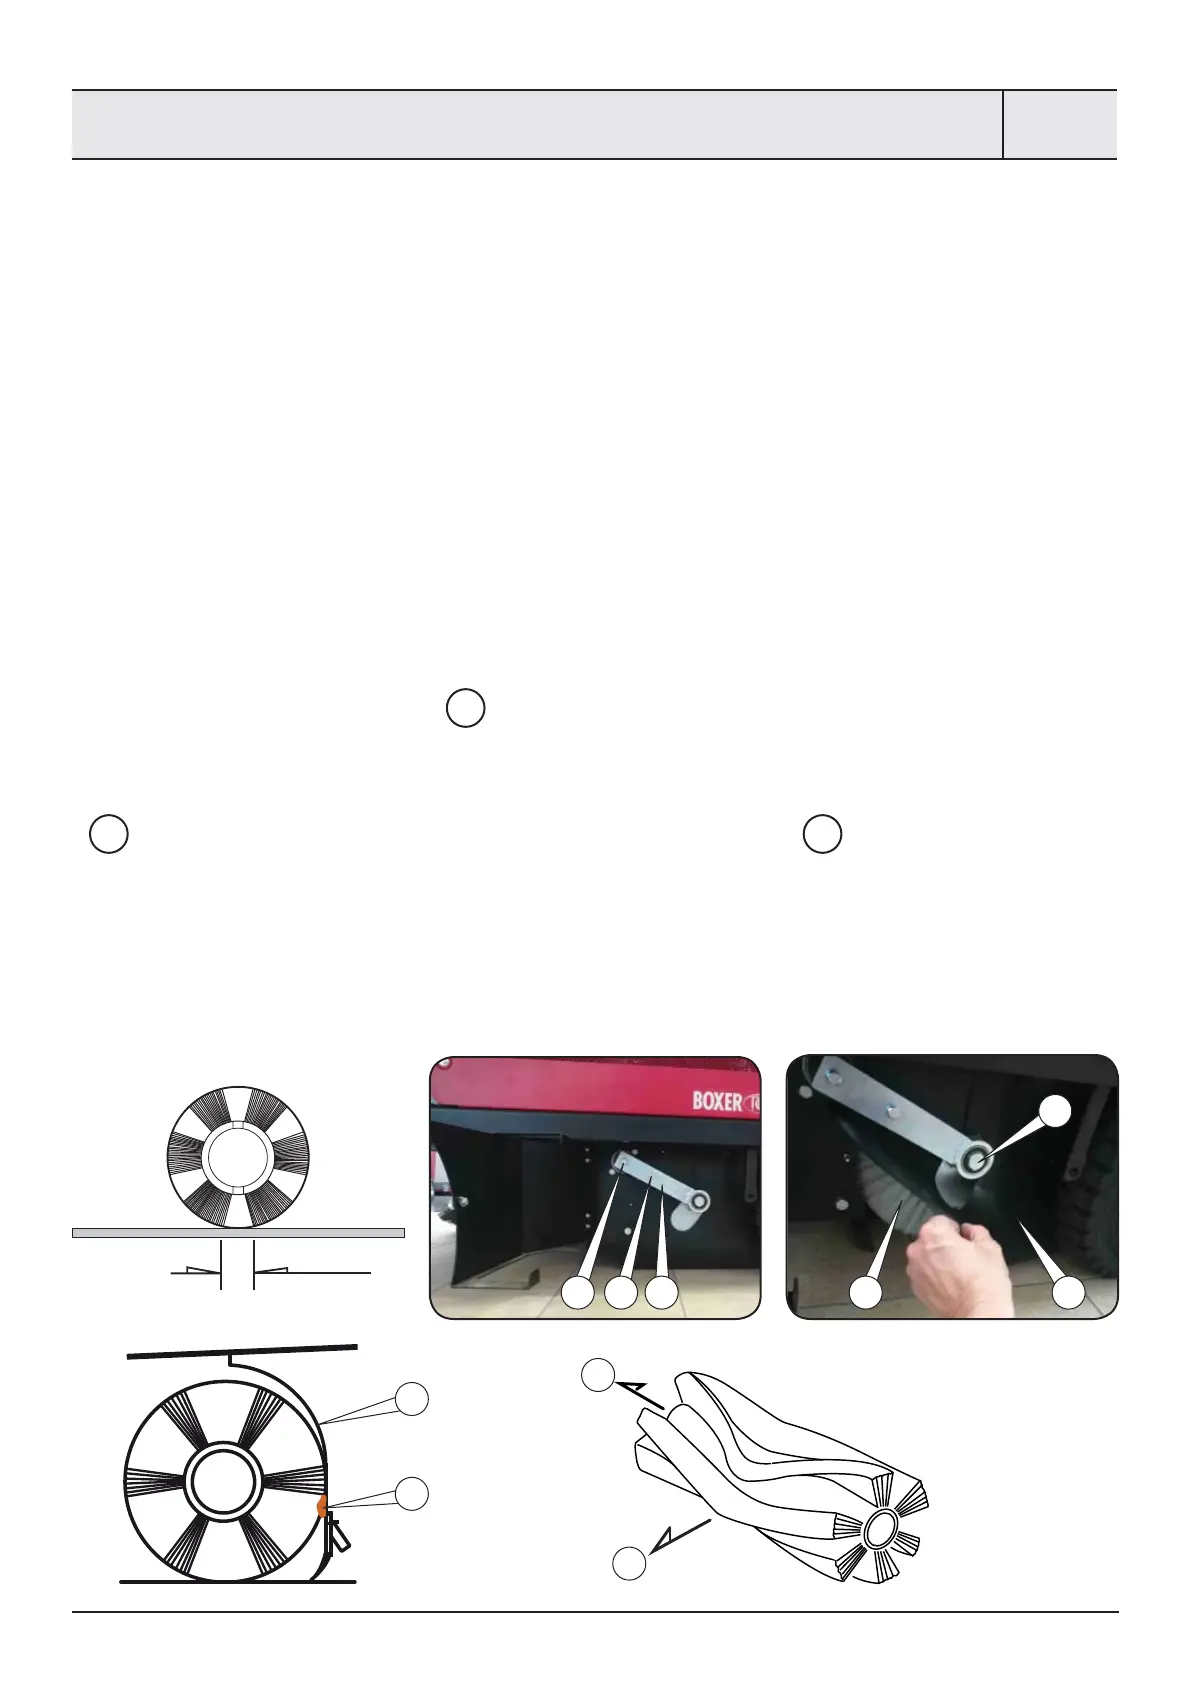
4 - 5mm
45
SPAZZOLE
BRUSHES CEPILLOS
FIG.6C
Disincrostazione convogliatore
Nel caso in cui la motoscopa operi in ambienti esterni
(piazzali, cortili, ecc....) dove può trovare terreno umi-
do, è possibile che si crei un’incrostazione sulla parte
anteriore del convogliatore per spazzola centrale , la
quale pregiudica il buon funzionamento della moto-
scopa stessa.
Pertanto è necessario in questi casi controllare saltua-
riamente le condizioni del convogliatore e provvedere
a disincrostare, se necessario, con un raschietto me-
tallico, tutto il materiale che col tempo si è formato.
• Incrostazioni 5.
• Convogliatore 6 per spazzola centrale.
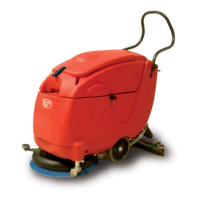
Smontaggio / montaggio spazzola centrale
La spazzola centrale è smontabile dal lato sinistro del-
la motoscopa e le operazioni di smontaggio devono
essere e ettuate nel seguente ordine:
• Aprire lo sportello di ispezione spazzola cen-
trale, mediante apposita chiusura e rimuove-
re il ap 11.
• Svitare le viti di ssaggio 7.
• S lare il gruppo leva 8 e supporto di trasci-
namento 9.
• S lare la spazzola 10.
• In lare la nuova spazzola centrale (vedi posi-
zione di montaggio a, b) e cercare di centrare
le tacche con le alette sul supporto motore di
trascinamento lato destro.
Per il montaggio della spazzola centrale, ripetere i
punti 3,2,1 sopra descritti, in modo inverso.
!
Attenzione!
Quando si monta la spazzola centrale, fare at-
tenzione al senso di montaggio (vedere posio-
ne A, B).
Dopo aver montato la nuova spazzola, eseguire
nuovamente le operazioni di regolazione de-
scritte, spostando il fermo sul settore asolato
nel senso opposto a quello descritto per la re-
golazione.
Riportare nella posizione iniziale (tutta solleva-
ta) la paratia mobile posta sulla bocca di carico
del contenitore ri uti.
Cleaning the dust guide plate
If the motor sweeper is used outdoors (courtyards,
squares, etc.) where the ground may be damp, dirt
may build up on the front part of the main brush dust
guide plate, reducing the e ciency of the machine.
Check the condition of the dust guide plate at regular
intervals and remove any encrusted dirt with a metal
scraper.
• Dirt build-up 5.
• Guide plate 6.
Removing / mounting the main brush
The main brush can be removed from the left side of
the sweeper in the following way:
• Open the main brush inspection door using
the knob and remove the ap 11.
• Loosen the xing screws 7.
• Slide the drive roller 9 and lever unit 8 o .
• Slide the brush 10 o .
• Insert the new main brush,centering the
notches with the ns on the right side of the dri-
ve motor support. (See mounting position a, b).
To mount the main brush, repeat points 3,2,1 in the
opposite way.
!
Warning!
When the main brush is being positioned, it has
to be done in the correct direction. (See pos. A, B).
After tting the new brush, repeat the adjust-
ment operations described, moving the stopper
on the slotted element in the opposite direction
to that described for adjustment.
Return the mobile barrier on the refuse bin inlet
to the initial position (fully raised).
Eliminación de incrustaciones en el tran-
sportador
Si la barredora trabaja en exteriores (plazas, patios,
etc.) donde el terreno puede ser húmedo, es posible
que se creen incrustaciones en la parte anterior del
transportador del cepillo central, que podría perjudi-
car el buen funcionamiento de la barredora.
En estos casos es necesario comprobar de vez en
cuando el estado del transportador y quitar las in-
crustaciones acumuladas utilizando una rasqueta
metálica.
• Incrustaciones 5.
• Transportador 6.
Desmontaje / montaje del cepillo central
El cepillo central se desmonta por el lado izquierdo de
la barredora y las operaciones de desmontaje deben
seguir el orden siguiente:
• Abrir la ventanilla de inspección del cepil-
lo central por medio de su cierre y quitar la
goma 11.
• A ojar los tornillos de jación 7.
• Extraer el conjunto de la palanca 8 y el rodillo
de arrastre 9.
• Extraer el cepillo 10.
• Colocar el cepillo central nuevo (ver posición
de montaje a, b) y centrar las muescas con las
aletas sobre el soporte de arrastre del lado
derecho.
Repetir los puntos 3,2,1 en la manera inversa para
montar el cepillo central.
!
¡Atención!
al montar el cepillo central hay que jarse en el
sentido correcto de montaje (ver pos.A, B).
Después de haber montado el cepillo nuevo
volver a efectuar las operaciones de regulación
descritas, desplazando el sector ranurado en el
sentido opuesto al descrito para la regulación.
Volver a posicionar en la posición inicial (com-
pletamente elevada) el panel separador móvil
situado en la boca de carga del contenedor de
basura.