24 Rockwell Automation Publication 20B-IN017B-EN-P - September 2011
Chapter 2 Basic Component Removal Procedures
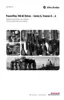
Figure 4 - Screws on Panel over Transitional Bus Bar
4. Using Figure 4 -, remove the seventeen (17) screws for the Transitional
Bus Bar.
5. Slide the Transitional Bus Bar to the left and out.
This allows access to the wire connections below it if needed.
Install Components
When instructed for the component you are replacing, reinstall the Transitional
Bus Bar components in the reverse order of removal.
Only torque screws after all components are in place.
Remove these screws
TIP
When you remove the screws in the next step, you will remove
the Bus Fuse as well. There is a plate over the top end of the Bus
Fuse which will be free upon removal of the screws. Do not let
the plate fall.

 Loading...