25
With the JUNO-X, you can add a variety of eects to process the tones, and you can use the controllers such as the buttons and knobs to edit the
tones themselves.
Elements marked with an asterisk (*) are enabled only for the JUNO-X model.
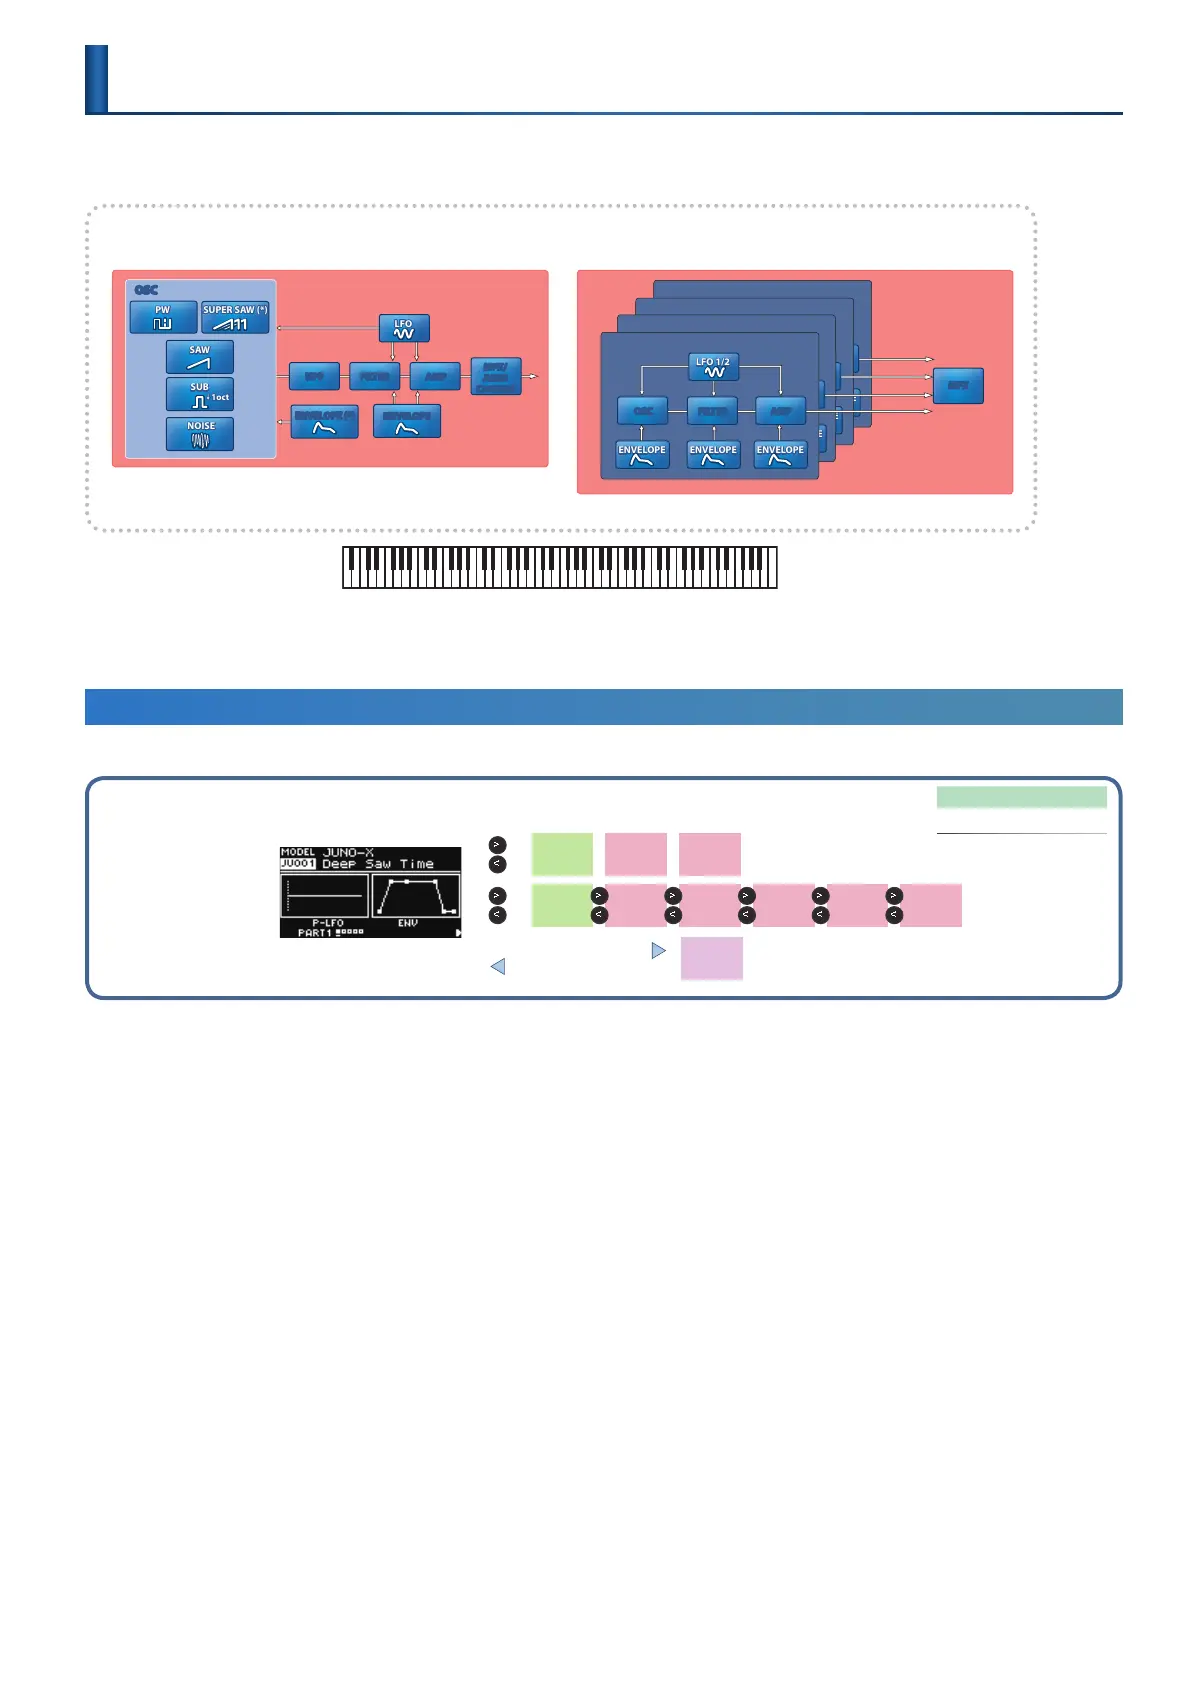
*Elements of a tone (expanded view)
¹ Model: XV-5080, RD-PIANO, etc. ¹ Model: JUNO-X, JUNO-106, JUNO-60
* Some functions may vary, depending on the model.
Partial 4
ENVELOPE ENVELOPEENVELOPE
LFO 1/2
OSC FILTER AMP
Partial 3
ENVELOPE ENVELOPEENVELOPE
LFO 1/2
OSC FILTER AMP
Partial 2
ENVELOPE ENVELOPEENVELOPE
LFO 1/2
OSC FILTER AMP
Partial 1
ENVELOPE ENVELOPEENVELOPE
OSC FILTER AMP
MFX
MFX/
JUNO
CHORUS
SAW
SUB
PW
SUPER SAW (*)
OSC
ENVELOPE
ENVELOPE (*)
LFO
NOISE
Ò1oct
AMPFILTERHPF
LFO 1/2
Pitch information for the key you play is sent to the oscillator, and is output as sound via the mixer, lter, and amp etc.
The change produced by each section can be modied using an LFO or envelope.
Editing a Tone (TONE EDIT Screen)
From the MODEL BANK TOP screen, you can use the [Í] [Ë] buttons to move to the pages at the right, and edit the tone from the tone edit pages.
MODEL BANK
MODEL BANK TOP screen
SCENE PART
MODEL
BANK
  Ã
TONE
COMMON
EDIT
TONE
EDIT
TONE MFX
TONE LIST
[ENTER] (INIT) button
[EXIT] button
* Press the [EXIT] button to return to the MODEL BANK TOP screen.
TONE
COMMON
EDIT
TONE
PARTIAL 1
TONE
PARTIAL 2
TONE
PARTIAL 3
TONE
PARTIAL 4
TONE MFX
* You can also access the tone edit pages from the MENU screen.
Ø “Accessing the MENU Screen” (p. 42)
1. Press the [MODEL BANK] button.
The MODEL BANK screen appears.
* Only some models allow multiple selection.
2. Use the [Í] [Ë] buttons to move to the tone edit page of the item that you want to edit.
3. Use the [ÇSELECTÉ] knob to select the parameter that you want to edit, and use the [- VALUE +] knob to change
the value.
For details, refer to “Parameter Guide” (PDF).
4. If you want to save the setting, execute the Tone Write operation.
4-1.
Hold down the [SHIFT] button and press the [MENU] (WRITE) button.
The WRITE MENU screen appears.
4-2.
Use the [ÇSELECTÉ] knob to select the part where the tone you want to save is assigned, and then press the [ENTER] (INIT) button.
4-3.
Use the [ÇSELECTÉ] knob and the [- VALUE +] knob to select the save-destination, and then press the [ENTER] (INIT) button.
If you want to rename the tone that’s being saved, use the [Í] [Ë] buttons to move the cursor and use the [- VALUE +] knob to specify characters.
4-4.
Press the [ENTER] (INIT) button.
4-5.
To execute, press the [ENTER] (INIT) button.
Editing a Tone
(TONE EDIT)

 Loading...


