41
Control
Using the AIRA LINK Function
AIRA LINK (*) lets you connect the AIRA MIXER MX-1 (sold separately)
and this instrument via a single USB cable. This is an easy way to enjoy
synchronized performances using I-ARPEGGIO.
(*) What is AIRA LINK?
AIRA LINK is a feature that lets you exchange audio/MIDI data between compatible
devices using a single USB cable, such as the AIRA-series MX-1 digital mixer and the
JUNO-X.
NOTE
In order to use this function, the SYSTEM parameter USB Driver
must be set to “VENDOR.”
Ø “USB driver settings” (p. 39)
Settings on the JUNO-X
1. Press the [MENU] (WRITE) button.
2. Use the [ÇSELECTÉ] knob to select “SYSTEM,” and
then press the [ENTER] (INIT) button.
3. Use the [ÇSELECTÉ] knob to select “Sync Mode,” and
use the [- VALUE +] knob to specify either “AUTO” or
“USB COM.”
4. To save the settings, hold down the [SHIFT] button
and press the [MENU] (WRITE) button.
A conrmation message appears.
If you decide to cancel, press the [EXIT] button.
5. To execute, press the [ENTER] (INIT) button.
Using I-ARPEGGIO Sync Mode
Species the synchronization setting for arpeggio performance when
connected to an external device and playing in synchronization.
1. Press the [MENU] (WRITE) button.
2. Use the [ÇSELECTÉ] knob to select “SYSTEM,” and
then press the [ENTER] (INIT) button.
3. Use the [ÇSELECTÉ] knob to select “Arp Sync,” and
use the [- VALUE +] knob to specify either “BEAT” or
“MEASURE.”
BEAT: The arpeggio plays in synchronization with the beat.
MEASURE: The arpeggio plays in synchronization with the
measure.
4. To save the settings, hold down the [SHIFT] button
and press the [MENU] (WRITE) button.
A conrmation message appears.
If you decide to cancel, press the [EXIT] button.
5. To execute, press the [ENTER] (INIT) button.
Controlling from an External Device
You can operate the JUNO-X via the MIDI IN connector, USB MIDI IN
port, or by using controllers such as a damper pedal etc. connected to
the rear panel.
1. Press the [MENU] (WRITE) button.
2. Use the [ÇSELECTÉ] knob to select “SYSTEM,” and
then press the [ENTER] (INIT) button.
3. Use the [ÇSELECTÉ] knob to select the “BUTTON
FUNC,” “SLIDER FUNC” and “PEDAL FUNC”
parameters, and use the [- VALUE +] knob to edit the
value.
Ø “List of functions that can be assigned to the controllers” (p. 41)
4. To save the settings, hold down the [SHIFT] button
and press the [MENU] (WRITE) button.
A conrmation message appears.
If you decide to cancel, press the [EXIT] button.
5. To execute, press the [ENTER] (INIT) button.
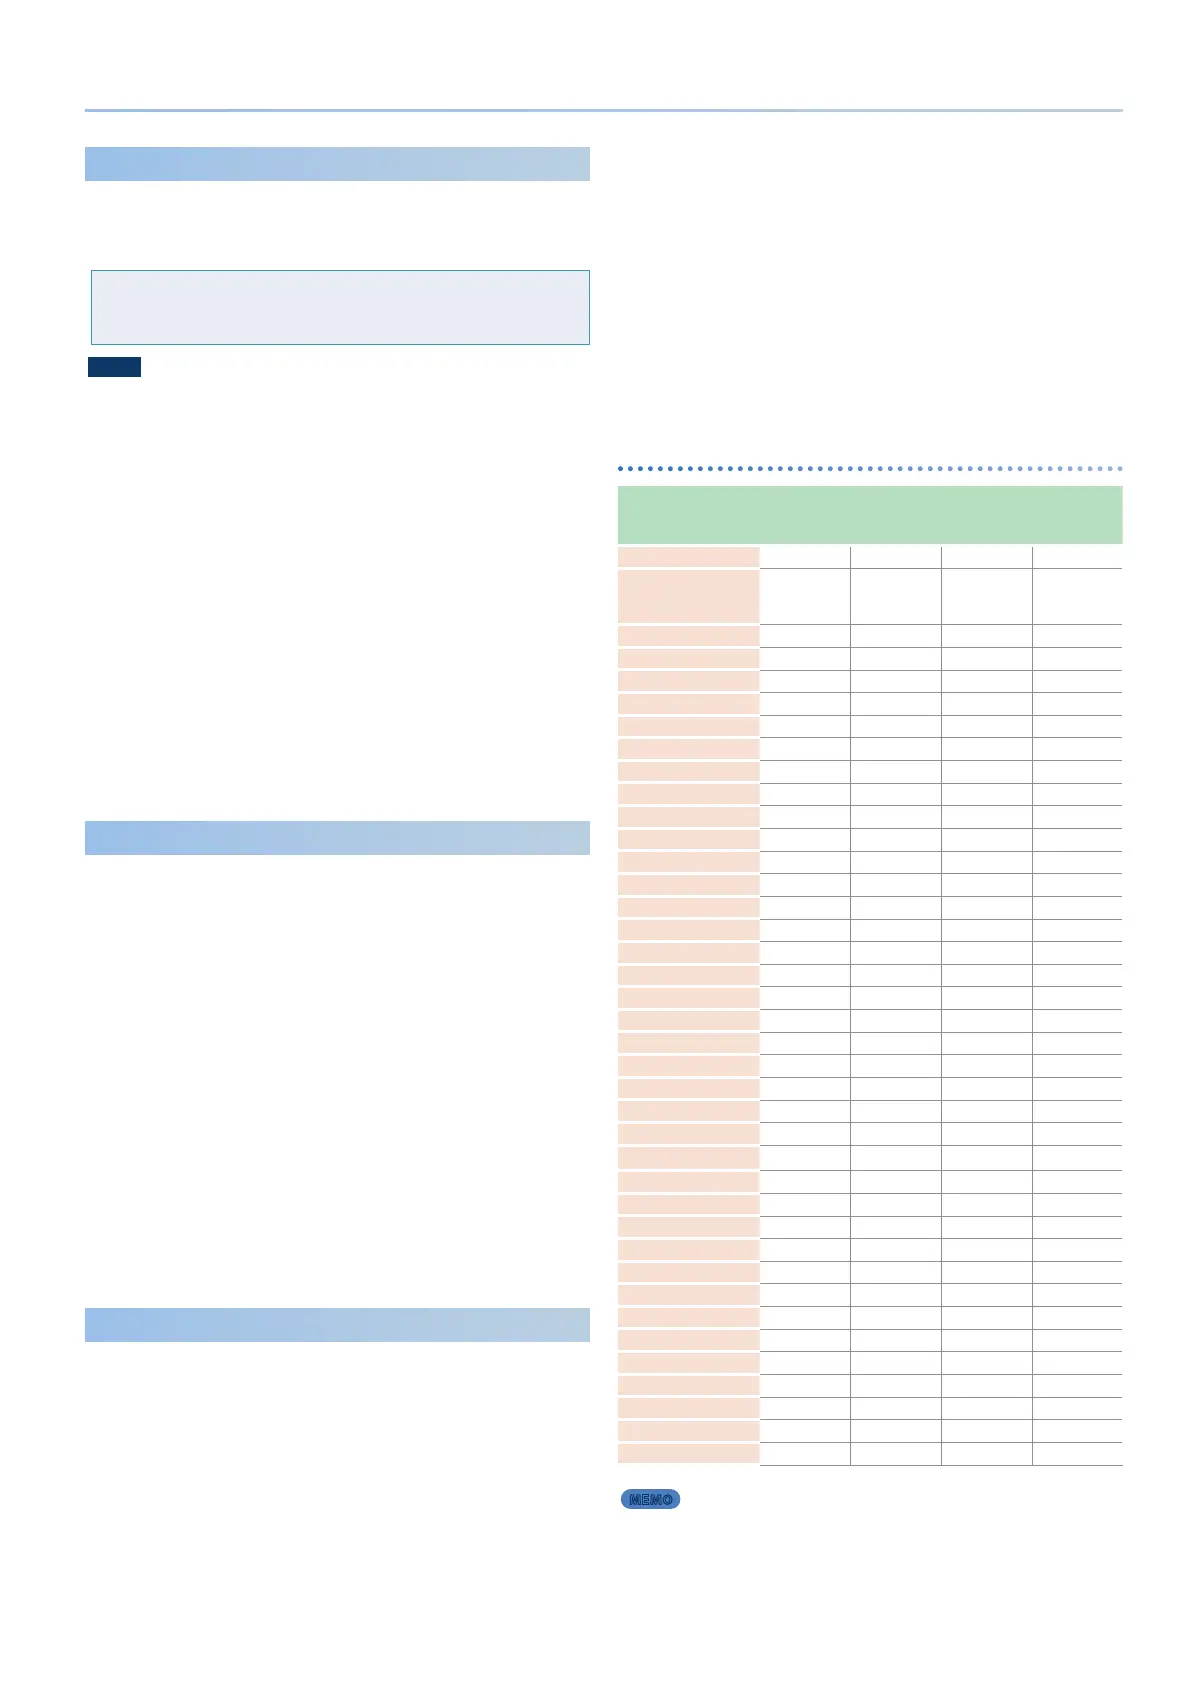
List of functions that can be assigned to the
controllers
Function
S1 Func
S2 Func
S3 Func
SL1 Func
SL2 Func
HOLD Func CTRL Func
OFF
µ µ µ µ
CC01–31,
32 (OFF),
33–95
µ µ µ µ
AFTERTOUCH
µ µ µ µ
MONO/POLY
µ µ
SCENE DOWN *
µ µ
SCENE UP *
µ µ
TONE DOWN *
µ µ
TONE UP *
µ µ
PANEL DEC *
µ µ
PANEL INC *
µ µ
CHO SW
µ µ
REV SW
µ µ
DLY SW
µ µ
ARP SW *
µ µ
ARP HOLD *
µ µ
DETECT KEYS *
µ µ
DETECT BEAT *
µ µ
UNISON SW
µ µ
BEND MODE
µ µ
AUTO TUNING *
µ µ
TAP TEMPO *
µ µ
START/STOP *
µ µ
DRV SW
µ µ
VOC/MIC
µ µ
BEND DOWN
µ µ
BEND UP
µ µ
CHO LEVEL
µ µ
REV LEVEL
µ µ
DLY LEVEL
µ µ
ARP SHUFFLE
µ µ
ARP DURATION
µ µ
PART FADE1
µ µ
PART FADE2
µ µ
LEVEL P-1
µ µ
LEVEL P-2
µ µ
LEVEL P-3
µ µ
LEVEL P-4
µ µ
LEVEL P-R
µ µ
AGE
µ µ
MEMO
Functions marked by “*” operate only in Latch mode. They do
not operate in Momentary mode.

 Loading...


