Do you have a question about the Roland VersaUV LEF2-300 and is the answer not in the manual?
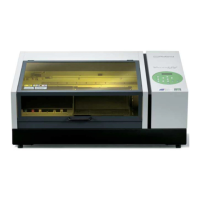
Overview of fundamental information about the printer, including part names and functions.
Detailed identification and function of each part of the printer unit.
Explanation of the operation panel layout, buttons, and their functions.
Guides on fundamental operations such as power supply and initial checks.
Instructions for turning the printer on, off, and managing power-saving features.
Essential checks to perform before starting printer operations, including network setup.
Covers the entire printing process, from preparation to execution and post-printing tasks.
Key checks to ensure optimal printing quality and prevent issues like dot drop-out.
Detailed steps for initiating the printing process after setup.
Procedure for head refreshing to maintain print head health after daily use.
Methods to optimize setup for better printing results and efficiency.
Manual and automatic methods for setting the object height for printing.
Procedures for defining and setting the print area on the object.
Techniques to enhance and maintain print quality.
Utilizing built-in functions to correct printing issues like misalignment.
Strategies to improve the speed and efficiency of printing operations.
How to save and load print settings for recurring jobs.
Methods to shorten printing time by optimizing machine settings.
Managing printer operations for better efficiency and control.
Configuring the printer's date and time for proper operation.
Setting a timer for the machine to start operations automatically.
An overview of maintenance procedures and essential knowledge.
Crucial guidelines for safe and proper handling of the printer.
Fundamental understanding of maintenance types, timing, and procedures.
Procedures for routine maintenance tasks to keep the printer operational.
Instructions for cleaning the printer's internal components.
Steps for checking ink levels and replacing ink cartridges.
Daily maintenance tasks essential for printer upkeep.
Procedure for head refreshing to prevent print head clogging.
Advanced procedures for resolving specific print quality issues.
Troubleshooting steps for significant dot drop-out issues.
Comprehensive cleaning of all print heads to resolve persistent issues.
Guidance on replacing consumable parts like wipers and filters.
General instructions for replacing consumable components.
Detailed steps for replacing the wipers and wiper cleaner.
Diagnosing and resolving issues related to print quality.
Troubleshooting steps for coarse prints or horizontal stripes.
Resolving issues with unstable or uneven color reproduction.
Troubleshooting common problems with the printer unit's functionality.
Steps to take if the print heads are not moving correctly.
Troubleshooting steps when the printer unit fails to power on or operate.
Solutions for issues where the flat table fails to move.
Troubleshooting when the head gap sensor fails to detect the object.
Explanation of messages displayed on the operation panel.
List and explanations of error messages and their remedies.
Instructions for connecting external devices to the printer.
Steps to connect an external alarm lamp to the machine.
Connecting external devices via Expansion Terminal B.
Procedures for safely moving the printer unit.
Preparation steps before moving the machine.
Procedure to clean all print heads before moving the unit.
Instructions for reinstalling the printer after it has been moved.
Technical specifications and diagrams for the printer.
Visual representation of the printer's physical dimensions.
Details on the external expansion terminal's specifications and connectors.
| Printing Technology | Piezo inkjet |
|---|---|
| Ink Configuration | CMYK + White + Clear |
| Ink Colors | Cyan, Magenta, Yellow, Black, White, Clear |
| Connectivity | USB 2.0, Ethernet |
| Maximum Print Width | 780 mm |
| Maximum Media Width | 800 mm |
| Print Resolution | 1440 x 1440 dpi |
| Media Thickness | Up to 200 mm |
| Maximum Media Thickness | 50 mm |
| Ink Type | UV Ink |
| Ink Droplet Size | Variable dot |
| Power Supply | 100-240V AC, 50/60Hz |
| Power Requirements | 100-240V AC, 50/60Hz |
| Power Consumption | 600W |
| Dimensions | 1, 318 (W) x 983 (D) x 705 (H) mm 51.9 (W) x 38.7 (D) x 27.8 (H) in. |
| Dimensions (W x D x H) | 1190 x 940 x 290 mm |
| Weight | 128 kg |