7-4. Maintenance and Repair
This section gives general instructions for handling the
PTMPG printer. Directions for maintenance and repair are
also included.
1.
Handling the PTMPG Printer
The PTMPG printer should be handled carefully and gently.
If you follow the instructions given below, your PTMPG
printer should give years of service. The sections below give
ti ps for proper handling of the printer.
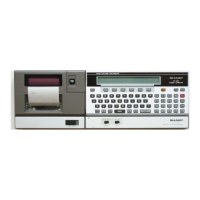
1) Holding the Printer
Hold the front and rear of the printer (marked with..o.),
as shown in Figure IX-l below. The printer could malfunc-
tion if it is held on the sides (marked with
*).
Do not
squeeze the ejection lever shaft unit when you hold the
printer.
Ejection
Lever
Shaft Unit
Figure IX-l
2) Parts That Should Not Be Touched
• 00
not touch the slider unit, except to take out the
pen.
• 00
not touch the wire. If you do, it may come out of
the pulley.
• 00
not touch any shafts.
• 00
not touch the ejection lever shaft unit. If you do,
the relation between the connecting ring and the shaft
will be shifted, and the pen-up/down or color-change
functions may not be performed.
3) Handling the Pen
Be careful not to drop the pen.
2. Maintenance
The PTMPG printer should be cleaned every three months,
or after using 5 rolls of paper, whichever comes first.
Remove paper debris, dirt, and dust by suction (using a
vacuum cleaner). If necessarv, apply alcohol or petroleum
benzine to remove dirt.
00
not use lacquer thinner, trichlo-
roethylene or ketone solvents. They can damage the plastic
parts.
Grease the printer, if necessarv. Apply the grease to specified
parts only.
3. Repairing the PTMPG Printer
This section covers instructions for repairing. the PTMPG
printer, including descriptions of the levels of skill a tech-
nician must have to perform different tvpes of repair [obs,
a list of the tools a technician will need, and a comprehen-
sive Repair Guide that shows remedies for problems that
might occur.
-81-
-
PC-1600
1) The Repair Technician
There are three levels of repair technicians: A, B, and C.
Each level is based on the level of knowledge about and
the skills required in repairing the PTMPG printer.
Level
A:
This technician has little experience. He has general
knowl-
edge of the principles of operation and structure of the
printer. He does not require extensive experience or
skill.
For example, suppose the printer does not
print,
The Level
A technician would first check to see if the solenoid were
energizing. If
necessarv,
he would replace it or repair the
driving circuit. If the solenoid were enegizing properlv,
he would check the battery voltage and, if neccessarv,
rech arge it.
Level
B:
This technician has some experience. He should have more
understanding of the principles of operation and structure
of the printer than the Level A technician. He knows how
to disassemble and reassemble the printer and can use
measuring instruments and tools to repair it. For example,
if the printer were not working, the Level B technician
could check the same things as the Level A technician. In
addition, he would measure the length of the pen and re-
place it if it were too short. He could check the actuator, or
look for a broken spring in the solenoid, and replace the
unit if necessary. He could also replace the rotary holder
for the pen if it were defective.
Level C:
This technician is highly experienced. He should have de-
tailed knowledge of the principles of operation and structure
of the printer, a high level of capability in printer disas-
sembly and reassembly, experience with measuring instru-
ments and tools, and the ability to repair all parts of the
printer. The Level C technician would perform all of the
tasks of Levels A and B. In addition, he would replace
the ejection lever if it were bent, and replace the ejection
lever shaft unit, if the bearing were defective.
2) Repair Tools
Following is a list of the tools a technician needs to re-
pair the PTMPG printer.
• Tweezers
• ET holders (ET4, ET2, and ET1.5)
• Screwdrivers for precision instrument:
Phillips screwdrivers: No. 0 and NO. 1
Keystone screwdrivers: l.4m/m and 2.9m/m
• Long nose pliers or lead pliers
• Soldering iron and solder remover
• Special Tools:
a set of pen-stroke adj ustment j igs:
Adjustment jig A 00P72-0012/// FG
Adjustment jig B 00P72-0013/// FG
Thickness gauge
3) The Repair Guide
ARepair Guide is shown in the following pages. It is
divided into five columns for ease of reference. Descrip-
tions of the five columns are shown on the next page: