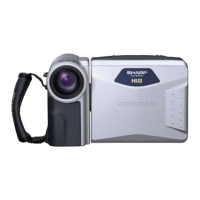
1
Cassette compartment
door OPEN release
9
EJECT button
3
“PUSH” mark
5
Red
indicator
INSERTING AND REMOVING A
CASSETTE
Inserting a Cassette
f
Slide the OPEN release to open the cassette
compartment door.
Press the EJECT button. The cassette compart-
ment extends automatically.
Insert the tape cassette with the window facing
outwards.
Press the “PUSH” mark until the compartment
clicks into place. The cassette compartment
retracts automatically.
Close the compartment door by pressing at the
“
A
”
mark with your finger tip until the door
clicks into place.
Removing a Cassette
Slide the OPEN release to open the cassette
compartment door.
Press the EJECT button to extend the cassette
compartment.
Take out the cassette.
Close the cassette compartment and the com-
partment door.
Cautions:
. Do not try to close the door while the cassette compart-
ment is being extended or retracted.
l Be careful not to get your fingers caught in the cassette
compartment.
l Do not apply force to the cassette compartment except
for pressing the “PUSH” mark to close it.
l Do not tilt the
VIEWCAM
or hold it upside-down when a
cassette is being inserted or removed. It may damage
the tape.
l Remove the cassette if the
VIEWCAM
will not be used for
a long time.
l If you do not press the cassette compartment closed cor-
rectly in step 4 above, the
VIEWCAM’s
cassette protec-
tion mechanism might eject the cassette. If this happens,
repeat the insertion procedure.
l Do not attempt to pick up the
VIEWCAM
by the cassette
compartment door.
To protect recordings from accidental erasure
Slide the red projection on the tape cassette in the
direction of the arrow until the red indicator is visible.
When you want to record on the tape again, slide the
red projection in the reverse direction.
14