Replacing important components 6 - 3
Siemens AG SPR8-125.061.02 Page 3 of 8 POLYMOBIL Plus
Medical Engineering Rev. 01 01.00 TD SD 24
Replacing the collimator 6
In case of damage, the collimator has to be completely replaced.
Proceed as follows:
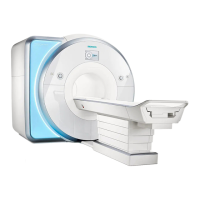
• Remove the two screws ( 5/Fig.5) and remove the back panel.
• Mark the 5 connecting cables of the collimator and disconnect them.
• Remove two screws on each side (6/Fig.5) of the upper cover.
• Turn the two knobs to the end position and remove them.
• Remove the front panel after you have removed the two screws (7/Fig. 6).
Caution : The front panel is connected to the collimator via a cable (9/Fig. 7).
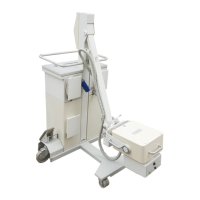
• Remove the collimator after removing the four Allen screws (arrow /Fig.4/5).
• Attach the new collimator with the four screws (arrow /Fig.4/5) and center it.
• Reconnect the cables and the back panel.
• Check the coincidence of the light and radiation fields and adjust, if required.
(Refer to “Coincidence of light and radiation field”, page 5-15.)
Hold the collimator securely.
Lift the upper cover and pull the cable through the housing.
5
6
Fig. 4 Fig. 5
CAUTION