Scene Selection (Clip List Editing)
101
Chapter 5 Operations in GUI Screens
6 Press the RESET/RETURN button.
This returns you to the clip thumbnail screen.
7 Repeat steps 1 to 6 as required to add
more clips.
8 Save the clip list (see page 103).
In step 1, you can hold down the SHIFT button
when you press the SET/S.SEL button. This is a
shortcut that displays the Add Sub Clip screen
immediately. You can also save the clip list
immediately in step 5 by executing the Save Clip
List command in the Disc Menu.
Adding sub clips from the clip list thumbnail
screen
See page 91 for more information about thumbnail
screen operations.
1 Display the Thumbnail Menu.
2 Select Add Sub Clips, and then press the
SET/S.SEL button or the MENU knob.
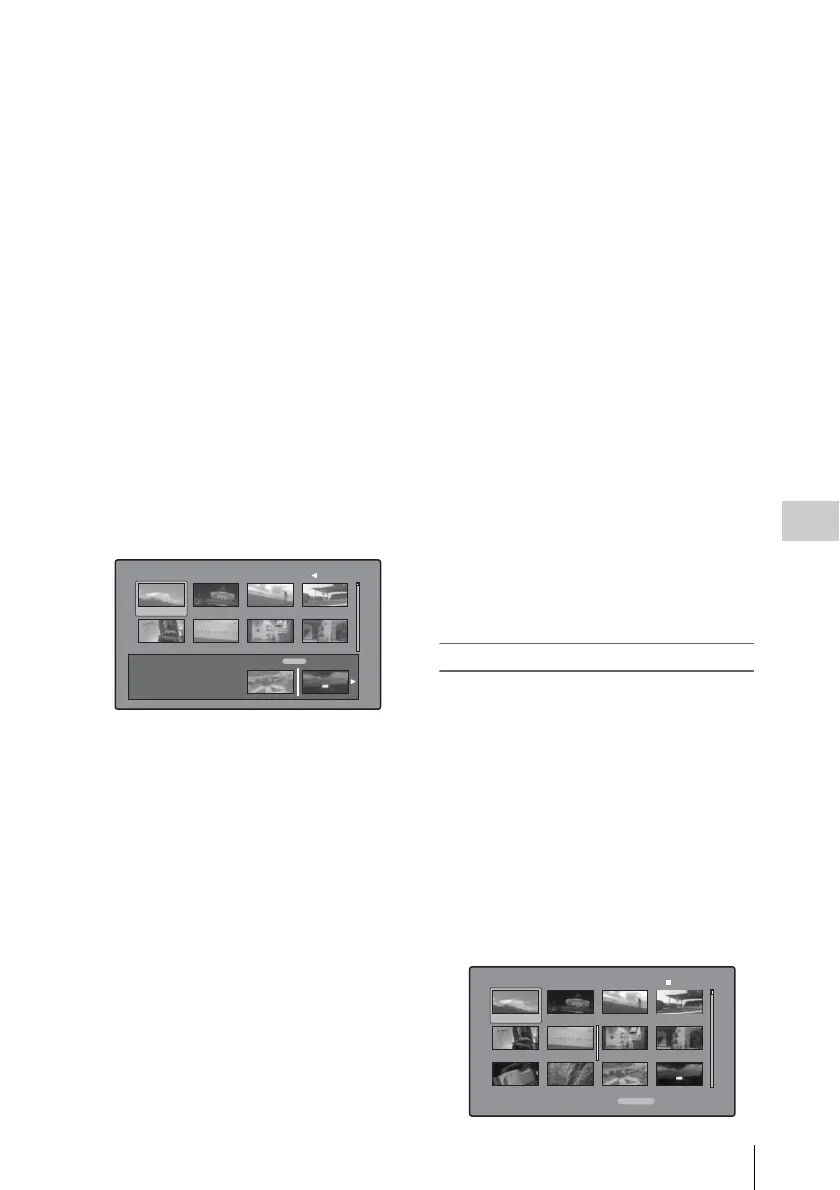
The Clip List (Add) screen appears.
3 Select the sub clips that you want to add
from the upper part of the screen (the
part where 8 thumbnails are displayed,
multiple selections possible).
To select from expanded thumbnails
Press the DISP SEL/EXPAND button to
display the expand thumbnail screen.
To select from chapter thumbnails
Press the HOLD/CHAPTER button to
display the chapter thumbnail screen.
4 Press the SET/S.SEL button or the
MENU knob.
The thumbnail selection is confirmed, and an
I cursor appears at the bottom of the Clip List
(Add) screen (in the Scene Selection
window). The I cursor indicates the location
where the currently selected sub clips will be
inserted.
To display the total duration after
addition of the selected clips
Press the SHIFT button.
5 In the Scene Selection window, move
the I cursor to the location where you
want to insert the clip. (The existing
thumbnails arrange themselves to the
left and right of the I cursor.)
6 Press the SET/S.SEL button or the
MENU knob.
The sub clips are added at the I cursor
position, and you return to the clip list
thumbnail screen.
You can check the results of the addition in
that screen.
7 Repeat steps 1 to 6 as required to add
more clips.
8 Save the clip list (see page 103).
In step 1, you can also perform a shortcut
operation by pressing the SET/S.SEL button with
the SHIFT button held down.
To reorder sub clips
See page 91 for more information about thumbnail
screen operations.
1 In the clip list thumbnail screen, select
the thumbnails of the sub clips that you
want to move (multiple selections
possible).
2 Display the Thumbnail Menu.
3 Select Move Sub Clips, and then press
the SET/S.SEL button or the MENU
knob.
The Clip List (Move) screen appears.
TOTAL
00:13:48:24
Clip List (Add) 017/035002
Scene Selection
TC 00:30:25:11
TC 00:24:24:29
TC 00:30:40:13
TC 00:24:34:27
TC 01:01:28:25
TC 00:24:46:22
TC 00:09:43:14
TC 00:24:56:24
001/034
TC 00:00:00:00
TC 00:04:35:12
TC 00:06:03:03
DATE&TIME
08 AUG 2007 11:50
TOTAL DUR
00:13:48:24
TC 00:00:21:27
TC 00:04:57:10
TC 00:06:25:00
TC 00:04:06:00
TC 00:05:19:08
TC 00:06:46:27
TC 00:04:13:14
TC 00:05:41:05
TC 00:07:08:25
006Clip List (Move)



 To Next Page