1-5
22
Setting the clock
Step 5 : Setting the clock
Using the Auto Clock Set
feature
Some TV and cable channels transmit time
signals with their broadcasts. Your DVD-
VCR can pick up this time signal to
automatically set the clock.
The Auto Clock Set feature works only if a
channel in your area is broadcasting a time
signal. If broadcasters in your area are not
yet sending time signals, set the time
manually (page 24).
Before you start…
•Turn on the DVD-VCR and your TV.
When using a cable box, turn it on.
•To control the DVD-VCR, set TV
/
DVD·VIDEO
to DVD·VIDEO on the
remote (page 10).
•Set the “RF Output Channel” to “3CH” or
“4CH” in “OPTION SETUP” menu
(page 110). If your TV is connected to the
DVD-VCR using A/V connections, set the
TV to video input.
• If the DVD player is in play mode, you
cannot display the setup menu. Stop the
DVD playback.
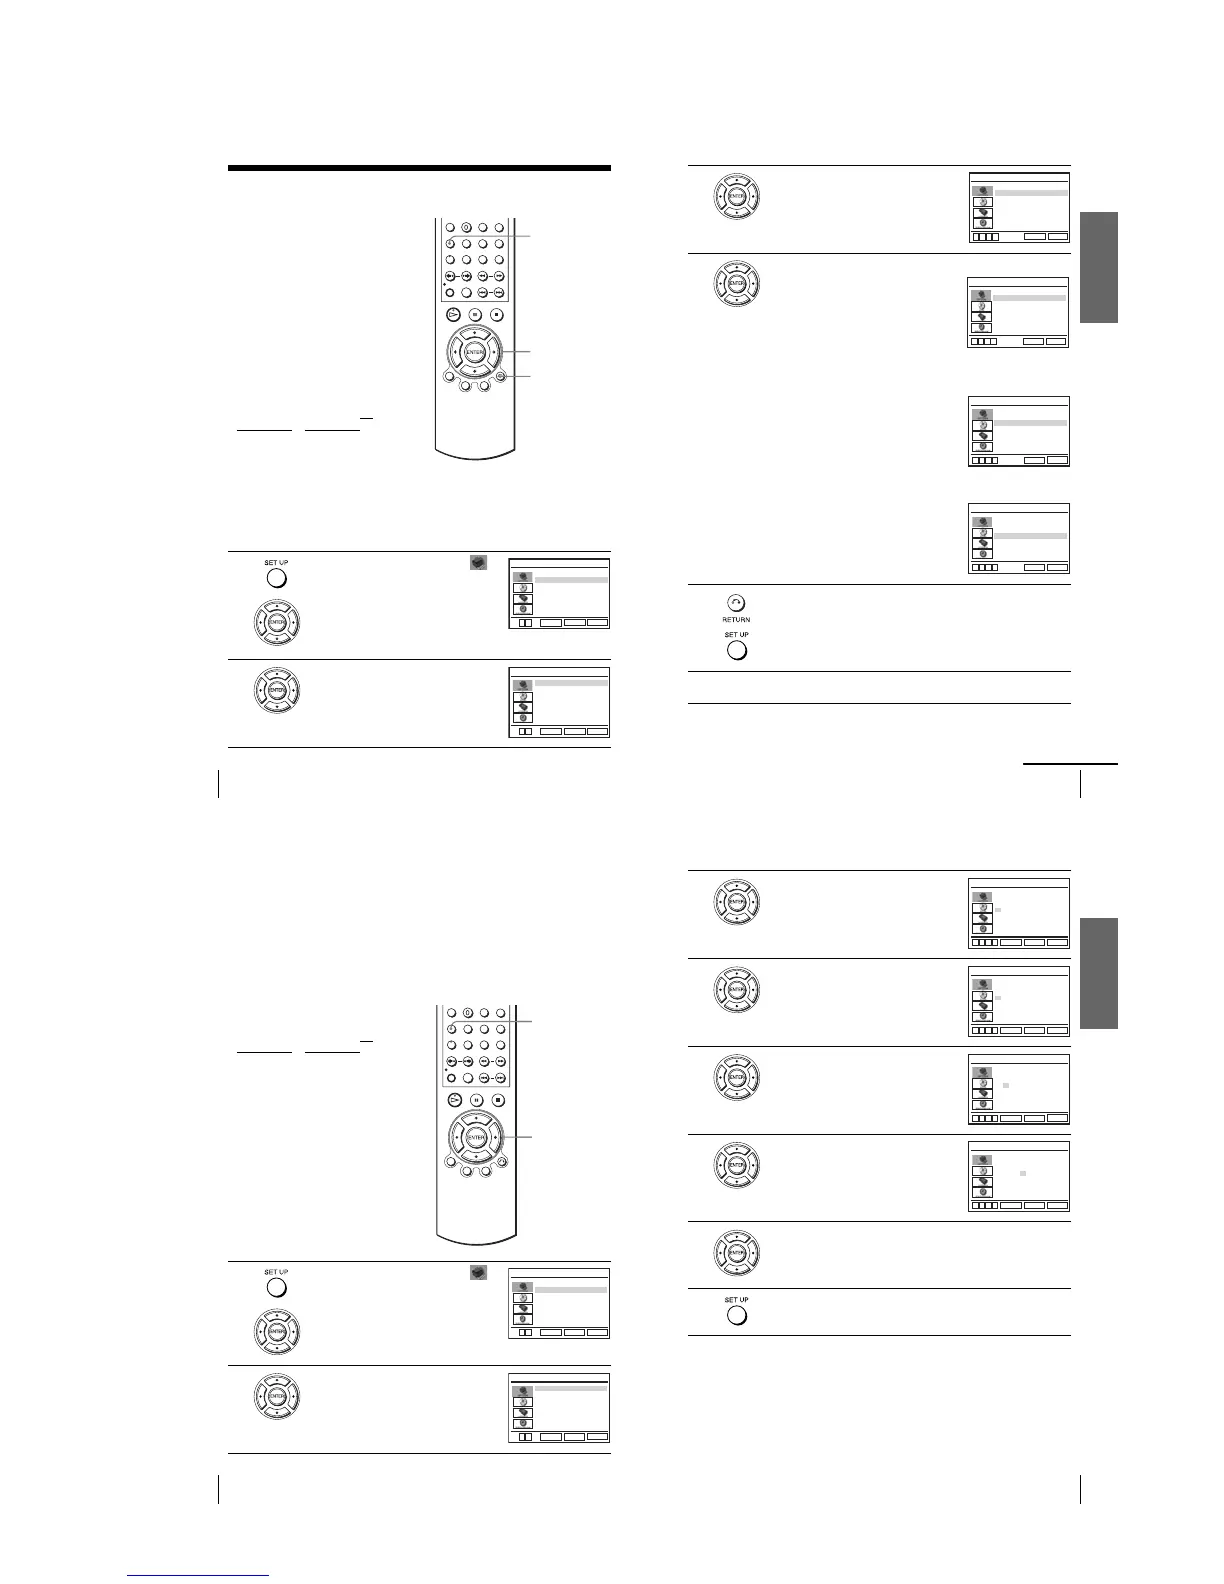
1
Press SET UP, then press V/v to select
(OPTION) and press ENTER.
2
Press V/v to select “Clock Set/Adjust”, then
press ENTER.
The “CLOCK SET/ADJUST” menu appears.
V/v/B/b
ENTER
SET UP
O RETURN
Language
Channel Setup
Auto Power Off
RF Output Channel
Clock Set/Adjust
:English
[ Off ]
[3CH]
RETURN
OPTION SETUP
SET UP
ENTER
vV
RETURN
CLOCK SET/ADJUST
SET UP
ENTER
Auto
Manual
vV
Getting Started
23
Setting the clock
3
Press V/v to select “Auto”, then press
ENTER.
4
Press V/v to select the item you want, then press B/b to make the setting.
•For “Clock data CH”
Leave the setting to “Auto” to have the
DVD-VCR automatically search for a
channel that carries a time signal. Press
B/b
to select a channel that carries a time signal.
Use this option if you know of a channel that
carries a time signal. Most PBS member
stations broadcast a time signal. For the
fastest response, select your local PBS
station.
•For “Time zone”
Select the time zone of your area, or select
“Auto” to have the DVD-VCR automatically
set your time zone.
The options are:
Auto y Atl. (Atlantic) y East (Eastern)
y Cen. (Central) y Mtn. (Mountain) y
Pac. (Pacific) y Alas (Alaska) y
Haw. (Hawaii) y Auto
•For “Daylight saving”
Select “Yes” or “No” (standard time), or
“Auto” to have the DVD-VCR automatically
set the daylight saving time.
5
Press O RETURN, then press SET UP to exit the menu.
6
To activate the Auto Clock Set function, turn off the DVD-VCR.
RETURN
CLOCK SET/ADJUST
SET UP
Clock data CH [ Auto ]
Time zone [ Auto ]
Daylight saving [ Auto ]
vV bB
RETURN
CLOCK SET/ADJUST
SET UP
Clock data CH [ 123 ]
Time zone [ Auto ]
Daylight saving [ Auto ]
vV bB
RETURN
CLOCK SET/ADJUST
SET UP
Clock data CH [ Auto ]
Time zone [ Pac. ]
Daylight saving [ Auto ]
vV bB
RETURN
CLOCK SET/ADJUST
SET UP
Clock data CH [ Auto ]
Time zone [ Auto ]
Daylight saving [ No ]
v
V
b
B
continued
24
Setting the clock
Notes
•The clock cannot be set automatically if you do not receive a channel that carries a time
signal in your area. If so, set the clock manually (page 24).
• If there are only a few channels in your area that carry time signals, setting the clock
automatically may take up to about 20 minutes. If nothing happens even after you wait about
20 minutes, set the clock manually (page 24).
• If you made Hookup 3, make sure you leave the cable box on.
•To record TV programs using the timer, you must set the clock accurately.
•The clock display appears when VIDEO mode is selected with no tape inserted or when the
DVD-VCR is turned off.
Using Manual Clock Set
Before you start…
•Turn on the DVD-VCR and your TV.
•To control the DVD-VCR, set TV
/
DVD·VIDEO
to DVD·VIDEO on the
remote (page 10).
•Set the “RF Output Channel” to “3CH” or
“4CH” in “OPTION SETUP” menu
(page 110). If your TV is connected to the
DVD-VCR using A/V connections, set the
TV to video input.
• If the DVD player is in play mode, you
cannot display the setup menu. Stop the
DVD playback.
1
Press SET UP, then press V/v to select
(OPTION) and press ENTER.
2
Press V/v to select “Clock Set/Adjust”, then
press ENTER.
The “CLOCK SET/ADJUST” menu appears.
V/v/B/b
ENTER
SET UP
Language
Channel Setup
Auto Power Off
RF Output Channel
Clock Set/Adjust
:English
[ Off ]
[3CH]
RETURN
OPTION SETUP
SET UP
ENTER
vV
RETURN
CLOCK SET/ADJUST
SET UP
ENTER
Auto
Manual
vV
Getting Started
25
Setting the clock
Tip
•To change the digits while setting, press B to return to the item to be changed, and select the
digits by pressing V/v.
Notes
•To record TV programs using the timer, you must set the clock accurately.
•The clock display appears when VIDEO mode is selected with no tape inserted or when the
DVD-VCR is turned off.
3
Press V/v to select
“
Manual
”
, then press
ENTER.
4
Press V/v to set the hour.
5
Press b to select the minutes and set the
minutes by pressing V/v.
6
Set the month, day, and year in sequence by
pressing b to select the item to be set, and
press V/v to select the digits, then press b.
The day of the week is set automatically.
7
Press ENTER to confirm the setting.
8
Press SET UP to exit the menu.
12:00
A
M
1/01 2005 Sat
Time Date
RETURN
CLOCK SET/ADJUST
SET UP
ENTER
vV bB
Year
12:00
A
M
1/01 2005 Sat
Time Date
RETURN
CLOCK SET/ADJUST
SET UP
ENTER
vV bB
Year
12:00
A
M
1/01 2005 Sat
Time Date
RETURN
CLOCK SET/ADJUST
SET UP
ENTER
vV bB
Year
12:00
A
M
10/06 2005 Thu
Time Date
RETURN
CLOCK SET/ADJUST
SET UP
ENTER
vV bB
Year
 Loading...