EasyManua.ls Logo

Sony UP-980CE User Manual

Sony UP-980CE
204 pages
Go to English
To Next Page IconTo Next Page
Page #1 background imageLoading...
Page #1 background image
3-862-475-05 (1)
UP-980
UP-980CE
1998 by Sony Corporation
電気製品は安全のための注意事項を守らないと、火災や
人身事故になることがあります。
この取扱説明書には、事故を防ぐための重要な注意事項と製品の取り扱
いかたを示しています。この取扱説明書をよくお読みのうえ、製品を安
全にお使いください。お読みになったあとは、いつでも見られるところ
に必ず保管してください。
Video Graphic
Printer
取扱説明書
Page 2
Instructions for UsePage 54
Mode d’emploiPage 104
GebrauchsanweisungSeite 154
J
EN
F
D
UP 980/980CE

Table of Contents

Other manuals for Sony UP-980CE

Question and Answer IconNeed help?

Do you have a question about the Sony UP-980CE and is the answer not in the manual?

Sony UP-980CE Specifications

General IconGeneral
BrandSony
ModelUP-980CE
CategoryPrinter
LanguageEnglish

Summary

Back Panel Connector Guide

VIDEO IN (BNC) Connector

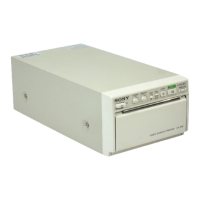
Input for video signals from equipment.

VIDEO OUT (BNC) Connector

Output for video signals to monitors.

REMOTE and AC IN Connectors

Ports for remote control and power supply.

Equipotential Terminal

Terminal for system potential equalization.

Owner's Record and Safety Precautions

Record Model and Serial Numbers

Space to log product identification details.

General Safety Warnings

Critical warnings for fire and shock hazards.

Medical Environment Usage

Safeguards for use in medical environments.

Medical Power Connection

Power cord specifications for medical applications.

Manual Introduction and Conventions

Manual Structure Overview

Explains the organization of the manual's chapters.

Document Conventions Used

Describes cross-references and important notes.

Printer Overview and Capabilities

Print Quality and Modes

Features of clear print quality and various printout modes.

Input Signal Compatibility

Supported video signal types and auto scan function.

Printer Specification Management

Saving and loading printer settings.

Paper Handling Features

Auto-cut function and types of available paper.

Operation: Loading Paper - Initial Steps

Paper Loading Notes

Important notes on paper handling and quality.

Operation: Loading Paper - Inserting Rolls

Inserting Paper Rolls

How to place UPP/UPT paper rolls in the printer.

Feeding Paper into Slot

Manually feeding the paper end into the insertion slot.

Operation: Loading Paper - Finalizing

Closing the Printer Door

Securing the printer compartment after loading.

Initial Feed and Cut

Using FEED and CUT for initial paper alignment.

Thermal Head Cleaning Reminder

Note on cleaning for UPT-210BL usage.

Operation: Making Printouts - Single Picture Mode

Printout Modes Explained

Overview of single and multi-picture print modes.

Single Picture Print Preparation

Checklist for successful single-page printouts.

Operation: Single Picture Printout Execution

Executing a Single Printout

Process of printing the current image.

Managing Multiple Copies

Making copies and re-printing the last printout.

Interrupting and Stopping Prints

Controlling print jobs during operation.

Operation: Printout Adjustments and Remote Control

Adjusting Print Quality

Fixing blurred images, brightness, and contrast issues.

Remote Control Operation

Using remote or foot switch for printer control.

Operation: Multi Picture Mode - Setup

Selecting Multi Picture Count

Setting the number of images per page.

Operation: Multi Picture Mode - Configuration

Setting Image Count

Choosing 2, 4, or 6 reduced images.

Navigating Multi Picture Menus

Accessing and selecting options in the menu.

Customizing Multi Picture Borders

Setting border color (black/white) for images.

Operation: Multi Picture Mode - Capturing Images

Multi Picture Print Preparation

Checklist before capturing multiple images.

Initiating Image Capture

Starting video source and positioning cursor.

Operation: Multi Picture Mode - Printing

Capturing and Printing Multiple Images

Process of capturing and printing all images.

Automatic Printing and Copying

Options for auto-printing and re-printing copies.

Operation: Advanced Printing Controls

Managing Print Interruptions

Stopping and restarting print jobs.

Fine-Tuning Print Quality

Adjusting blur, brightness, and contrast.

Remote Control for Multi Picture

Using remote control during multi-picture printing.

Operation: Clearing Stored Images

Clearing All Images from Memory

Steps to clear all images at once.

Operation: Printout Layout Variations

Standard Mode Layout Options

Single, 2, 4, 6 images in standard mode.

Side Mode Layout Options

Single, 2, 4, 6 images in side mode.

Operation: Manual Paper Cutting

Disabling Auto Cut Mode

Turning off automatic paper cutting.

Initiating Manual Cut

Starting printing after disabling auto cut.

Operation: Manual Paper Cutting - Finalizing

Executing the Manual Cut

Pressing the CUT button for paper cutting.

Adding Print Margins

Creating margins before manual cutting.

Connection and Adjustment: Connecting the Printer

Connection Preparation Notes

Important considerations before connecting devices.

Connection Wiring Diagram

Visual guide for connecting video and power.

Setting Up the Printer: Navigating Menus

Printer Specification Setup

Inputting and storing printer specifications.

Menu Operation Button Functions

Explains the purpose of MENU, Cursor, and EXEC buttons.

Setting Up the Printer: Menu Operation Procedure

Step-by-Step Menu Navigation

Detailed steps for operating the printer menus.

Note on Saving Settings

Importance of closing the door to retain settings.

Setting Up the Printer: PICTURE Menu Options

PICTURE Menu Submenus

Overview of submenus for print adjustments.

Selecting Paper Type

Choosing between thermal paper and film.

Setting Print Tone (Gamma Curve)

Adjusting print tone using TONE 1, 2, or 3.

Setting Up the Printer: Image and Sharpness Settings

Image Output Mode (Positive/Negative)

Setting printout to positive or negative.

Printout Sharpness Control

Adjusting the sharpness of printouts.

Memory Mode Selection

Choosing between FRAME and FIELD modes.

Setting Up the Printer: Brightness and Contrast Adjustments

Adjusting Print Brightness

Modifying printout brightness using +/- steps.

Adjusting Print Contrast

Modifying printout contrast using +/- steps.

Setting Up the Printer: LAYOUT Menu Options

LAYOUT Menu Overview

Adjusting print size, area, and functions.

Image Size and Printing Direction

Selecting print direction (vertical/horizontal).

Setting Up the Printer: Layout Configuration Options

Setting Paper Feed Margins

Adjusting top/bottom margins for paper feed.

Setting Border Colors

Choosing border color for multi-picture mode.

Setting Print Direction

Selecting normal or reverse print direction.

Setting Up the Printer: Image Layout and Aspect Ratio

Mirror Image Printing Control

Enabling or disabling mirror image output.

Multi Picture Image Count

Setting number of images for multi-picture layouts.

Aspect Ratio Selection

Choosing between 4:3 and 1:1 aspect ratios.

Setting Up the Printer: Fine Print Size Adjustments

Aspect Ratio Fine-Tuning

Adjusting aspect ratio for wider or taller prints.

Horizontal/Vertical Size Adjustments

Fine-tuning horizontal/vertical shift and size.

Setting Up the Printer: PRINTER Menu Options

PRINTER Menu Overview

Submenus for operation functions and specifications.

Setting Print Quantity

Specifying the number of printouts per job.

Setting Up the Printer: Settings Management

Saving and Loading Configurations

How to save and recall printer settings.

Initializing Printer Settings

Resetting all settings to factory defaults.

Print Interruption Settings

Enabling image capture during printing.

Setting Up the Printer: Operational Controls

Audio Feedback (Beep) Settings

Enabling or disabling operational tones.

LCD Display Contrast Adjustment

Adjusting the contrast of the printer's display.

Automatic Gain Control (AGC)

Optimizing input signal level for printing.

Trap Filter for Signal Types

Setting filter for color or B/W signals.

Setting Up the Printer: Signal and Cutting Options

75 Ohm Impedance Configuration

Setting 75-ohm impedance termination.

Clearing Stored Images

Procedure to clear memory contents.

Auto Cut Mode Configuration

Setting paper to cut automatically or manually.

Setting Up the Printer: Advanced Print Settings

Automatic Printing Control

Enabling automatic printing in multi-picture mode.

Auto Scan Mode Functionality

Automatic adjustment based on input signal.

Scan Input Signal Reset

Resetting settings for scanned input signals.

Pixel Density Selection

Choosing between standard and high line density.

Setting Up the Printer: Adjusting Printout Size

Print Area vs. Input Image Relation

Visualizing relation between input and print areas.

Adjusting Image Position

Shifting print area horizontally or vertically.

Adjusting Print Area Dimensions

Modifying horizontal and vertical print size.

Setting Up the Printer: Horizontal Shift Adjustment

H-SHIFT Adjustment Details

Specifies horizontal shift value in dots.

Setting Up the Printer: Horizontal Size and Vertical Shift

H-SIZE Adjustment Details

Specifies horizontal size in dots.

V-SHIFT Adjustment Details

Specifies vertical shift value in lines.

Setting Up the Printer: Vertical Size Adjustment

V-SIZE Adjustment Details

Specifies vertical size in lines.

Setting Up the Printer: Saving and Loading Settings

Procedure for Saving Settings

Steps to save current printer configurations.

Procedure for Loading Settings

Steps to recall saved printer configurations.

Setting Up the Printer: Managing Saved Settings

Completing Settings Load Operation

Final step for loading saved settings.

Copying Saved Settings

Transferring settings between save slots.

Modifying and Resaving Settings

Editing loaded settings and saving them.

Precautions for Safe Operation

General Safety Precautions

Electrical safety and handling warnings.

Operational Precautions

Warnings during printer operation.

Printer Carriage Handling

Precautions when moving the printer.

Installation Guidelines

Placement and environmental considerations.

Maintenance: Cleaning Procedures

Cleaning the Printer Cabinet

How to clean the printer's exterior.

Thermal Head Cleaning - Initial Steps

First steps for cleaning the thermal head.

Maintenance: Thermal Head Cleaning Process

Using the Cleaning Sheet

Inserting and feeding the cleaning sheet.

Completing Head Cleaning

Finishing the head cleaning process.

Thermal Head Cleaning Notes

Important notes on cleaning frequency.

Paper Specifications and Handling

Available Paper Types

Lists compatible paper and film types.

Proper Paper Storage Guidelines

Recommendations for storing paper and film.

Printer Specifications

Technical Specifications

Thermal head, gradation, picture elements, print sizes.

Performance Specifications

Printing speed, memory, input/output ports.

Environmental and Power Specs

Operating/storage conditions, power requirements.

Physical and Safety Specs

Dimensions, mass, safety ratings, accessories.

Troubleshooting Common Problems

Print Quality Troubleshooting

Issues like specks, borders, stripes, density.

Printing Start and Paper Feed Issues

Problems with printing initiation or paper feeding.

Specific UPT-210BL Issues

Troubleshooting stripes on UPT-210BL.

Operational and Jamming Problems

Printer stopping, jams, or unclear output.

Error Messages and Solutions

Motor and Sensor Errors

Troubleshooting motor or sensor trouble messages.

Paper and Input Signal Errors

Issues with paper loading or input signals.

System and Image Capture Errors

Overheating, over spec, or no image messages.

Location and Function: Front Panel Controls

Front Panel Overview Diagram

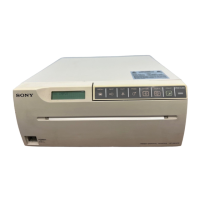
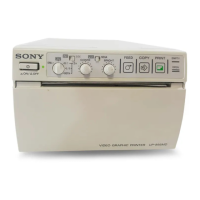
Visual layout of the front panel.

Power and Menu Buttons

Functions of Power and MENU buttons.

Print Control Buttons

SKIP, CUT, FEED, CAPTURE, COPY, PRINT buttons.

Door Control Button

Function of the OPEN/CLOSE button.

Location and Function: Sub Panel Controls

Sub Panel Button Layout Diagram

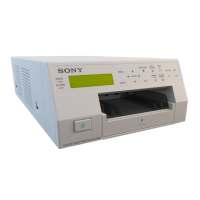
Visual layout of the sub panel.

Navigation and Execution Buttons

Cursor keys and EXEC button for menu operation.

Adjustment Buttons

BRIGHT and CONTRAST buttons for adjustments.

Menu Access Buttons

CLEAR and MULTI PICTURE buttons for menu access.

Location and Function: Back Panel Connectors

Video Input/Output Connectors

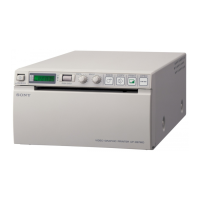
BNC connectors for video signals.

Remote and Power Connectors

REMOTE and AC IN ports.

Equipotential Terminal

Terminal for system potential equalization.

Related product manuals