175
OMAHA STANDARD
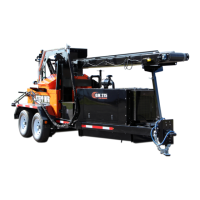
TRAILER HOIST INSTALLATION INSTRUCTIONS
INSTALLATION CHECKLIST
The following is a step-by-step checklist, in proper order for hoist installation. Please study
complete installation procedure before beginning. Go over this checklist again, after installing
hoist ,to make sure you did not miss any steps.
NOTE: These instructions are only for components supplied by Omaha Standard. If you are
using another hydraulic system, rear hinge or hoist mounting brackets, please follow the
manufacture’s instructions provided with those components and give those operating manuals
to the end user.
WARNING: IF THE HYDRAULIC SYSTEM INSTALLED IS NOT SUPPLIED BY
OMAHA STANDARD OR HAS BEEN MODIFIED, IT IS THE RESPONSIBILITY OF
THE INSTALLER TOE VERIFY THAT THEY SYSTEM IS COMPATIBLE WITH
THE HOIST. HOIST HYDRAULIC SPECIFICATIONS CAN BE FOUND IN THE
REFERENCE SECTION FO THIS MANUAL. THE INSTALLER MUST PROVIDE
THE CORRECT OPERTION MANUL FOR THE HYDRAULIC SYSTEM THAT IS
USED.
A. CHECKK ALL KITS
B. PRELIMINARY PLAN
C. POSITION HOIST ON FRAME
D. VERIFY PLAN
E. INSTALL REAR HINGE ASSEMBLY
F. MOUNT HOIST TO FRAME
G. INSTALL HYDRAULIC SYSTEM
H. ATTACH HARDWOOD RISERS
I. ATTACH BODY TO REAR HINGE AND UPPER MOUNTS
J. AFFIX ALL WARNING DECALS
K. REVIEW INSTALLATION CHECKLIST
INSTALLATION PROCEDURE
A. Check all kits:
Remove all parts from kit boxes and refer to drawings and related parts lists to make
sure you have all necessary parts and are familiar with part names
B. Preliminary Plan:
CAUTION: PROTECT ALL HYDRAULIC PARTS FROM FOREIGN MATERIALS
WHILE ASSEMBLING, WELDING, AND GRINDING.