WORKSHOP MANUAL
Map of functional units
MP 84/98 - MP 84/98 Hy
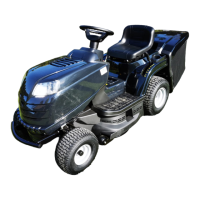
A) Rear
The conveyor (1) is connected to the rear plate (2) by
two plastic clamps (3), removable with the help of a
screwdriver.
On assembly, ensure the free vibration of the convey-
or at each plate height variation.
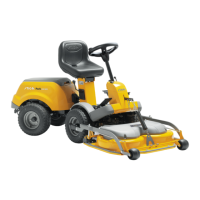
B) Front
Remove the cutting deck.
Remove the rear wheels.
Loosen the two nuts (11).
Remove the screws (12) and the spacers (13), oper-
ating from inside the outlet, and remove the front part
of the conveyor (14).
On assembly, ensure the free vibration of the convey-
or at each plate height variation.
Ret the rear wheels.
Reassemble the cutting deck.
General informations
The removal of the front part of the conveyor
makes the small side wheels and the transmis
sion belt accessible.
The removal of the conveyor’s rear part is neces
sary to disassemble the cutting deck and in case
the rear plate is removed.
Related topics
[
5.7] Removal of the cutting deck
[
6.1] Removal of the wheels
Tightening torques
11 Screws for front discharge conveyor 8 - 10 Nm
REMOVAL OF THE DISCHARGE CONVEYOR
CHAPTER REVISION FROM ... PAGE
5.8 0 2018 1 of 1
1
2
3
11
1213
14