MORTEXPRODUCTSINC.501TERMINALRDFORTWORTH,TEXAS76106 Page34
Change Motor Speeds – Constant Torque Motor
1. Turn off all electrical supply circuits to the air handler
at the main service (House Circuit Breaker) panel.
2. Turn off the circuit breakers in the control box.
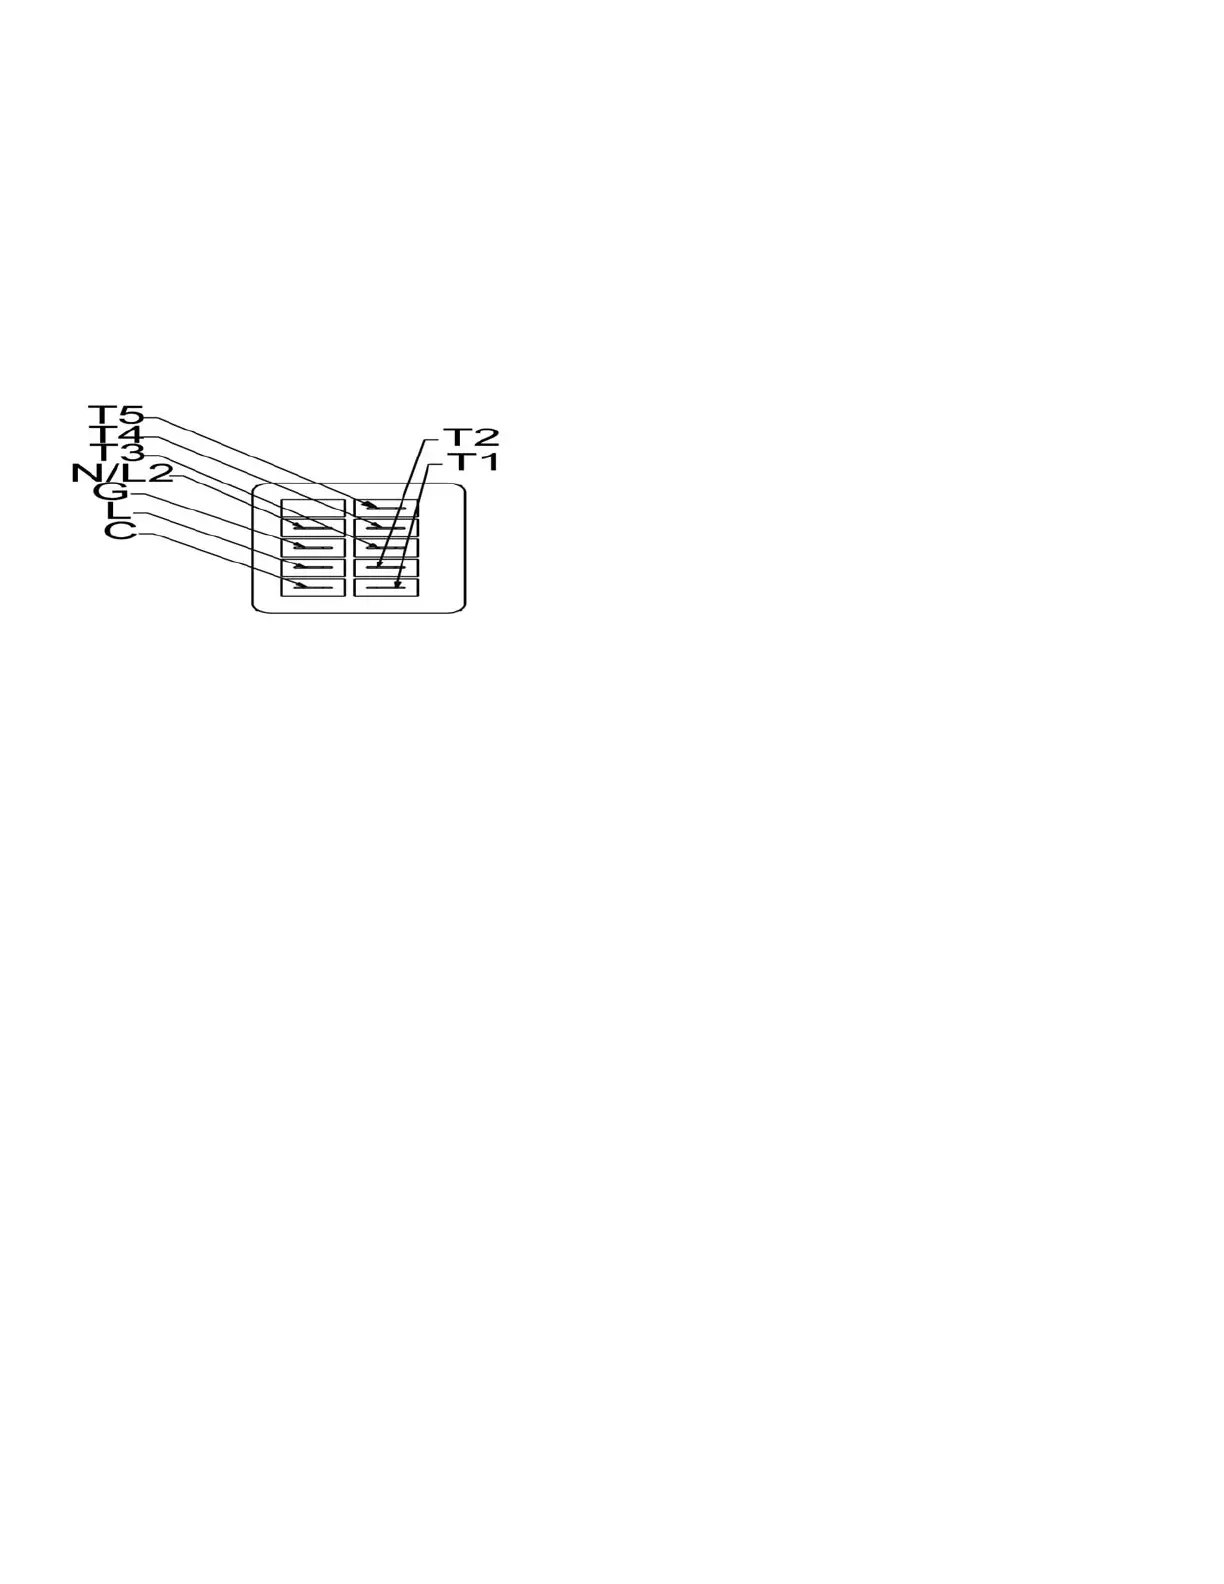
3. Disconnect the wire from the blower motor terminal
and reconnect the desired wire to the terminal. Here is
the constant torque motor speed tap wire color code.
Orange wire is Cool Speed and White wire is Heat
Speed. The motor speed connections are T5 is high
speed and T1 is low speed. Use T2 for heating.
4. Turn the circuit breakers to the “ON” position and
reinstall air handler blower door.
5. Turn on all electrical supply circuits to the air handler
at the main service (House Circuit Breaker) panel.
6. Set the thermostat to the desired temperature.
Figure 33: Constant Torque Motor Terminals
Replacing the Constant Torque Blower Motor
1. Turn off all electrical supply circuits to the air handler at
the main service panel (House Circuit Breaker Panel).
2. Turn off the circuit breakers located in the control box.
3. Disconnect the power cable and the speed tap cable that
connect to the blower motor.
4. Remove the two screws on the right side and the three
screws on the left side of the blower mounting plate.
5. Slide the blower out of the blower compartment and set on
the floor.
6. Loosen the wheel set screw by placing on wrench on the
screw head and turning counter clockwise. Loosen the
wheel set screw until the shaft can spin freely 360° while
inside the wheel hub. The wheel set screw is located on the
wheel hub on the opposite side of the motor.
7. Remove the blower motor from the blower housing by
removing the screws on the sides of the housing that secure
the blower to the housing
8. Remove the motor controller that is mounted to a hat
channel normally located on the left side of the blower.
9. Remove the screws that are securing the blower housing to
the unit.
10. Remove the blower motor mount assembly by removing the
clips shown in Figure 30 and pull out the motor and the
blowers.
11. Insert the new blower motor into the blower mounting
bracket making sure the clips are properly attached to
secure the motor to the mount bracket.
12. Line up the blowers to the screw holes and insert the screws
in each blower. Make sure the blowers are securely attached
to the unit.
13. Center the blower wheel in the housing, turn the motor
shaft so the wheel set screw is located on the center of the
flat spot of the shaft and tighten the set screw.
14. Connect the same two cables that were removed in step 3.
15. Slide the blower assembly into the blower deck and insert
the screws on the right and left sides of the mounting
bracket.
16. Turn on all electrical supply circuits to the furnace at the
main service (House Circuit Breaker) panel.
17. Set the thermostat to the desired temperature.
SECTION XI: FINAL SYSTEM
CHECKOUT
1. Refer to appropriate wiring diagram and recheck all wiring
connections. Ensure that all wiring connections are tight.
2. Check blower motor connectors to make sure they are not
damaged or loose.
3. If the control box cover was removed; reinstall control box
cover.
4. Switch circuit breaker(s) to “ON” position.
5. Switch the furnace circuit breakers in the main service
(House Circuit Breaker) panel to the ON position.
6. Set the blower selector switch to the ON position and check
all of the duct connections for air leaks. Seal any air leaks
found.
7. Set the blower selector switch to the AUTO position.
8. Set the thermostat above the room temperature to check for
proper operation of the electric heaters.
9. Set the thermostat to the desired temperature.
Thermostat Heat Anticipator
Some thermostats have a heat anticipator setting that must be set
to the settings shown below in order to function correctly. If the
heat anticipator setting is too low the furnace will short cycle. If
the heat anticipator setting is too high the furnace will run long
cycles thus causing the temperature to overrun the temperature
setting. This will cause the home owner to feel hot by the time
the blower completes its cycle; then cold, by the time the
furnace cycles on again.
The heat anticipator should be set to the following settings.
For 3kW, 5kW, 6kW, 8kW and 10kW Models Set at 0.4