RT-SVX24Q-EN
171
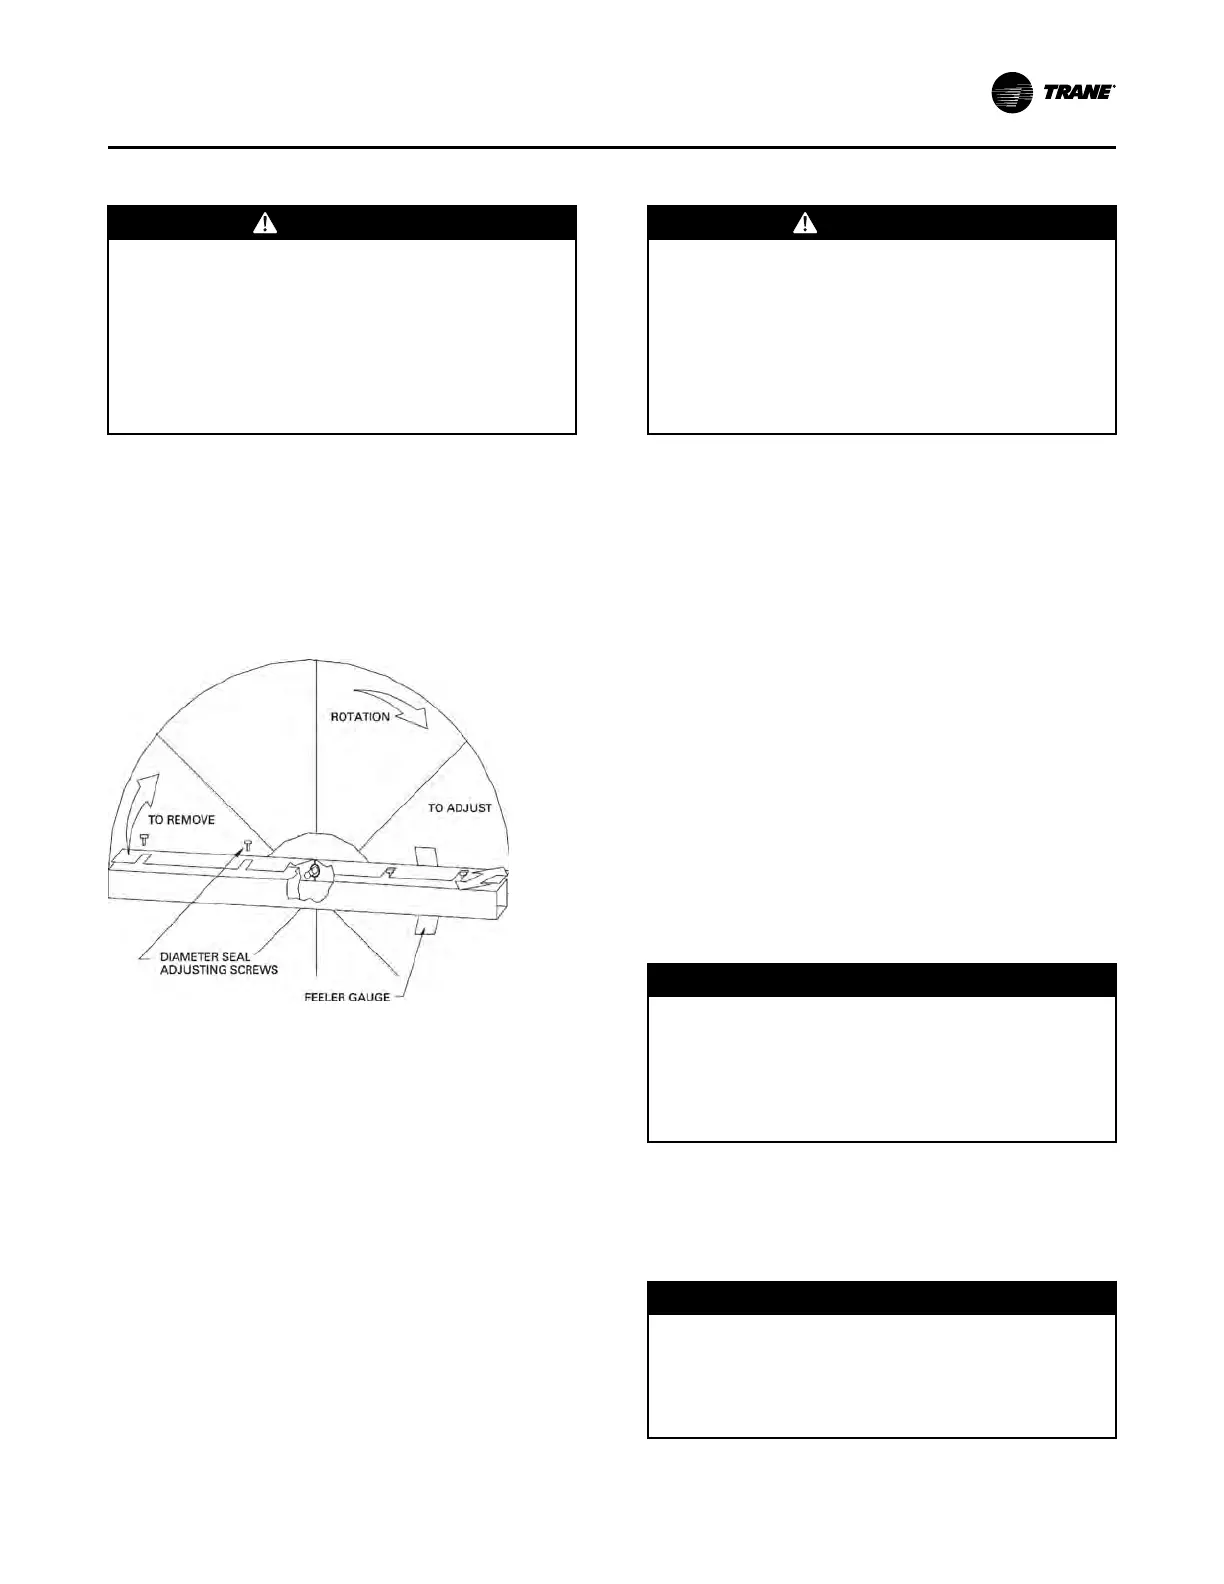
Seal Adjustment
WWAARRNNIINNGG
HHaazzaarrddoouuss VVoollttaaggee!!
FFaaiilluurree ttoo ddiissccoonnnneecctt ppoowweerr bbeeffoorree sseerrvviicciinngg ccoouulldd
rreessuulltt iinn ddeeaatthh oorr sseerriioouuss iinnjjuurryy..
DDiissccoonnnneecctt aallll eelleeccttrriicc ppoowweerr,, iinncclluuddiinngg rreemmoottee
ddiissccoonnnneeccttss bbeeffoorree sseerrvviicciinngg.. FFoollllooww pprrooppeerr
lloocckkoouutt//ttaaggoouutt pprroocceedduurreess ttoo eennssuurree tthhee ppoowweerr
ccaann nnoott bbee iinnaaddvveerrtteennttllyy eenneerrggiizzeedd.. VVeerriiffyy tthhaatt nnoo
ppoowweerr iiss pprreesseenntt wwiitthh aa vvoollttmmeetteerr..
1. Disconnect all electrical power.
2. Loosen the diameter seal adjustment screws and
back the seals away from the wheel surface, see
Figure 132, p. 171.
3. Rotate the wheel clockwise until two opposing
spokes are hidden behind the bearing support
beam.
Figure 132. Wheel rotation
4. Using a folded piece of paper as a feeler gauge,
position the paper between the wheel surface and
the diameter seals.
5. Adjust the seals toward the wheel surface until
slight friction on the paper feeler gauge is felt when
the gauge is moved along the length of the spoke.
6. Check the seal adjustment through a full rotation of
the wheel. Re-tighten the adjusting screws and
recheck the clearance with the paper-feeler gauge.
Drive Motor and Pulley Replacement
WWAARRNNIINNGG
HHaazzaarrddoouuss VVoollttaaggee!!
FFaaiilluurree ttoo ddiissccoonnnneecctt ppoowweerr bbeeffoorree sseerrvviicciinngg ccoouulldd
rreessuulltt iinn ddeeaatthh oorr sseerriioouuss iinnjjuurryy..
DDiissccoonnnneecctt aallll eelleeccttrriicc ppoowweerr,, iinncclluuddiinngg rreemmoottee
ddiissccoonnnneeccttss bbeeffoorree sseerrvviicciinngg.. FFoollllooww pprrooppeerr
lloocckkoouutt//ttaaggoouutt pprroocceedduurreess ttoo eennssuurree tthhee ppoowweerr
ccaann nnoott bbee iinnaaddvveerrtteennttllyy eenneerrggiizzeedd.. VVeerriiffyy tthhaatt nnoo
ppoowweerr iiss pprreesseenntt wwiitthh aa vvoollttmmeetteerr..
1. Disconnect all electrical power.
2. Remove the belt from the pulley and position it
temporarily around the wheel rim.
3. Measure and record the distance from the inner
edge of the pulley to the mounting wall.
4. Loosen the set screw in the wheel drive pulley
using an Allen wrench and remove the pulley from
the motor drive shaft.
5. While supporting the weight of the drive motor in
one hand, loosen and remove the four mounting
bolts.
6. Install a replacement motor with the hardware kit
supplied.
7. Install the pulley and adjust it to the distance
recorded earlier in this procedure.
8. Tighten the set screw to the drive shaft.
9. Stretch the belt over the pulley and engage it in the
groove.
Compressor Startup
NNOOTTIICCEE
CCoommpprreessssoorr FFaaiilluurree!!
FFaaiilluurree ttoo ffoollllooww iinnssttrruuccttiioonn bbeellooww ccoouulldd rreessuulltt iinn
ccoommpprreessssoorr ffaaiilluurree..
UUnniitt mmuusstt bbee ppoowweerreedd aanndd ccrraannkkccaassee hheeaatteerrss
eenneerrggiizzeedd aatt lleeaasstt 88 hhoouurrss BBEEFFOORREE ccoommpprreessssoorrss
aarree ssttaarrtteedd..
1. Ensure that the “System” selection switch at the
remote panel is in the “Off” position.
2. Before closing the disconnect switch, ensure that
the compressor discharge service valve for each
circuit is back seated.
NNOOTTIICCEE
CCoommpprreessssoorr DDaammaaggee!!
EExxcceessssiivvee lliiqquuiidd aaccccuummuullaattiioonn iinn tthhee ssuuccttiioonn lliinneess
ccoouulldd rreessuulltt iinn ccoommpprreessssoorr ddaammaaggee..
DDoo nnoott aallllooww lliiqquuiidd rreeffrriiggeerraanntt ttoo eenntteerr tthhee ssuuccttiioonn
lliinnee..
UUnniitt SSttaarrttuupp

 Loading...


