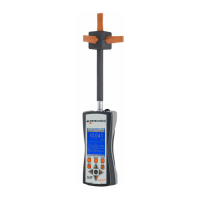
To start logging samples, press the “LOG” button on the virtual menu. When
logging starts, the device creates a new measurement record identified with
its starting date and a unique measurement ID.
To stop logging samples, press the “END” button or wait until the defined
measurement time is reached. A new screen will appear to show you a
summary screen with all the important information. In this summary screen
you can either go back or show a QR code to export easily the information
to an external App for example.
Important: To store position information along with the field values, the GPS
receiver must be enabled before logging is started.
Note 1: During logging, the parameters of the
SMP3
cannot be changed.
Note 2: With the broadband probes, if you select a limit you can go to the “UNITS” and
select a % in power density (%S) or field intensity (%E or %H).
6.1.1.1. High frequency measurements
International standards have specific requirements for high frequency
measurements. When you make a selection on “MENU” “MEASUREMENT
OPTIONS” “Standard”, the following parameters will be adjusted to the pre-
defined values:
• Measurement time
• Logging rate
• Average type
• Average interval
Then you are ready to measure. Just press the “HOME” button and press
the “LOG” button on the virtual menu:
• The device will wait the time specified in “Wait time before start” (see 5.4)
before starting the measurement to allow the technician to move away. A
beep will indicate the start of the measurement.