Print-no. 504 474 4
01/2017
Installation, Operating and Maintenance
Instructions blueMatic EAV
40
Aug. Winkhaus GmbH & Co. KG · Berkeser Str. 6 · D-98617 Meiningen www.winkhaus.de
Subject to technical changes
X6
X3
X1
1
2
3
NOTICE!
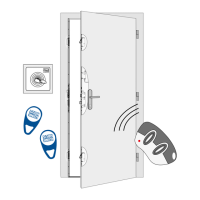
Control unit ekey home integra, ngerprint ekey home integra, cable type A ekey
home integra included in standard delivery ekey. For further information on ekey
home integra please contact company ekey (www.ekey.net).
3. Assembly connection between control unit ekey home integra 6 and motor
housing EAV 4 . For this connect the wires of the included 3 m cable integra-EAV
3 to terminal X6 (see detail A). After that put the blue plug into the motor housing
EAV 4 .
Figure 3.6.2-1: Wiring blueMatic EAV and ngerprint ekey home integra (sash side)
Detail B: Connections frame part STV-KÜ-T1 RT Ka-
bel 4M or signal line frame power supply 12 V DC
Detail A: Terminal at control unit ekey home integra
X1: Connection from
sash part cable
transition STV-
KÜ-T1 SET FT
INTEGR-EAV to the
control unit ekey
home integra with
8-pole plug
green/yellow = output relay 2 at integra 2
grey/pink = input for external potential-free
contact (e. g. unlocking via intercom
/open button)
NOTICE! max. 40 m extendable
white + 12 V DC
brown 0 V
yellow
green
grey
pink
}
relay 2
(at integra 2)
}
external ope-
ning signal
X3: Connection from control unit to the
ngerprint (plug-in)
X6: Screw-type terminal, Connection to
motor housing EAV (relay 1)
1 = white supply +
2 = brown supply -
3 = green switching pulse
 Loading...