RX-V1700/DSP-AX1700
19
2. 本機の電源コードをACコンセントに接続します。
3. DVD/CDプレーヤーの電源コードをACコンセント
に接続します。
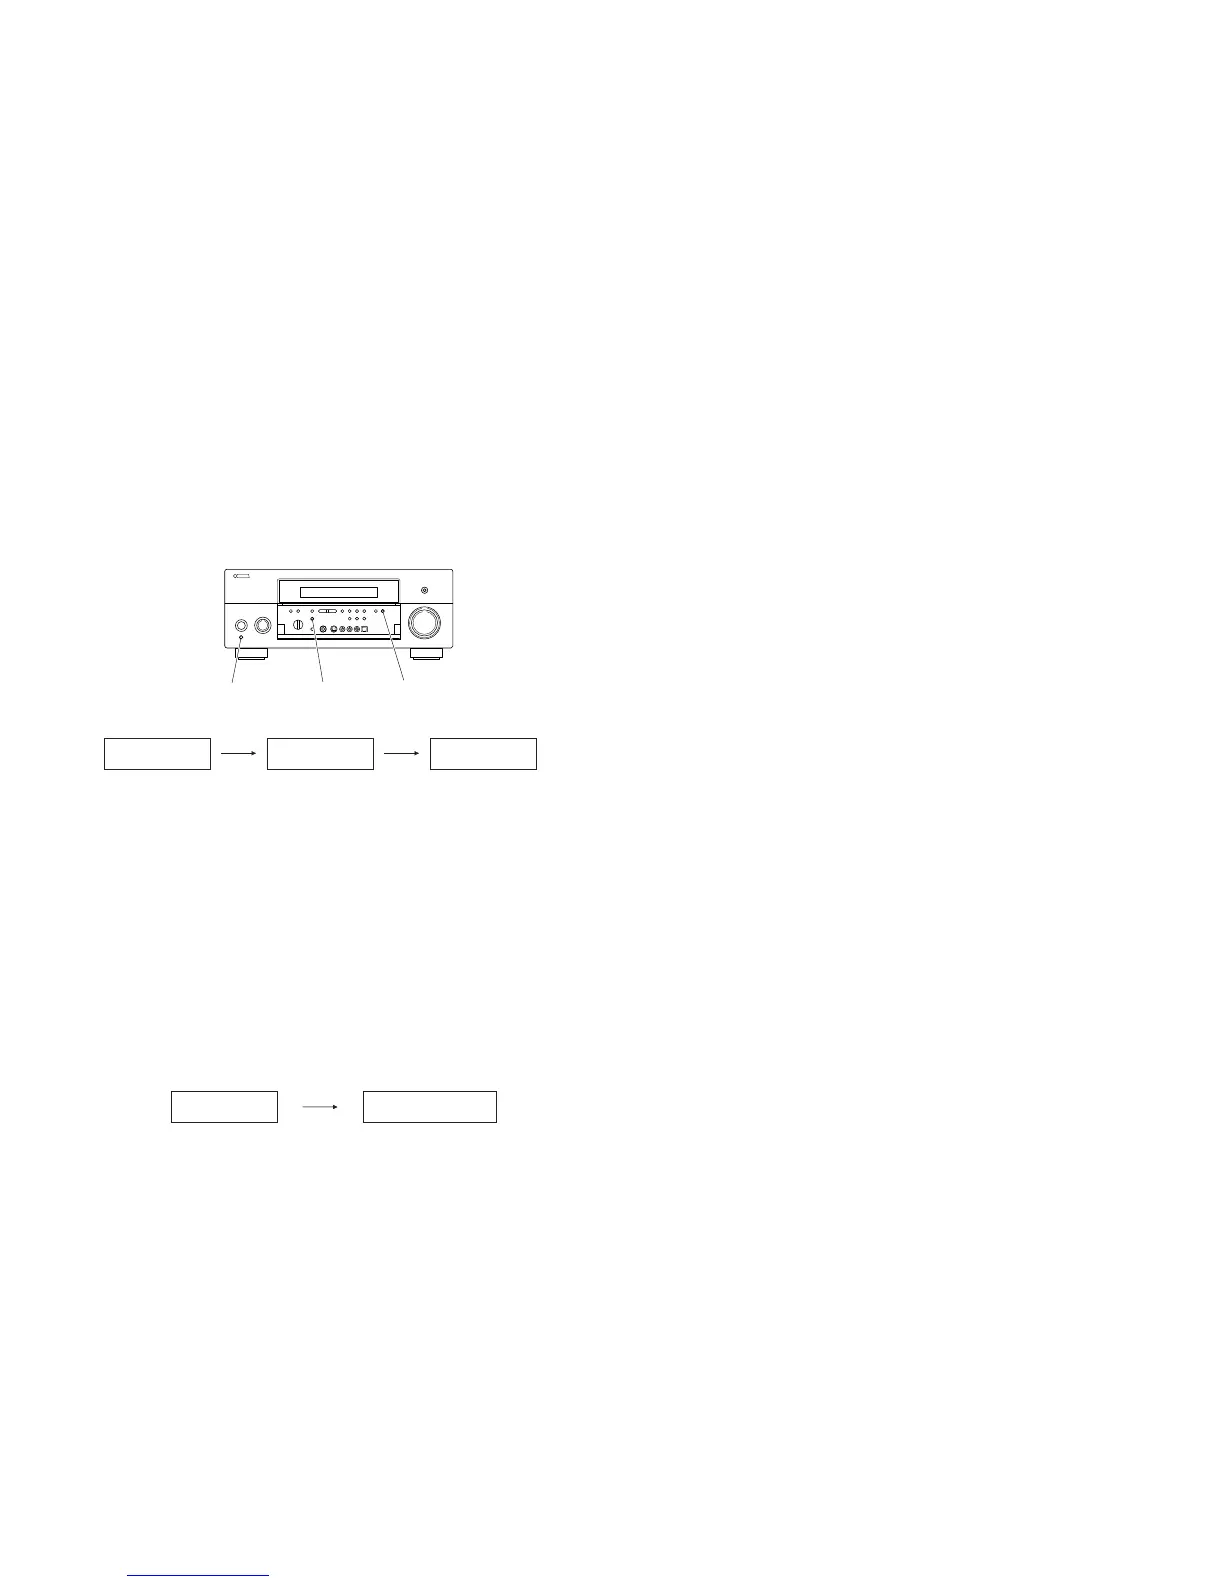
4. 本機のSTRAIGHTキーを押しながら、MASTER
ON/OFFキーを押し、アドバンスドセットアップ
を起動します。(Fig.2)
Fig. 2
ADVANCED SETUP USER PRESET
CANCEL
CDDA Upgrader
1700
Keep pressing the “NIGHT” key for about 3 seconds.
NIGHTキーを約3秒間押し続ける
Writing is completed. / 書き込み完了
Found Header Update Success
Please MASTER Off!
Writing is started. / 書き込み開始
Fig. 3
5. 本機のNIGHTキーを約3秒間押し続けます。(Fig.
2)
CDDAUpgrader1700が表示されます。(Fig.2)
6. DVD/CDプレーヤーのSTANDBY/ONキーを押し
ます。
7. DVD/CDプレーヤーのEJECTキーを押し、ト
レーを開きます。
8. ファームウェアCDをトレーに載せ、トレーを閉じ
ます。
9. DVD/CDプレーヤーのPLAYキーを押します。
ファームウェアの書き込みが開始されます。
10. ファーウェアの書き込み完了後、UpdateSuccess
PleaseMASTEROff!が表示されます。
※UpdateSuccessPleaseMASTEROff!が表示
されない場合、または途中でErrorxxxが表示
された場合は、操作方法の5から10までをも
う一度やり直してください。
2. Reconnect the power cable of main unit to the AC
outlet.
3. Reconnect the power cable of DVD/CD player to
the AC outlet.
4. Press the “MASTER ON/OFF” key of the main unit
while simultaneously pressing the “STRAIGHT”
key of the main unit.
Then the ADVANCED SETUP mode is activated.
(Fig. 2)
5. Keep pressing the “NIGHT” key for about 3 sec-
onds. (Fig. 2)
CDDA Upgrader 1700 is displayed. (Fig. 2)
6. Press the “STANDBY/ON” key of the DVD/CD
player.
7. Press the “EJECT” key of the DVD/CD player to
open the tray.
8. Put the firmware CD on the tray and close the tray.
9. Press the “PLAY” key of the DVD/CD player.
Then writing of the firmware is started.
10. When writing of the firmware is completed, “Update
Success Please MASTER Off!” is displayed.
* If “Update Success Please MASTER Off!” is not
displayed or “Errorxxx” appears before coming
to the end, perform Steps 5 to 10 of “Operation
Procedures” again.
11. DVD/CDプレーヤーのSTOPキーを押します。
12.DVD/CDプレーヤーのEJECTキーを押し、ト
レーを開きます。
13. ファームウェアCDをトレーから外し、トレーを閉
じます。
14. DVD/CDプレーヤーの電源を切り、電源コードを
ACコンセントから抜きます。
15. 本機の電源を切り、電源コードをACコンセントか
ら抜きます。
● ファームウェアバージョンおよびチェックサムの
確認
ダイアグメニューでファームウェアが正しく更新され
たことを確認します。
ダイアグメニューの詳細は「自己診断」を参照してくだ
さい。
1. MAINのバージョン(ダイアグ29-1)
2. MAINのチェックサム(ダイアグ29-2)
3. VIDEOのバージョン(ダイアグ29-3)
4. VIDEOのチェックサム(ダイアグ29-4、29-5)
5. TI(DSP)のバージョン(ダイアグ29-6)
6. TI(DSP)のチェックサム(ダイアグ29-7)
※ 表示されたファームウェアのバージョンおよび
チェックサムが、書き込んだファームウェアのバー
ジョンおよびチェックサムと異なる場合、操作方
法の1から15までをもう一度やり直してくださ
い。
11. Press the “STOP” key of the DVD/CD player.
12.Press the “EJECT” key of the DVD/CD player to
open the tray.
13. Remove the firmware CD from the tray and close
the tray.
14. Turn off the power of the DVD/CD player and dis-
connect the power cord from the AC outlet.
15. Turn off the power of main unit and disconnect the
power cable from the AC outlet.
● Confirmation of firmware version and checksum
Confirm that the firmware is updated successfully with
the DIAG function.
For more information, refer to “SELF DIAGNOSIS FUNC-
TION”.
1. Version of MAIN (DIAG 29-1)
2. Checksum of MAIN (DIAG 29-2)
3. Version of VIDEO (DIAG 29-3)
4. Checksum of VIDEO (DIAG 29-4, 29-5)
5. Version of TI (DSP) (DIAG 29-6)
6. Checksum of TI (DSP) (DIAG 29-7)
* When the displayed firmware version and checksum
are different from written firmware version and
checksum, follow the steps from 1 to 15 of “Opera-
tion Procedures” again.
"MASTER ON / OFF" Key
"MASTER ON / OFF" キー
"STRAIGHT" Key
"STRAIGHT" キー
"NIGHT" Key
"NIGHT" キー
ADVANCED SETUP mode
アドバンスドセットアップモード
 Loading...