EasyManua.ls Logo

YOKOGAWA PH202G (S) - User Manual

YOKOGAWA PH202G (S)
88 pages
Print Icon
To Next Page IconTo Next Page
Loading...
User’s
Manual
Model PH202G (S)
pH Transmitter
IM 12B6C3-E-E
12th Edition
Y
OKOGAWA

Table of Contents

Questions and Answers

  • S
    samantha58Sep 10, 2025
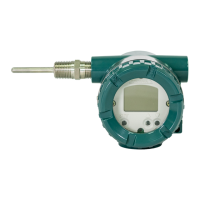
    What to do if ORP/rH is outside of preset limits in YOKOGAWA PH202G (S)?
    • A
      Angela GalvanSep 10, 2025
      If the ORP / rH is outside of the preset limits on your YOKOGAWA Transmitter, the sensors might be disconnected or wrongly connected. Check the cabling.
  • S
    Sandra GarciaAug 22, 2025
    Why is the asymmetry potential too high on my YOKOGAWA PH202G (S)?
    • M
      maynardkathyAug 22, 2025
      If the asymmetry potential is too high on your YOKOGAWA Transmitter, and it exceeds the limits set in service code 22, it could be due to aged or polluted sensors or a mistake during calibration. You should check the buffer solution, recalibrate at pH7, or replace the sensor.
  • M
    mbrockAug 25, 2025
    How to fix slope outside limits on YOKOGAWA Transmitter?
    • C
      Craig RomeroAug 25, 2025
      If the slope (sensitivity) is outside the limits on your YOKOGAWA Transmitter, as defined in service code 23, it could be due to an aged measuring sensor or poor insulation at the connector. Replace the measuring sensor, or replace or dry the cables.
  • B
    beankyleAug 27, 2025
    What causes low impedance of input 1 on YOKOGAWA Transmitter?
    • E
      Elizabeth Brown DVMAug 27, 2025
      If the impedance of input 1 is too low on your YOKOGAWA Transmitter, as defined in service code 03, it could be caused by a broken measuring sensor or damaged or damp connections. Replace the measuring sensor, or replace or dry the cable.
  • M
    Mark TurnerAug 27, 2025
    Why is the impedance of input 2 too low on my YOKOGAWA PH202G (S)?
    • D
      Deanna OrozcoAug 27, 2025
      If the impedance of input 2 is too low on your YOKOGAWA Transmitter, as defined in service code 04, it may be due to a broken reference sensor or damaged connections. Replace the reference sensor or the cables.
  • J
    Jim JacksonAug 29, 2025
    What to do if zeropoint is outside limits in YOKOGAWA Transmitter?
    • B
      Bradley HartAug 29, 2025
      If the zeropoint is outside the limits on your YOKOGAWA Transmitter, it may be due to aged or polluted sensors, or a mistake in calibration. Check the buffer solution, recalibrate at pH7, or replace the sensor.
  • J
    jennifermorrisonSep 18, 2025
    How to fix no valid calibration data on YOKOGAWA PH202G (S) Transmitter?
    • K
      kathryn92Sep 18, 2025
      If there is no valid calibration data on your YOKOGAWA Transmitter, it may be because the data was lost after switching from pH to ORP. Recalibrate the device.
  • L
    Laura SmithSep 12, 2025
    Why cable resistance to temperature sensor exceeds limit value in YOKOGAWA Transmitter?
    • M
      Michelle FergusonSep 12, 2025
      If the cable resistance to the temperature sensor exceeds the limit value on your YOKOGAWA Transmitter, it could be due to high cable resistance, corroded contacts, or a wrongly programmed sensor. Consider using Pt1000, clean and reterminate the connections, or reprogram the sensor.
  • A
    Aaron JohnsonSep 8, 2025
    What causes wash recovery check error on YOKOGAWA PH202G (S) Transmitter?
    • E
      Elizabeth WhiteSep 8, 2025
      If you get a wash recovery check error on your YOKOGAWA Transmitter (if communication is set to pH201*B in code 60), it could be because the measuring sensor is aged, still coated after washing, or the wash system is defective. Replace the measuring sensor, check the cleaning system, and if needed, adjust the timings.
  • M
    Marissa MaldonadoSep 5, 2025
    Why is the temperature sensor open on my YOKOGAWA PH202G (S) Transmitter?
    • S
      Sean CopelandSep 5, 2025
      If the temperature sensor is open and reads > 1400C (or

Summary

2. PH202 SPECIFICATIONS

General and Input;Output Specifications

Details on general specs, input ranges, span, and output signal characteristics.

Temperature, Calibration, and Communication Specs

Specs for temp compensation, calibration, serial communication, and display.

2-2. Operating Specifications

Performance Metrics and Environmental Limits

Linearity, accuracy, ambient temperature, humidity, and housing details.

System Features and Protection

Data protection, watchdog timer, operation protection, and communication specs.

Safety Certifications and Model Codes

Compliance, Intrinsic, and Non-Incendive Safety

Details on regulatory compliance and various safety certifications (ATEX, CSA, FM).

Model and Suffix Code Information

Table listing model codes and their corresponding options and descriptions.

2-4. Specification - Intrinsically Safe Design

CENELEC EEX ib Intrinsically Safe Design

Diagrams and data for intrinsically safe installations in hazardous areas per CENELEC.

2-5. Specification - FISCO Intrinsically Safe Design

FM FISCO Intrinsically Safe Design

Diagrams and electrical data for FM intrinsic safety (FISCO concept).

2-6. Specification - CSA Intrinsically Safe Design

CSA Intrinsically Safe Design Compliance

Diagrams and electrical data for CSA intrinsic safety compliance.

2-7. Specification - CSA Entity Intrinsically Safe Design

CSA Entity Concept Intrinsically Safe Design

Diagrams and electrical data for CSA intrinsic safety (entity concept).

2-8. Specification - FM Intrinsic Safety Design

FM Intrinsically Safe Design Diagrams

Diagrams and electrical data for FM intrinsic safety compliance.

2-9. Specification - FM Non-Incendive Design

FM Non-Incendive Design Diagrams

Diagrams and electrical data for FM non-incendive installations.

2-10. Specification - FM FISCO Concept Wiring

FM FISCO Concept Wiring Diagrams

Diagrams and electrical data for FM intrinsic safety (FISCO concept).

2-11. Specification - FM Entity Concept Wiring

FM Entity Concept Wiring Diagrams

Diagrams and electrical data for FM intrinsic safety (Entity concept).

2-12. Specification - FM Non-Incendive Entity Wiring

FM Non-Incendive Entity Wiring Diagrams

Diagrams and electrical data for FM non-incendive (Entity concept).

3. INSTALLATION AND WIRING

Installation Site Selection and Mounting Methods

Criteria for choosing an installation location and available mounting options.

3-2. Preparation for Wiring

Cables, Terminals, and Glands Usage

Details on cable types, terminal specifications, and gland usage for wiring.

3-3. Wiring of Sensors

Sensor Wiring Precautions and Hazardous Area Guidelines

Precautions for sensor wiring, including general and hazardous environment guidelines.

3-4. Wiring of Power Supply

Power Supply Connection and Precautions

Steps for wiring the power supply, including safety precautions.

3-4. Power Supply Connection and Switching On

Connecting Power Supply and Initial Power-Up

Detailed steps for connecting power and turning on the instrument.

3-5. Wiring the Sensor System

3-6. Sensor Wiring

3-6-1. Connection Cable Types

3-6-2. Sensor Cable with Special Grommet

3-6-3. Junction Box and Extension Cable Wiring

4. OPERATION; DISPLAY FUNCTIONS AND SETTING

4-2. Explanation of Operating Keys

4-3. Setting Passcodes

4-5. Display Functions

4-5-2. Display Functions for ORP

4-5-3. Display Functions for rH

5. PARAMETER SETTING

5-1-1. Manual Temperature Adjustment

5-1-2. Process Temperature in ORP Mode

5-1-3. Manual HOLD Activation

5-1-4. Manual Impedance Check

5-2. Commissioning Mode Setup

5-2-1. mA Output Range Configuration

5-2-2. Hold Function Configuration

5-2-3. Service Menu Access and Operation

5-3-1. Parameter Specific Functions

5-3-2. Temperature Compensation Functions

5-3-3. Calibration Functions

5-3-4. mA Output Functions

5-3-5. User Interface Settings

5-3. Configuration Setup

6. CALIBRATION

6-5. Calibration Procedures

6-5-2. Automatic Calibration with HOLD Active

6-5-3. Manual Calibration (2 nd Parameter)

6-5-4. Sample Calibration Procedure

7. MAINTENANCE

8. TROUBLESHOOTING

8-1. Diagnostics

10-2. Configuration Checklist for PH202 G

10-3. Setup for Sensor Compatibility

10-4. Setup for Other Functions

10-5. Setup for Pfaudler Type 18 Sensor

4.3 Overall Accuracy Test

YOKOGAWA PH202G (S) Specifications

General IconGeneral
BrandYOKOGAWA
ModelPH202G (S)
CategoryTransmitter
LanguageEnglish

Related product manuals