Do you have a question about the Amazone AmaSpread+ and is the answer not in the manual?
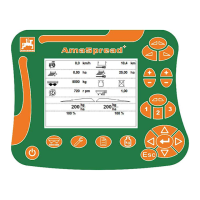
Provides an overview of the AmaSpread+ control computer interface and functions.
Emphasizes the importance of reading and following the manual for proper operation.
Explains the purpose and scope of this operating manual.
Describes how directions and instructions are presented in the manual.
Explains how to interpret diagrams and item numbers.
Outlines user obligations and liability regarding manual compliance.
Explains the meaning of various safety symbols used in the manual.
Specifies the intended application of the AmaSpread+ control unit.
Details the primary functions and capabilities of the AmaSpread+ system.
Describes the physical layout and function of the control terminal buttons.
Explains the different menus available in the AmaSpread+ system.
Details the process and buttons used for navigating through the menu system.
Details the steps for entering numerical values, including decimal places.
Outlines the procedure for entering text, character by character.
Specifies the required power connection for the control unit.
Explains how to save and recall device settings.
Mentions the possibility of configuring extended settings for the device.
Lists optional and mandatory settings required for operation.
Details entering the tractor name and pulses per 100m for accurate spreading.
Explains the use of the speed simulator and its effect on spread rate control.
Explains how to activate, deactivate, and manage saved settings.
Details settings available on the first page of the extended settings menu.
Details settings available on the second page of the extended settings menu.
Details settings available on the fourth page of the extended settings menu.
Explains how the system switches to Tractor data menu for slug pellets.
Describes how to enter or determine the calibration factor.
Explains how to adjust limiter settings for different spreading methods.
Details the process for residual emptying of the hopper.
Covers selecting, entering, deleting, and scrolling through tractor data.
Provides steps for entering tractor-specific information like name and pulses.
Details settings for signal tones, alarms, task numbers, and tramlines.
Explains settings for quantity increment and part width sections.
Guides on checking lateral distribution using a mobile test rig.
Covers settings for baud rate, contrast, and brightness of the terminal.
Explains how to save, recall, and manage operating data.
Lists the types of data recorded by the system, like worked area and time.
Notes that spread rate and calibration can be adjusted within this menu.
Explains how to activate, delete, and scroll through operating data overviews.
Details how to set up the ASD interface for data transmission.
Covers hopper capacity display and refilling operations.
Details selecting the type of calibration, offline or online.
Displays refilled quantity, total quantity, and workable area.
Explains why the "Pulses per 100 m" value is needed for accurate operation.
Guides on how to perform a calibration run to determine the pulses per 100m.
Explains the role of the calibration factor in regulating the system.
Advises when and why to redetermine the calibration factor.
Provides specific instructions for slug pellets and fine seeds spread rate checks.
Outlines methods for spread rate checks while the machine is stationary or in motion.
Lists conditions for determining the calibration factor with the fertiliser chute.
Step-by-step guide for performing a spread rate check using the fertiliser chute.
Step-by-step guide for performing a spread rate check using a side calibration device.
Explains how online calibration works and when it can be started.
Details the conditions required for online calibration to function correctly.
Step-by-step guide for performing offline calibration.
Advises on performing additional calibrations for optimization.
Provides an overview of the information displayed in the Work menu.
Explains special displays for slug pellets and the distance counter.
Illustrates shutter positions for open and closed states.
Shows how part width sections are switched or pre-selected.
Depicts different spreading methods like normal, ditch, boundary, and border spreading.
Explains buttons for increasing/decreasing spread rate and setting it to 100%.
Details buttons for opening/closing shutters and controlling part width sections.
Describes selection of boundary spreading methods and width adjustment.
Explains the function of the Cancel/Back button.
Covers switching on, data entry, and calibration before starting work.
Guides on opening/closing shutters at switch-on and switch-off points.
Details closing shutters and switching off the system after operation.
Steps for preparing the system for slug pellets/fine seeds.
Notes on driving at constant speed when speed-proportional control is off.
Instructions for setting simulated speed to zero after use.
Explains how to switch part width sections on/off and pre-select them.
Illustrates how part width sections are displayed based on their status.
Provides a practical example of switching part width sections when entering a wedge.
Details how to adjust the spread rate for both shutters or individual shutters.
Mentions quick access for the Empty hopper function in extended settings.
Guides on how to open the Setup menu and enter the password.
Lists initial setup options like configuring the scale and calibrating the shutter.
Lists further setup options including low level sensor and spread rate check methods.
Covers scale on/off, calibration, adjustment, and parameter settings.
Step-by-step guide for calibrating the scale, including taring and filling.
Explains how to adjust the scale if filled and displayed quantities do not match.
Details the process for calibrating individual shutters on the left and right sides.
Step-by-step guide for performing shutter calibration, including motor disengagement and pin marking.
Explains how to restore the implement to its original production status.
Describes alarms, their causes, and acoustic signals.
Lists warnings, their causes, and acoustic signals for implement issues.
Provides a list of error numbers and their corresponding notification messages.
Shows a diagram illustrating the implement connection points.
Provides a caution regarding cleaning the setting motor with a high-pressure cleaner.
Advises on storing the on-board computer in a dry place.
| Brand | Amazone |
|---|---|
| Model | AmaSpread+ |
| Category | Controller |
| Language | English |