Commissioning
28 Edition 03.19 qTOWER
3
/ qTOWER
3
G
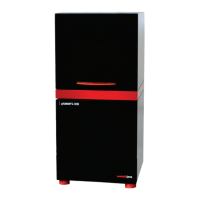
4. Place the device on its side. Check the
set operating voltage.
5. Use the voltage selection switch (Fig. 7
S. 26) to adjust the operating voltage to
the mains voltage.
Adjust the switch using a screwdriver or
a coin so that the arrow points in the di-
rection of the mains voltage available on
site.
6. Connect the USB-cable to the USB interface of the qTOWER³ (8 in Fig. 5 p. 25)
and to the PC.
7. Connect the mains connection to the qTOWER³. Plug the plug into the mains
socket.
8. Switch on the PC. Install qPCRsoft on the PC. Pay Attention to the information in
the software manual.
Note:
The qTOWER³ is only supported from qPCRsoft program version 3.2.
9. Switch on the qTOWER³ with the mains switch.
During first startup the qTOWER³ will be detected as a USB device. After suc-
cessful automatic driver installation the qTOWER
3
is ready for operation. If the
drivers are not installed automatically, you can complete the installation via the
Windows routine.
The drivers are on the installation CD or on the USB memory stick.
10. Start the qPCRsoft program.
11. Open the lid. To do so, press in the red handle on the front until the lock opens
with a click. Fold back the upper part of the device.
12. Remove the red transport lock and put it aside for later transports.
13. If you installed color modules, specify them in the qPCRsoft software (see section
"Installing color modules" p. 34).
The qTOWER³ is ready for operation.
Its operation is software-controlled using qPCRsoft. The settings for the measuring or
temperature program can be found in the software manual.