XD-502 Digital Console
Apex Instruments, Inc.
22
3.2.6 Sample train leak check procedure
2
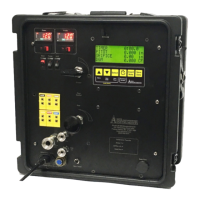
Fig. 6 System Leak Check
♦
1
TIMER: 0:00:00
LPM: .01
TIMER: 0:00:00
LPM: .01
TIMER: 0:00:00
LPM: .01
3
4
TIMER: 0:00:00
TIMER: 0:00:00
INC
TIMER: 0:00:00
LPM: .01
TIMER: 0:00:00
LPM: .01
TIMER: 0:00:00
LPM: .01
5
6
Navigate to the Leak Test function by pressing the
Insert Note button and selecting Leak Test or
perform the leak test from the main screen.
A leak check before the sampling run is
recommended, but not required. The leak check
procedure includes the following steps:
1. Close the coarse valve by rotating the handle
1/4 turn right (clockwise) until it is horizontal or
the arrow is pointing to “3:00.” Decrease the fine
tune knob by rotating all the way to the left
(counterclockwise).
2. Plug the probe inlet or nozzle tip using a clean
finger or a clean cap.
3. Turn the pump on using the switch in the
upper-left corner of the console and open the
coarse valve fully by turning to the left (counter-
clockwise until it is pointing straight up.
4. Adjust the fine valve by rotating it clockwise to
pull a vacuum of at least 10 inches Hg (250 mm
Hg), which can be observed by the vacuum value
on the LCD screen.
a. If this vacuum level is overshot, either
complete the leak check at this value or
slowly release the cap from the probe or
nozzle and close the coarse valve.
b. Adjust the fine valve by rotating it
counter-clockwise and then repeat the
leak check process.
5. Observe the leak rate as indicated by the DGM
volume on the LCD screen for one minute and
ensure that the volume is not increasing during
this time. A leakage rate in excess of 2 percent of
the target average sample rate is not acceptable
(e.g. 0.02 L/min for a 1.00 L/min target sample
rate).
The operator can use the timer to track and
quantify leak rates. The timer can be started or
stopped by pressing the Start/Stop button once. If
the timer needs to be reset, the Zero Timer button
(Select) can be pressed and held for 3 seconds.
6. Press the Save Data button to save and exit the leak test menu. The DGM reading can remain at
the current value or can be zeroed before the run by holding the Down, or Zero DGM button, on the
membrane switch pad for 3 seconds.
Slowly release the probe inlet plug before closing the coarse valve.
NOTICE