Chapter 2: Hardware Setup
2-16
4. Push the storage device and drive tray assembly all the way into the the drive bay until
the tray lever and spring lock clicks and secures the drive tray in place.
5. Repeat steps 1 to 4 to install additional 2.5” storage devices.
To install 2.5-inch storage devices into storage bays 3, 4, 5, and 6:
1. Remove the drive tray.
Refer to the
Installing a 3.5-inch SATA/SAS storage device
section for the steps on
removing the drive tray.
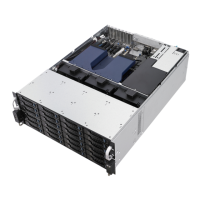
2. Prepare the 2.5-inch storage device and
the bundled set of screws.
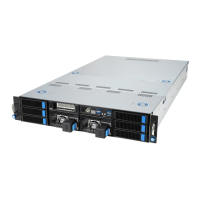
3. Place the 2.5-inch storage device into
the tray, then secure it with four screws.
The tool-less notch may interfere when
trying to align the screw holes. Press
the storage device against the notch if
you are experiencing issues trying to
align the screw holes.
4. Insert the tool-less 2.5-inch tray into the
device tray until it clicks in place.
5. Push the storage device and drive tray assembly all the way into the the drive bay until
the tray lever and spring lock clicks and secures the drive tray in place.
6. Repeat steps 1 to 5 to install additional 2.5” storage devices.