Creating Boldface Text
Boldface text is created on a line-by-line basis.
To create a boldface line of text:
Step 1.
Step 2.
Place your cursor anywhere in the line of text.
Press
FONT SIZE.
Step 3.
Step 4.
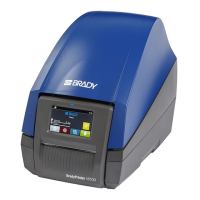
Press the softkey beneath
BOLD.
Press
ENTER.
Step 5.
Step 1.
Press the Bold softkey to toggle on and off on a line-by-line basis. When Bold is toggled
to ON, the bold formatting stays on until OFF is selected.
Auto Sizing Text
The auto size feature works on a whole label/all zones basis, not line-by-line. As text and/or
characters are entered, if they do not fit, the printer calculates a new size, allowing the largest font
size required to fit on the current line.
To auto size text and/or characters:
Press
FONT SIZE.
Press the softkey beneath
AUTO.
Step 2.
Step 3.
Press
ENTER.
Press the Auto softkey to toggle auto sizing on and off. When
AUTO is toggled to ON, the Auto Size feature stays on until OFF
is selected; however, you can still manually alter the font size of
individual lines while the Auto Size feature is ON.
Note: When rotation is altered, Auto Sizing adjusts accordingly; if rotation won’t allow
smallest font to fit, the error message “Cannot Fit” appears. Also, if rotation will cause
cropping of any text lines, the same “Cannot Fit” message appears, and no rotation will
occur.
User Manual 17