Assembly preparation - Long shield ILS
Before assembling the hardware, check for correct
fit of the coupling module; see "Check the coupling
module" on page17
1. If a handle set is already existent in the door,
dismantle it. An existing Euro profile cylinder having
appropriate length, can continue to be used with the
Long shield ILS - Option S.
If the door does not have a Euro profile cylinder yet,
it is advisable to assemble it before assembling the
long shield ILS Option S.
You can now start with the assembly.
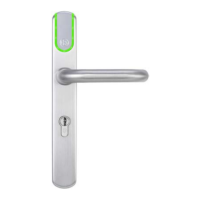
Assembly on the outside of the door
1. Push one of the FIXING SCREWS WITHOUT WIRING SLIT in the
lower screw placement slot of OUTER FITTING.
The fixing rings on the head of the screws serve to
fix the screws in the position that matches the
existing holes.
2. Optional: If a hole already exists at the appropriate
location in the door, you may push the third fixing
screw without wiring slit in the top most screw hole.
3. Hold the CABLES upwards and slide the FIXING SCREW WITH
WIRING SLIT in the middle screw placement slot of the
OUTSIDE FITTING.
Ensure that the cable slit of the fixing screws faces
upwards.
Ensure that the cables run through the recess in
the screw head.
Page 36 of 141 Long shield ILS
4.6 Assembly Option S (for Short shield holes)
Overview: Master media usage
Help & troubleshooting Technical data
Maintenance & disposal
Operation Administration
Assembly
Basics