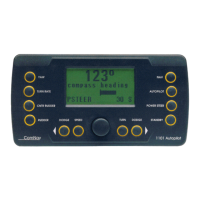
ComNav 1101 Autopilot
4 - 2 INSTALLATION
Control Head
The 1101 Control Head is normally mounted in the vessel’s
wheelhouse. It can also be mounted in more exposed locations,
such as on a flying bridge. Although the control head is waterproof, it
should not be submerged, nor should it be exposed to prolonged
direct sunlight. The control head comes with a 7.7m (25’) cable with
plug.
Surface Mounting
1. Ensure that the location you choose for the 1101 Control Head
has a behind-the-panel clearance of at least 51mm (2 inches) to
allow for the cabling.
2. Place the Angle Mounting Bracket face down on to the panel
surface where the Control Head will be mounted. Use the
bracket as a template to mark the location of the two outer
holes and the centre of the large slot onto the panel surface.
3. Drill out the panel using the two smaller holes to a diameter of
5.5mm (7/32"). Drill a 19 mm (3/4") hole where the center of
the large slot is marked to accommodate the 1101 Control
Head cable.
4. Feed the connector end of the Control Head cable through the
large hole in the panel.
5. Ensure that the mounting screws supplied with the Control
Head are threaded all the way into the brass inserts on the rear
of the Control Head. Line up the mounting screws with the
corresponding holes drilled into the panel, and settle the
Control Head so that it lies flush on the surface of the panel.
6. Secure the Control Head with the washers, lockwashers, and
hexnuts provided.
7. Route the Control Head cable to the SPU.
Figure 4—Flush Mount Diagram