System Installation and Configuration
96-30051-001 Rev. D3 DDN SFA12K (SFA OS 2.3.1) Hardware Installation & Configuration Guide | 11
5. Disk Module Installation
The disk modules are shipped separately from the disk enclosures.
CAUTION !
Ensure that the disk modules are at room temperature before
installation. It is recommended that the disks are allowed at least two
hours to acclimate to room temperature prior to installation.
For E-platforms and pre-configured systems, each disk module has been pre-labeled with a
slot number. Refer to Appendix C for information on proper disk placement.
For block-storage configurations:
• Create a more balanced load by evenly distributing the disk modules among the disk
enclosures
• Always fill the rows from front to back (also see Section 5.1 for blank module
requirements)
• Place disks with similar rotational speed in the same row
• If a mixture of disk technologies will be populated into one enclosure, for optimal
cooling, the best loading order from front to back will be:
❖ 10,000 RPM disks, 7,200 RPM disks, then SSD
❖ 3.5" HDD, then 2.5" HDD or smaller
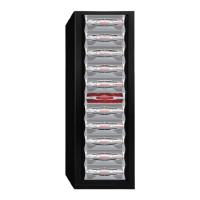
Figure 1 and Figure 2 illustrate the layout of disks in the SS7000 and SS8460 enclosures
respectively.
When handling the disk modules and components, avoid contact with
backplane components and module connectors. Electrostatic discharge
can damage the circuit boards.
Warning
!
Figure 1. SS7000 Disk Module Layout
2
3
4
5
13
14
15
16
17
25
26
27
28
29
37
38
39
40
41
49
50
51
52
53
6 18304254
7
8
9
10
11
12
43
44
45
46
47
48
19
20
21
22
23
24
31
32
33
34
35
36
55
56
57
58
59
60
1
Front
of
Chassis