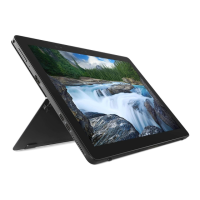
b Pull and disconnect the display cable on the system board [2].
9 Lift the display assembly from the tablet.
Installing the display assembly
1 Place the display panel on a plane surface.
2 Connect the display cable to the connector on the system board
3 Connect the battery cable to the connector on the system board.
4 Install the display panel on the tablet and press the edges until they snap in.
5 Flip the tablet and open the kickstand.
6 Replace the M1.6 x 3.0 screws to secure the tablet to the display panel.
7 Install the:
a uSIM/micro SD card
8 Follow the procedure in After working inside your tablet.
PCIe Solid State Drive (SSD)
Removing the SSD module
1 Follow the procedure in Before working inside your tablet.
2 Remove the:
a uSIM/microSD card
NOTE
: uSIM card slot is available only on tablets shipping with WWAN module.
14 Removing and installing components
 Loading...