Installing Drive-Panel Inserts in the Desktop Computer Drive Panel
1. Place the drive-panel insert tab into the drive-panel slot.
2. Pinch the drive-panel insert release tabs and press the drive panel insert into place.
3. Ensure that the drive-panel insert is correctly seated in the drive panel.
Switching Drive Orientations
1. If installed, remove the floppy drive by following the steps in Removing a Floppy Drive or Media Card Reader (Tower Computer), and reinstall it by
following the steps in Installing a Floppy Drive or Media Card Reader (Desktop Computer).
2. If installed, remove optical drives by following the steps in Removing a CD/DVD Drive (Tower Computer), and reinstall them by following the steps in
Installing a CD/DVD Drive (Desktop Computer).
Drive Panel
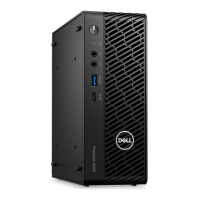
Removing the Drive Panel (Tower Computer)
1. Slide the sliding-plate lever to the right, pivot the drive panel outward, and lift to remove the panel.