Getting Started Connections Setup Playback Remote Control Information Troubleshooting
ENGLISH
Multi-Zone Operations
Turning the Power On and Off
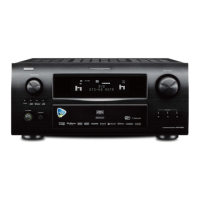
GOperation on the main unitH
Press <ZONE2 ON/OFF>, <ZONE3 ON/OFF> or <ZONE4 ON/OFF> for the zone
to be operated.
When the power turns on, the multi-zone indicator lights on the
display.
GOperation on the remote control unitH
In the zone mode you want to operate, press [ON] or [OFF].
Selecting the Input Source
GOperation on the main unitH
q Press <ZONE2/3/4 / REC SELECT> and select the zone to be adjusted.
w Turn <SOURCE SELECT>.
GOperation on the remote control unitH
In the zone mode you want to operate, press [SOURCE SELECT].
Adjusting the Volume
GOperation on the main unitH
q Press <ZONE2/3/4 / REC SELECT> and select the zone to be adjusted.
w Turn <VOLUME> to adjust.
GOperation on the remote control unitH
In the zone mode whose volume you want to adjust, press [VOLUME].
– – –
–70dB
~
–40dB
~
+18dB[Variable range]
• The volume can be adjusted when GUI menu “Manual Setup”
– “Zone Setup” – “(select the zone)” – “Volume Level” is set to
“Variable”. The volume can be increased up to the value set at
GUI menu “Manual Setup” – “Zone Setup” – “(select the zone)”
– “Volume Limit” (vpage 35).
• The volume for ZONE2 and ZONE3 can be adjusted with the remote
control unit.
Turning off the Sound Temporarily
In the zone mode for which you want to mute the sound, press
[MUTE].
The sound is reduced to the level set at GUI menu “Manual Setup”
– “Zone Setup” – “(select the zone)” – “Mute Level” (vpage 35).
To cancel, either adjust the volume or press [MUTE] again.
The setting is canceled when the zone’s power is turned off.
• The source selected for ZONE2 is also output from the recording
output connectors.
• For ZONE2, the “Zone Setup” can be made while watching the on-
screen display. Also, when ZONE3 is operated, the on-screen display
appears on the ZONE2 monitor, so operation can be performed
watching this on-screen display.
NOTE
• When connected to the component video output connectors, the
on-screen display is not displayed.
• When the input source to which the digital input connectors
(OPTICAL/COAXIAL) are assigned is selected in ZONE2 or ZONE3,
playback is only possible if the digital signal being input is in PCM
(2-channel) format.
• Digital audio signals input from the DENON LINK or HDMI connectors
cannot be played in multi-zone.
• In ZONE4, it is not possible to select “DAB”, or sources with no
digital input signals (“TUNER”, “PHONO”, “iPod”, etc.). Network audio
signals (Internet radio, music server, USB) can be played as long as
they are not copyright-protected.
• When certain digital signals are being input, noise may be output
from the ZONE2 and ZONE3 audio output connectors.
• When “DENON LINK” is assigned at the GUI menu “Assign” setting,
the PCM signals, network audio signals (Internet radio, music server
and USB) and DAB signals input from the digital input connectors
cannot be output from the ZONE2 and ZONE3 audio output
connectors.
 Loading...