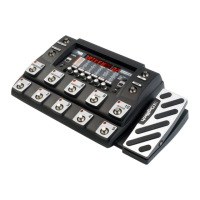
3. At this point, press the <2> button and then turn the <Data> wheel to select the bank to be named. Once the Bank has been selected,
press the <4> button to rename the bank. The display now appears like this:
4. To exit the naming bank assignment, press the <Utility> button.
5. Press the <1> button and then turn the <Data> wheel to change the character to the one you want in the selected position.
6. When the correct character is displayed in that position, use the <Next Page> or <Previous Page> buttons to scroll the cursor to the
next character you want to change.
7. Press the <2> button and then turn the <Data> wheel to select numbers. Press the <3> button and then turn the <Data> wheel to
insert spaces and press the <4> button and then turn the <Data> wheel to copy and paste characters.
8. To copy a character, position the cursor under the character you want to copy (using the <Next Page> button), then turn the <4>
knob clockwise. To paste the copied character, position the cursor where you want to paste the character, then turn the <4> button
counter-clockwise.
9. To abort the procedure, push either the <Program> button to take you to Program Mode, the <Edit> button to take you to FX Edit
Mode, or the <Utility> button to take you to Utility mode, depending upon which mode you want to enter.
 Loading...