Do you have a question about the EFI Vutek QS2000 and is the answer not in the manual?
EFI provides resources like documentation and training for printer use.
EFI's website for technical support, manuals, and software downloads.
Contact EFI customer support for questions about printers or products.
Hazards of UV light and UV-curable ink, and precautions for eye and skin protection.
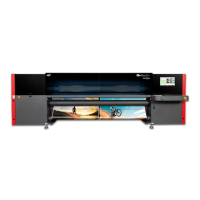
Identifies key components of the printer's front view.
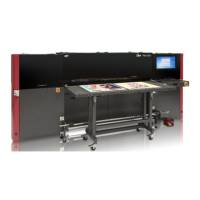
Identifies key components of the printer's rear view.
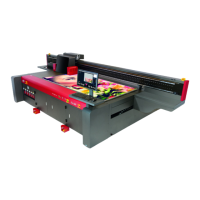
Identifies key internal components of the printer.
Describes the functions of the printer's rear control panel buttons.
Details on entering and managing security passwords for printer access.
Information on using an ink override password for printing during ink system issues.
Step-by-step instructions for powering on the printer and starting the VUI.
Guides on daily maintenance tasks to ensure optimal printer performance.
Procedure for purging all ink colors to remove head conditioner.
Instructions for wiping jet pack faces with maintenance fluid.
Procedure for printing and checking a jet test pattern.
Immediate actions to take when stopping the printer in an emergency.
Steps to safely restart the printer after an emergency stop event.
How to use the media conveyor belt for media movement.
Moving the media conveyor belt a precise distance.
Continuously moving the media conveyor belt into the printer.
Continuously moving the media conveyor belt out of the printer.
Managing vacuum to hold media on the conveyor belt.
Setting the vacuum percentage for different media widths.
Information on unwinder and rewinder attachments for media handling.
Describes the controls for the unwinder and rewinder attachments.
Steps for loading roll media onto the unwinder and rewinder.
How media hold down rollers keep media flat during printing.
Controls input registration and image placement against the fence.
Procedure for adjusting media placement tabs on the fence.
Instructions for feeding individual sheets of media into the printer.
How to install input and output tables on the printer.
Steps for using the input table to feed sheet media.
Guidance on preparing image files as .RTL files for printing.
Methods for transferring .RTL files from RIP to the printer.
Details on transferring files over a network to the printer.
Steps for transferring files using CD or DVD media.
Setting print parameters like duplication, mode, and speed.
Selecting or creating media profiles in the Media Database.
Positioning images and creating .RTL files for simple layouts.
Sequencing images and print settings for batch printing jobs.
Printing beyond media edges and potential ink buildup.
Printing mirrored images on the back of media for backlit displays.
Procedure to adjust the carriage height or head gap.
Handling, maintenance, and warranty information for jet packs.
Instructions for cleaning jet packs to prevent ink buildup and damage.
Understanding test patterns to verify jet pack nozzle operation.
How job settings affect jet test patterns and default behavior.
Steps to print and analyze a jet test pattern.
Initial procedure to recover missing nozzles detected in a test pattern.
Detailed steps to clear nozzles when quick purge fails.
Advanced procedure for recovering nozzles suspected due to media contact.
Testing horizontal print alignment by printing and analyzing test patterns.
Adjusting bidirectional settings based on test pattern results.
Adjusting vertical print alignment based on test pattern analysis.
Adjusting vertical print alignment based on test pattern analysis.
Procedure to find the optimal step setting for print quality.
Information on how to use and adjust UV curing lamps.
Configuring shutter modes for single, post, or double cure.
Setting lamp power levels (high, medium, low, minimum) for curing.
Guidelines for storing UV-curable ink safely and effectively.
Procedure for safely replacing old ink boxes with new ones.
List of materials required for performing maintenance procedures.
Procedure to prevent inadvertent power restoration during maintenance.
Bi-hourly maintenance tasks including wiping jet pack faces.
Tasks performed every eight hours, including rail cleaning and ink level checks.
Detailed steps for cleaning and lubricating printer carriage rails.
Daily maintenance tasks to keep the printer performing optimally.
Maintenance tasks to be performed weekly.
General considerations and precautions for cleaning printer components.
Procedure for inspecting and replacing air filters in UV lamp housings.
Steps to clean and lubricate purge wiper rails to prevent stalling.
How to clean the material detector lens with isopropyl alcohol.
Procedure for emptying or replacing the printer's waste tank.
Monthly cleaning of static eliminator bars for optimal efficiency.
Cleaning the umbilical assembly and shelf as part of monthly maintenance.
Cleaning dust from electrical compartments and vent filters.
Periodic cleaning of lamp housing lenses and shutters for adequate curing.
Replacing in-line ink filters in the ink compartment every six months.
Applying high-temperature grease to lamp shutter mechanisms.
Procedure for replacing the printer's purge ink trap.
Replacing carriage final ink filters on a yearly basis.
Guidelines for storing ink and media materials in a controlled environment.
Best practices for cleaning and handling various media types.
Requirements for rigid media flatness to prevent head strikes.
Distinguishing between flexible, rigid, and transitional media types.