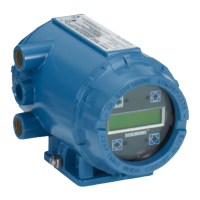
1. Once all wiring connections are secured and verified, apply power to the
transmitter.
When the transmitter is powered up for the first time, Quick Start screens appear.
The first quick start screen has two control boxes, one for language and the other for
temperature units.
a. The cursor, shown by dark blue backlighting, is on the language control box. To
change the language, press the ENTER/MENU key. A list of available languages,
shown two at a time, appears. Using the Up and Down keys, scroll (see
Section 6.2) to display the choices. Press ENTER/MENU to select the desired
language. Press Down to move the cursor to the temperature control box. To
change units, press ENTER/MENU and scroll to either °F or °C. Press ENTER/MENU
to store the selection.
b. To move to the next screen, use the navigation keys to move the cursor to NEXT
and press ENTER/MENU.
2. The next screen lists navigation rules. Press ENTER/MENU for the next screen.
3. The next step is to configure sensor 1. Sensor 1 is the total chlorine sensor. The
screen has two control boxes.
a. For measurement, choose Total chlorine.
b. Choose the desired units, mg/L or ppm.
4. Move the cursor to NEXT and press ENTER/MENU.
The display changes to show some basic keypad operation guidelines.
5. Press ENTER/MENU to show the main display.
The outputs, alarms, display configuration, and data logging are all assigned to
default values. The default value for data logging is disabled.
6. To change the settings, refer to Section 6.5, Chapter 7, and Chapter 9.
Wiring
Manual 23
 Loading...