Do you have a question about the Emerson Rosemount TCL and is the answer not in the manual?
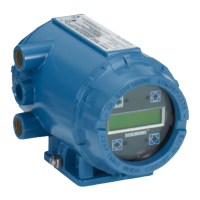
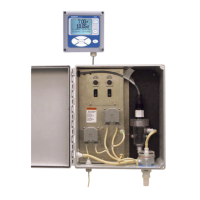
Details the capabilities and components of the Rosemount TCL system, including the sensor and transmitter.
Lists physical, electrical, and environmental parameters for the sample conditioning system and transmitter.
Provides part numbers and details for system components, reagents, and optional accessories.
Steps for checking contents and condition upon receiving the instrument.
General guidelines and precautions for installing the transmitter and sample conditioning system.
Instructions for mounting the transmitter unit itself, referencing figures for panel or wall mounting.
Steps for mounting the main sample conditioning enclosure unit.
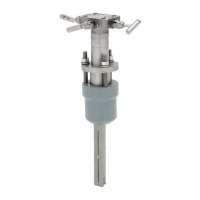
Procedures for connecting and installing the total chlorine sensor into the system.
Details on preparing the enclosure's cable entry points for electrical connections.
Steps for connecting the power supply to the sample conditioning unit.
Guides on connecting various cables and wires within the transmitter enclosure.
Procedures for connecting the sensor wiring to the transmitter.
Steps for initial power-up and the Quick Start configuration process.
Instructions for mixing the potassium iodide reagent solution for the system.
Procedure for calibrating the sensor to a zero point using deionized water.
How to adjust and ensure proper sample flow through the system.
Steps to initiate system operation and perform sensor calibration.
Overview of the transmitter's six-line display and its customization options.
Explanation of the membrane keypad functions for operating the transmitter.
A step-by-step guide to navigating and using the transmitter's programming menus.
Information on setting and using security codes to protect configuration settings.
How to place the sensor in a 'hold' state to prevent alarms during maintenance.
Instructions for customizing the parameters shown on the main display screen.
Introduction to the programming settings available on the transmitter.
Lists the factory default configuration values for outputs, alarms, and measurement.
Detailed procedures for setting up, scaling, and testing the analog current outputs.
How to set up and manage alarm relays, including logic and deadband.
Steps to configure the transmitter for total chlorine measurement and set display resolution.
Options for setting temperature units and applying temperature correction.
Guide to establishing and managing security code levels for transmitter access.
Procedures for restoring factory default settings or specific calibrations.
Overview of the calibration menu options available on the transmitter.
Procedure for calibrating the temperature sensor to ensure accurate readings.
Steps to calibrate the sensor for total chlorine measurement using zero and span standards.
Detailed steps for performing the zero calibration of the chlorine sensor.
Detailed steps for performing the full-scale calibration of the chlorine sensor.
Instructions for field trimming and calibrating the transmitter's analog current outputs.
Routine cleaning and maintenance procedures for the transmitter unit.
Maintenance tasks specifically for the total chlorine sensor, including cleaning and replacement.
Maintenance related to the sample conditioning system components like tubing and pumps.
Instructions for replacing the peristaltic pump tubing.
Procedures for replacing the air pump assembly.
Steps to replace the diaphragm and check valves within the air pump.
Introduction to the transmitter's self-monitoring and diagnostic features.
Guide on accessing and interpreting diagnostic messages for troubleshooting.
Explains fault messages and their causes, covering hardware and software issues.
Addresses warning messages and potential issues like sensor calibration or temperature errors.
Provides solutions for common problems without explicit error notifications.
Method for simulating sensor input to test transmitter performance.
Procedure to simulate temperature inputs for testing the temperature measurement function.
| Category | Measuring Instruments |
|---|---|
| Manufacturer | Emerson |
| Operating Temperature | 0 to 50°C (32 to 122°F) |
| Measurement Range | 0 to 20 ppm |
| Output Signal | 4-20 mA |
| Power Supply | 24 VDC |
| Enclosure Rating | IP65 |
| Material | Stainless steel |
| Technology | Amperometric Sensor |