Liquistation CSF34 Electrical connection
Endress+Hauser 37
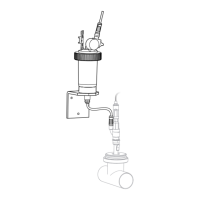
6.4.6 Bus termination
There are 2 ways to terminate the bus:
1. Internal termination (via DIP switch on module board)
44 DIP switch for internal termination
‣
Using a suitable tool such as a tweezer, move all four DIP switches to the "ON" position.
The internal termination is used.
390 W
220 W
390 W
VP
DGND
B/B' A/A'
45 Structure of internal termination
2. External termination
Leave the DIP switches on the module board in the "OFF" position (factory setting).
‣
Connect the external termination to terminals 81 and 82 on the front of module
485DP or 485MB for 5-V power supply.
The external termination is used.
6.5 Connecting additional inputs, outputs or relays
L
WARNING
Module not covered
No shock protection. Danger of electric shock!
‣
Change or extend the hardware for the non-hazardous area: always fill the slots from
top to bottom. Do not leave any gaps.
‣
If all of the slots are not occupied in the case of devices for the non-hazardous area:
always insert a dummy cover or end cover in the slot below the last module. This
ensures that the unit is shock-protected.
‣
Always ensure shock protection is guaranteed particularly in the case of relay modules
(2R, 4R, AOR).
‣
Hardware for the hazardous area may not be modified. Only the Manufacturer's
Service Team may convert a certified device to another certified device version. This
includes all modules of the transmitter with an integrated 2DS Ex-i module, as well as
changes that concern non-intrinsically safe modules.
‣
If additional shields are required, connect them with PE centrally in the control cabinet
via terminal blocks supplied by the customer.

 Loading...