155
Torch
body
Electrode
Removal
Tool
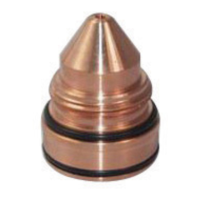
4. Unscrew nozzle retainer and pull nozzle straight out of torch body. Inspect insulator portion of the nozzle
retainer for cracks or chipping. Replace if damaged.
Inspect nozzle for:
melting or excessive current transfer •
gouges from internal arcing •
nicks or deep scratches on the O-ring seating surfaces •
O-ring cuts, nicks, or wear •
Remove hafnium particles (from the electrode) with steel wool•
Replace if any damage is found.
NOTE:
Discoloration of internal surfaces and small black starting marks are normal and do not eect cutting
peformance.
If the holder was tightened suciently, the electrode may unscrew without being attached to the electrode
holder. When installing the electrode, use only sucient force to adequately secure the electrode.
5. Remove electrode using electrode removal tool.
6. Disassemble electrode from electrode holder. Insert ats on the holder into a 5/16" wrench. Using the elec-
trode tool, rotate electrode counter-clockwise to remove. Replace electrode if center insert is pitted more
than 0.09" (3/32").
CAUTION
Incorrect assembly of the diuser in the shield will prevent the torch
from working properly. Diuser notches must be mounted away
from the shield as illustrated.
SECTION 5 MAINTENANCE
Electrode
Replace electrode if center insert is
pitted more than 0.09" (3/32")