Wireless TimeClock Configuration Guide 5
Install the Station
Receptacle spacers are provided to help align the station flush against the
wall in flush-mount applications. The spacers are not required when
installing the station into a surface-mount electrical box.
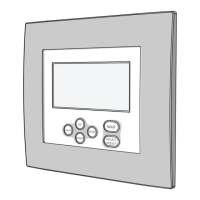
Faceplate hooks
Spacers
Spacers
1. Insert the station and the connected wiring in the electrical box.
2. Fold spacers as needed to achieve the thickness required to fill the gap
between the station, wall surface, and the electrical box.
3. Secure the station in place using the four screws provided. If using
spacers, insert the screws through the spacers.
4. Use a level to align the station square to the wall. Adjust spacers as
required so the faceplate fits flush against the wall.
5. Shape the internal whip antenna into a “J” or hockey stick with the
tip pointing up an away from the metal mounting bracket. Ensure the
tip of the antenna is not touching any metal.
Attach the Faceplate
The faceplate is secured to the station with
two magnets at the bottom.
1. Hook the top of the faceplate into the
tabs at the top of station’s metal plate.
2. Ensure the whip antenna is not pinched
and the tip is not touching any metal.
3. Close the bottom of the faceplate to
engage the magnets and secure it in
place.
Note: A two-gang locking cover can be installed to prevent tam-
pering. See Accessories.
 Loading...