F3D3 Series Service Manual Parts Replacement / Section 2.23
For Technical Support, Call 800-537-2653. Copyright 2012 Franke, Inc. All rights reserved.
2.23 Power Cord Replacement:
[See Section 1.5 for Part Number]
1) Unlock casters and pull out freezer to disconnect power
at outlet. [Pull plug.]
2) Use a medium Phillips screwdriver to remove the four
(two-left, two-right) front control panel mounting screws.
3) Pull panel cover/bezel up then out.
4) Locate the main Power-ON Switch mounted far-left on
the panel cover and remove the hot and neutral leads
from the power cord. Tip: Panel bezel can hang from the
remaining leads.
5) Locate main ground post through left round cutout in
back panel. [See Photos 2 & 3]
6) Remove the 10 mm [3/8”] nut and washer to power cord
power ground. NOTE: On F3D3S/P/SP Models, power
cord ground is the first-on (last off) of three grounds,
each secured to post with their own nut.
7) From rear of unit – use channel locks or pliers to loosen
power cord strain-relief nut that secures it to bottom of
condenser compartment.
8) From below condenser compartment bottom, pull power
cord out of flexible plastic harness tubing/chase.
9) From above the condenser compartment bottom,
continue pulling that cord out of grommet and free of
compartment bottom.
10) Remove any packaging from new Power Cord and uncoil
it as needed.
11) From wire terminal end of power cord, slide on strain
relief nut.
12) Push wire end of power cord down through grommet in
condenser compartment bottom, leaving 3 meters of
cord (with plug) extending beyond back of unit.
13) Tip: Fold over and tape the three end/attachment wires
to the insulated cord section. Insert wire end of power
cord up into right flexible plastic harness tubing. Feed in
cord until it end exits near front panel and power switch.
14) From unit front - remove tape from black, white and
green/yellow wire leads and pull out enough cord to
reach Power-ON Switch.
15) Attach black (120-volt) or brown/black (230-volt) lead to
terminal 1A and white (120-volt) or blue (230-volt) lead to
terminal 4B on Power-ON Switch.
16) Attach ground wire ring terminal to ground post using its
own washer and nut. Ensure connection is tight.
17) Reposition front control bezel and secure with four
Phillips screws removed earlier.
Continued…
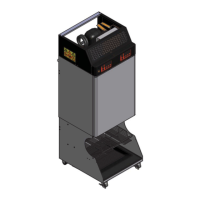
[Photo 1] F3D3S shown
Remove four front control panel
cover/bezel screws.
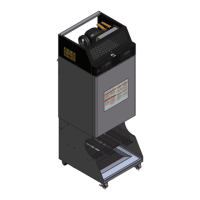
[Photo 2]
Remove black & white cord
leads from Power Switch.
[Photo 3]
Remove top ground connection
from main front ground post.
[Photo 4] – From rear of unit
Loosen and remove power cord
strain relief nut.