– 67 –
L.P. Conversion Instructions
The pressure regulators and the burner orifi ces
are set for natural gas operation. To use Liquid
Propane Gas, the regulator and burner orifi ces must
be converted. Conversion orifi ces and complete
instructions are packed with each model and are
located on the regulator bracket behind the storage
drawer. Remove the storage drawer to access these
parts and instructions.
On models equipped with the extra large right front
cooktop burner, a second bracket near the regulator
holds the LP 15K orifi ce extended spud, choke, and
set screw for LP conversion of that burner.
WARNING: The following adjustments must be
made before turning on the burner. Failure to do
so could result in serious injury. Be sure pressure
regulator has been converted as described in Step 1.
To adjust the range for use with L.P. gas, follow
these instructions:
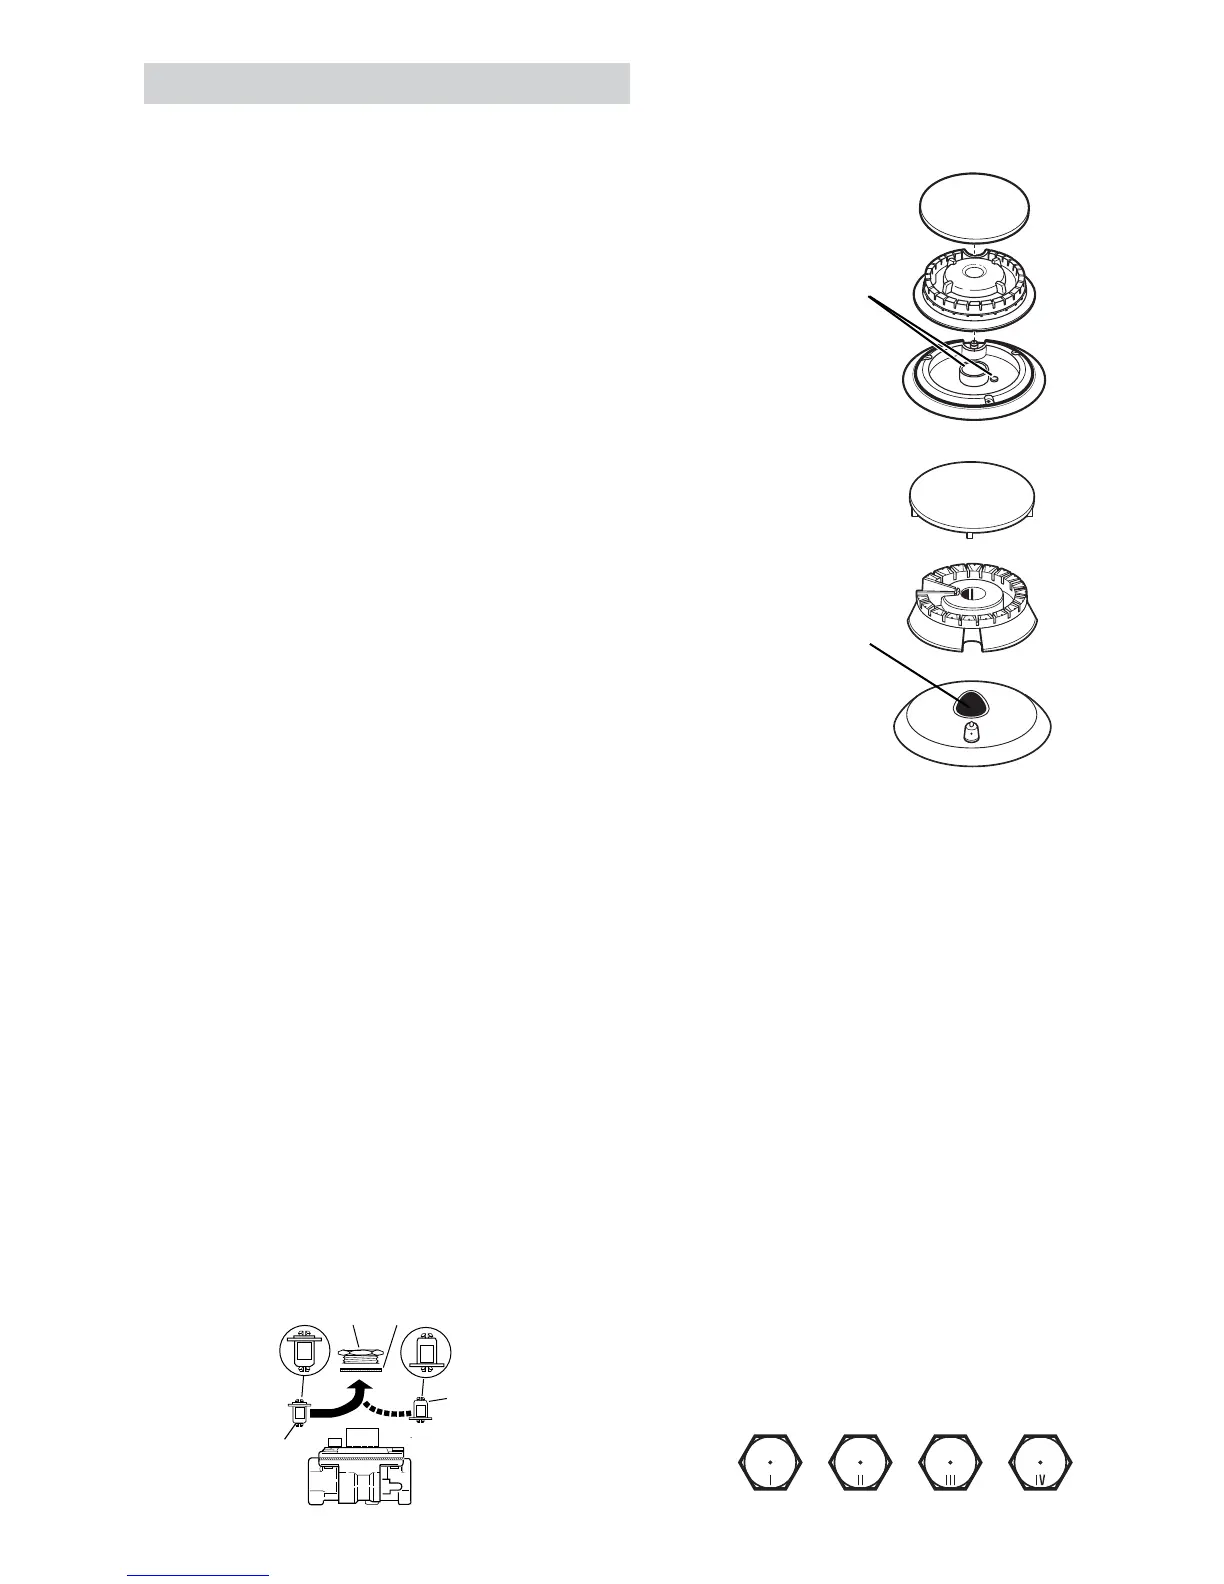
Adjusting the Pressure Regulator
Disconnect all electrical power, at the main 1.
circuit breaker or fuse box.
Shut off the gas supply to the range by closing 2.
the manual shut-off valve.
Remove the storage drawer.3.
Find the pressure regulator by reaching through 4.
the storage compartment and the opening at
the back of the range.
Unscrew the cap and carefully look at the spring 5.
retainer to locate the NAT or L.P. position.
Place your thumb against the fl at side of the 6.
spring retainer and press down to remove the
retainer.
Turn the spring retainer over so that L.P. is 7.
showing on the bottom.
Snap the retainer back into position and 8.
retighten the cap back onto the regulator.
AT.
SITION
L.P./PROPANE
POSITION
CAP
SPRI
RETAI
DOWN
FOR OFF
NAT
LP
LP
NAT
GASKET
PRESSURE REGULATOR
LP
NAT
NAT
LP
Cap
Gasket
Spring
Retainer
L.P./Propane
Position
Pressure Regulator
Nat.
Position
Adjusting the Cooktop Burners
Remove the top grates, burner caps and burner 1.
heads.
Using a 7-mm or 9/32-in. nut driver, remove 2.
the top burner orifi ces. These may be accessed
through the burner opening in the base.
IMPORTANT: Save these orifi ces for future
conversion back to natural gas.
Locate the L.P. orifi ces. The L.P. orifi ces for the 3.
cooktop burners are shipped on the regulator
bracket behind the storage drawer. Also, in the
same area, is a second bracket holding the L.P.
15K orifi ce extended spud, choke and set screw
for the front right Extra Large cooktop burner
on models so equipped). Remove the storage
drawer to locate.
Non-Convection Range
Note: For convection range proceed to step 8.
Each orifi ce will also show a series of engraved 4.
marks ( I, II, III or IV) located on the top. These
marks denote the precise location of each orifi ce
to the cooktop burner.
Cap
Head
Base
ORIFICE
SPUDS LOCATED
THRU THESE
OPENINGS
Base
ORIFICE
SPUD
LOCATED
THRU THIS
OPENING
Burner Cap
Burner Head
Front right burner
on some models
Front right burner (on
some models), front
left burner, back right
burner, and back left
burner
(Continued next page)
 Loading...