Do you have a question about the Henry Schein OneStepPlus and is the answer not in the manual?
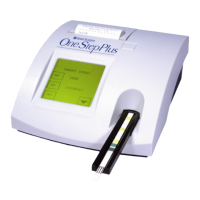
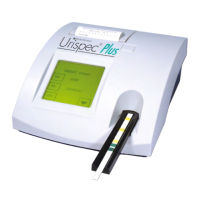
Details the instrument's components and operational principles.
Guides users on unpacking, connecting power, and preparing the instrument.
Explains how to navigate menus, perform measurements, and view results.
Covers displaying results, errors, and recalling data.
How to navigate, search, and filter stored measurement results.
Guidance on reviewing and performing quality control tests.
Adjusting strip parameters and protecting settings with a PIN.
Configuring printer, sound, autostart, language, and date/time.
Instructions on how to clean the instrument housing and strip holder.
How to reset the system and activate test stick LOT control.
How to reset settings and adjust instrument sensitivity.
Details about connecting the instrument via serial and USB ports.
Guidance on interpreting and clearing error messages.
Details on technical data, dimensions, weight, and operating conditions.
Guides users through unpacking, connecting power, and turning on the instrument.
Detailed steps on how to insert and use a test stick for analysis.
Explains how results are displayed on the screen and printed.
Details the instrument's function as a reflection photometer.
Describes the reflectometric analysis process using test sticks.
Explains how light intensity is used to calculate results.
How measurements are started and user inputs are made via the touch-screen.
Lists all items included in the instrument package.
Advises reading the manual carefully before first startup.
Identifies and explains the function of instrument parts shown in diagrams.
Guidance on where to place the instrument and environmental factors to consider.
Instructions on connecting the power adapter and plugging into a socket.
Step-by-step guide on how to load paper into the printer.
Final steps for loading the printer paper roll.
Instructions on how to install type AA batteries for portable operation.
Explains how to interact with the touch-screen for inputs.
Details the function of framed areas and pictograms on the screen.
How to use scroll arrows to select items from lists.
How to make selections using radio-button style options.
Visual representation of the instrument's menu hierarchy.
Explains the main sections like SN, ID, Memory, Check mode, and Settings.
Detailed instructions on how to perform a measurement with a test stick.
Precautions for blotting test sticks and safety warnings regarding infection.
Explains how results are displayed, including sequence number and patient ID.
Guidance on what to do if a "Measuring Error" message appears.
How to enter patient identification using the instrument's keypad or a PC keyboard.
Using a barcode reader to automatically input patient identification.
How to set a new starting number for measurements.
Explains access to Memory, Check mode, and Settings from the main menu.
How to enter the memory section from the main menu.
How to use arrows to scroll through stored measurement contents.
Options to print or send displayed memory contents.
How to set criteria for filtering measurement results.
How to select a specific day or date range for filtering.
How to select specific parameters to filter results by.
How to initiate the search after setting filter parameters.
Recommendations for when quality control inspections should be performed.
How to access and display previously recorded QC measurement results.
Steps for preparing and testing check urines as control samples.
What to do if QC results do not match expected values.
How to adjust parameters related to test strip types.
How to configure result units and the order of displayed parameters.
Information on the LOT-control feature for test strips.
How to enable PIN protection for instrument settings.
How to enable or disable acoustic confirmation for user inputs.
How to manage the autostart function and energy-saving options.
How to change the instrument's language and set the date/time.
How to set and format the date and time on the instrument.
How to enable or disable data transfer via interfaces.
How to add custom text to the printout header.
Instructions on how to clean the exterior of the instrument.
How to perform a factory reset of the instrument.
How to activate and manage test stick LOT control for expiry tracking.
How to enter the LOT code and the number of strips for LOT control.
What happens when expired test strips are detected and how to continue.
How to revert all sensitivity settings to their default values.
How to select parameters and adjust their sensitivity values.
How to increase or decrease threshold values for parameters.
Pinout and protocol details for the RS232 serial interface.
Information on the USB interface and data transmission protocol.
How to connect barcode scanners and keyboards via the PS/2 jack.
Lists common error messages, their causes, and recommended solutions.
Details on technical data, dimensions, weight, and operating conditions.
Information on directives and standards the instrument complies with.
| Brand | Henry Schein |
|---|---|
| Model | OneStepPlus |
| Category | Medical Equipment |
| Language | English |