I English
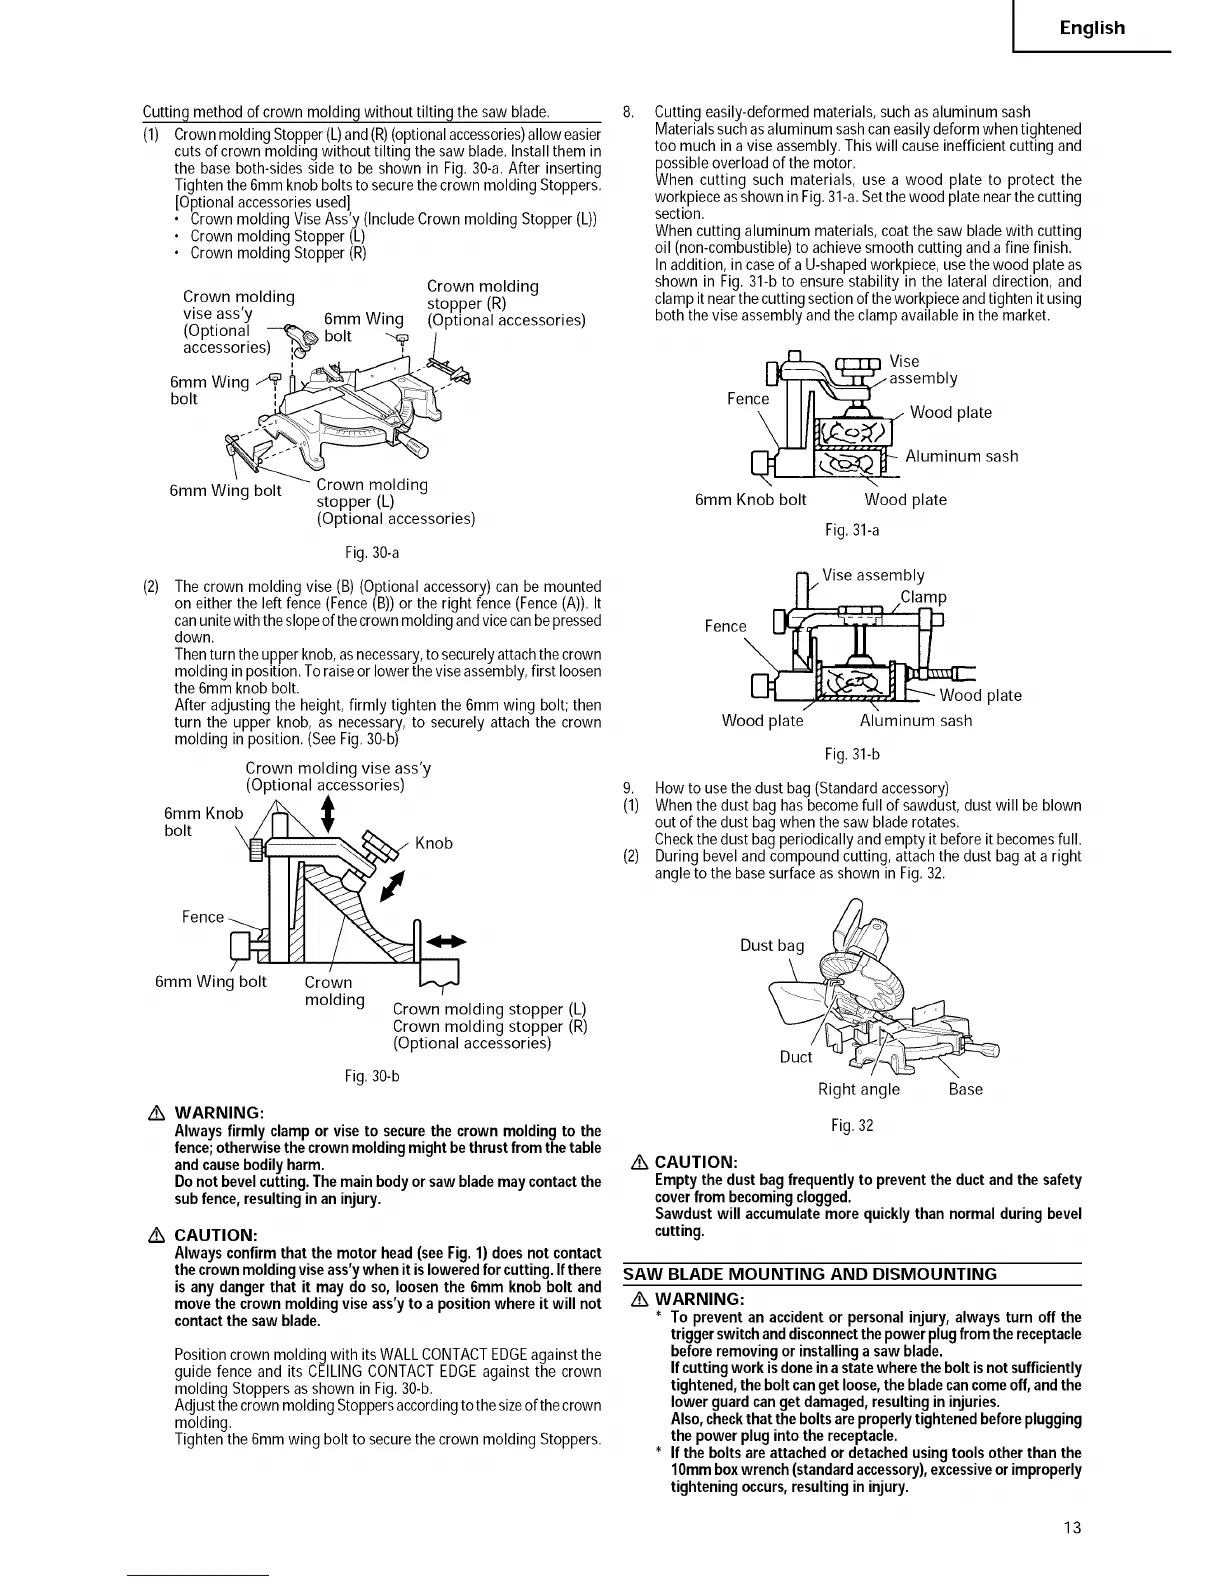
Cutting methodof crown molding without tilting the saw blade.
(1) Crownmolding Stopper(L)and(R)(optionalaccessories)alloweasier
cutsof crown molding without tilting the saw blade.Installthem in
the baseboth-sides sideto be shown in Fig. 30-a.After inserting
Tightenthe 6ramknob boltstosecurethe crown molding Stoppers.
[Optionalaccessoriesused]
• Crown molding ViseAss'y (IncludeCrown molding Stopper(L))
• Crown molding Stopper (L)
• Crown molding Stopper (R)
Crown molding
Crown molding stopper (R)
vise ass'y 6ram Wing (Optional accessories)
(Optional _ bolt _ i
accessories) [_ T I
6mm Wing _ __
bolt
m Wi° o,t :o2o X,o,di°
(Optional accessories)
(2)
Fig.30-a
Thecrown molding vise (B) (Optional accessory)can be mounted
on either the left fence (Fence(B))or the right fence (Fence(A)). It
canunitewith theslopeof thecrownmoldingandvicecanbepressed
down.
Thenturn theupperknob,as necessary,to securelyattachthe crown
molding in position.To raiseor lowertheviseassembly,first loosen
the 6ramknob bolt.
After adjusting the height,firmly tighten the 6mmwing bolt; then
turn the upper knob, as necessary,to securely attach the crown
molding in position. (SeeFig.30-b)
Crown molding vise ass'y
(Optional accessories)
6mm Knob
bolt \
Knob
6mm Wing bolt
Crown
molding
Crown molding stopper (L)
Crown molding stopper (R)
(Optional accessories)
Fig.30-b
Ak WARNING:
Always firmly clamp or vise to secure the crown molding to the
fence; otherwise the crown molding might be thrust from the table
and cause bodily harm.
Do not bevel cutting. The main body or saw blade may contact the
sub fence, resulting in an injury.
Ak CAUTION:
Always confirm that the motor head (see Fig. 1) does not contact
the crown molding vise ass'ywhen it islowered for cutting. If there
is any danger that it may do so, loosen the 6mm knob bolt and
move the crown molding vise ass'y to a position where it will not
contact the saw blade.
Positioncrown moldingwith its WALLCONTACTEDGEagainstthe
guide fence and its CEILINGCONTACTEDGEagainst the crown
molding Stoppersas shown in Fig. 30-b.
AdjustthecrownmoldingStoppersaccordingto thesizeof thecrown
molding.
Tightenthe 6ramwing bolt to securethe crown molding Stoppers.
Cutting easily-deformedmaterials, suchasaluminum sash
Materialssuchasaluminum sashcaneasilydeformwhentightened
too much in a viseassembly.Thiswill causeinefficientcutting and
possibleoverload of the motor.
When cutting such materials, use a wood plate to protect the
workpieceas shownin Fig.31-a.Setthe wood platenearthecutting
section.
Whencutting aluminum materials,coat the saw bladewith cutting
oil (non-combustible)to achievesmooth cutting and a fine finish.
Inaddition, in caseof a U-shapedworkpiece,usethewood plateas
shown in Fig. 31-bto ensure stability in the lateraldirection, and
clampit nearthe cuttingsectionof theworkpieceandtighten itusing
both the vise assemblyand the clamp available in the market.
_ Vise
IJi]-r-:_ assembly
Fence I II1
\ III!, ./'-N ,!" Wood plate
__ Aluminum sash
6mm Knob bolt Wood plate
Fig.31-a
i7/Vise assembly
I! Clamp
Fence_
L..rl /-";.."/Y...."_.11F'-'_ Wood
Wood plate Aluminum sash
plate
Fig.31-b
9. Howto usethe dust bag (Standardaccessory)
(1) Whenthe dust bag hasbecomefull of sawdust,dust will be blown
out of the dust bagwhen the saw bladerotates.
Checkthe dust bagperiodicallyand empty it beforeit becomesfull.
(2) During beveland compound cutting, attachthe dust bag at a right
angle to the basesurfaceas shown in Fig. 32.
Dust bag _,
Duct
Right angle
Base
Fig.32
Ak CAUTION:
Empty the dust bag frequently to prevent the duct and the safety
cover from becoming clogged.
Sawdust will accumulate more quickly than normal during bevel
cutting.
SAW BLADE MOUNTING AND DISMOUNTING
/k WARNING:
* To prevent an accident or personal injury, always turn off the
trigger switch and disconnect the power plug from the receptacle
before removing or installing a saw blade.
Ifcutting work is done ina state where the bolt is not sufficiently
tightened, the bolt can get loose,the blade can come off, and the
lower guard can get damaged, resulting in injuries.
Also, checkthat the bolts are properly tightened before plugging
the power plug into the receptacle.
* If the bolts are attached or detached using tools other than the
10mm box wrench (standard accessory),excessive or improperly
tightening occurs, resulting in injury.
13