IFP-75 Series Manual — P/N LS10147-001SK-E:E 4/6/2022 35
RA-100 Remote Annunciator Installation Control Panel Installation
4.7 RA-100 Remote Annunciator Installation
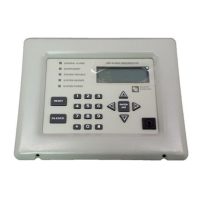
The optional model RA-100 Remote Annunciator, is shown in Figure 4.13. The RA-100 can be surface or flush mounted. Up to eight RA-
100 annunciators can be added to the IFP-75 system in any combination.
RA-100 installation involves the following steps:
1. Ensure power is off at the panel.
2. Mount the RA-100 in the desired location (see Section 4.7.1).
3. Connect the RA-100 to the panel (see Section 4.6.3).
4. Use the DIP switches on the back of the RA-100 to assign an ID#. (See Section Section 4.13.1.)
5. The new RA-100 module must be added to the system through programming. JumpStart
Auto-Programming will add the module
automatically (see Section 7.1). You can also add it manually (see Section 8.2.2). Select a name, if desired.
4.7.1 Mounting the RA-100
This section of the manual describes mounting the remote annunciator. The annunciator can be flush- or surface-mounted.
SLC IN
+
_
SLC OUT SLC PROG
+
_
+
_
SBUS
A
B
+
_
NAC 1
NAC 2
Figure 4.12 Powering SBUS Devices from 5495 or 5499
SBUS Device 5495 or 5499
FACP
supervised,
power-limited,
Class B
NOTE: The earth ground jumper on the 5495/5499 must be removed in this configuration.
Model RA-100
Farenhyt™ Series
Figure 4.13 RA-100 Remote Annunciator
 Loading...