Do you have a question about the Husqvarna AUTOMOWER 310E NERA and is the answer not in the manual?
Definitions of warnings, cautions, and notes used in the manual.
Essential safety guidelines for operating the product safely and correctly.
Safety precautions to follow during the installation process of the product.
Critical safety instructions for operating the robotic lawn mower.
Safety guidelines to adhere to when performing maintenance on the product.
Specific safety instructions related to the product's battery.
Instructions on how to safely lift and move the product.
General overview and purpose of the operator's manual.
Information on how to obtain support for the product.
Detailed description of the robotic lawn mower's features and functions.
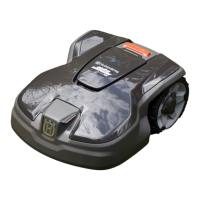
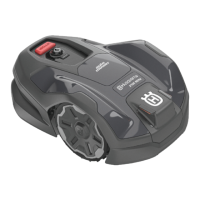
Visual identification and explanation of the product's main components.
Explanation of symbols found on the product and their meanings.
Explanation of symbols found on the battery and their meanings.
Guidelines on how to use the operator's manual effectively.
Overview of the product's user interface and controls.
Diagram illustrating the product's menu navigation structure.
Explanation of symbols used within the product's submenus.
Introduction to the installation process using a boundary wire.
List of primary components required for product installation.
Steps to take to prepare for a successful product installation.
Important considerations before commencing wire installation.
Guidelines for selecting the optimal location for the charging station.
Instructions for placing the power supply unit safely.
Guidance on determining the correct placement for the boundary wire.
Specific instructions for installing boundary wire on slopes.
How to create passages within the work area using boundary wire.
Steps to create isolated areas or "islands" using boundary wire.
Instructions for setting up secondary work areas.
Guidance on selecting the correct placement for the guide wire.
Practical examples of work area setups and wire installations.
Step-by-step guide for installing the robotic lawn mower.
List of tools required for product installation.
Instructions for downloading and setting up the Connect app.
Initial setup and first-time operation guidance.
Detailed steps for installing the charging station.
Procedures for installing the boundary wire loop.
Instructions for installing the guide wire.
Method for positioning wires using stakes.
Technique for burying wires into the ground.
How to perform a visual inspection of the charging station setup.
How to set the operating schedule for the product.
Method for calculating the daily operating hours based on lawn size.
How to adjust the cutting height of the product.
Step-by-step guide for adjusting the cutting height.
Function to gradually lower cutting height over 10 days.
Overview of how to change the product's operation settings.
Explanation of the spiral cutting pattern for specific areas.
Description of the object avoidance feature for the 410XE NERA model.
Feature that automatically adjusts cutting time based on grass growth.
Power-saving mode that disables signals when idle.
Feature for cutting lawn edges, can be disabled.
Settings related to the product's installation and wire detection.
Methods for the product to locate its charging station.
Settings for optimizing cutting coverage in different areas.
Use of GPS for optimal operation and area management.
Configuration options for up to five distinct work areas.
Adjustment for the width of corridors used for navigation.
Setting for how far the product reverses before cutting.
How the product maneuvers past boundary wires.
Settings for product accessories.
Control over the product's headlight settings.
Feature to reduce wear on the product and charging station.
General settings like time, date, and factory reset.
Security features including PIN code and GeoFence.
Settings for connecting and controlling the product via mobile app.
Accessing and understanding fault and information messages.
Feature for creating virtual maps of the work area.
How to update the product's software wirelessly.
Saving and managing different mowing configurations.
Procedure to re-establish the charging station's location in the map.
Step-by-step guide to power on the product.
Instructions on how to initiate the mowing operation.
Different modes for starting and operating the product.
How to put the product into a parked state.
Various modes for parking the product.
Procedure to stop the product's operation immediately.
Steps to power off the product completely.
Instructions for charging the product's battery.
General introduction to product maintenance procedures.
A schedule outlining routine maintenance tasks and intervals.
Guidelines for cleaning the robotic lawn mower.
Specific instructions for cleaning the blade area.
How to clean the main body of the mower.
Method for cleaning the product's wheels.
Instructions for cleaning the charging station.
Information and care related to the product's battery.
Detailed guide on how to replace the mower blades.
Step-by-step procedure for blade replacement.
Table of messages, causes, and recommended actions.
Troubleshooting based on charging station LED status.
Common symptoms and their corresponding causes and solutions.
Methods for locating and repairing breaks in the boundary wire.
Continued methods for locating and repairing breaks in the boundary wire.
Continued troubleshooting for product symptoms.
Further troubleshooting for product symptoms.
Final steps for locating breaks in the boundary wire.
Guidelines for transporting the product safely.
Instructions for preparing and storing the product.
Steps for storing the charging station.
Procedures for reinstalling the charging station after storage.
Information on proper disposal of the product and its components.
Detailed steps for safely removing the product's battery.
Specifications and technical details of the product.
Continued technical specifications and performance data.
Final technical specifications and regulatory information.
| Cutting Width | 22 cm |
|---|---|
| Cutting Height | 20-50 mm |
| Max Area Capacity | 600 m² |
| Battery Type | Li-Ion |
| Battery Voltage | 18 V |
| Charging Time | 60 min |
| Working Time | 70 min |
| Cutting system | 3 pivoting razor blades |
| App control | Yes |
| GPS theft protection | No |
| Weather Resistance | Yes |
| Smart Connectivity | Yes |
| Sound level perceived | 58 dB(A) |
| Connectivity | Bluetooth |
| Noise Level | 58 dB(A) |
| Blade Type | Razor blades |