Model 252
Label Printer/Applicator
Operators/Technical Manual
30
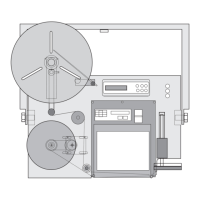
3.16 Corner Wrap Assembly
The corner wrap unit attaches to the 252 or 252N baseplate utilizing the same dedicated
slot configuration as a standard tamp unit. Start by removing the back cover from the
applicator using a 3mm hex wrench.
Before attempting to service machinery, the machine must be turned
off and the power and air locked out.
To mount the corner wrap unit, remove the four supplied M8x30 socket head screws, flat,
and spring washers, from the unit. Place the mounting block in position on the back of
the baseplate with the four mounting holes aligned with the slots. Insert the M8 screws
with washers, through the slots from the front of the baseplate, and attach the unit to the
baseplate. Adjusting the final position of the unit will not be important at this time.
Locate the fan power cord and route the connector through the grommeted hole on the
closest side of the electronic module. Insert the plug into the 2 conductor connector on
the PCB marked “J7” / “Fan”. Replace the back cover and reconnect any cables
disconnected during removal.