Installation
iSTAR Ultra Installation and Configuration Guide 2–17
9. Secure the power inputs with zip-ties to maintain minimum safe distance for electrical
safety. Install in accordance with local and national regulations. Non-limited power
supply lines must maintain a minimum of 1/2” spacing from limited power supply lines
and other signaling lines.
10. When routing signal cables from the ACM to accessory boards on the door, ensure that the
cables are not pinched by the door and cables are routed in accordance with NEC Codes or
the applicable Local codes.
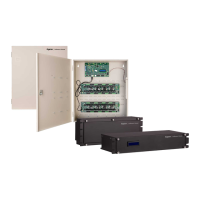
Rack Mount Installation
The GCM and ACMs are mounted separately in standard 19-inch racks. The cables will be
inside the cable management system of the rack. The components must remain secure, be
clearly labeled, and be easily accessible when using the correct tools.
Rack Mount Considerations
Be aware of the following considerations when mounting the iSTAR Ultra as a Rack Mount.
Elevated Operating Ambient - If installed in a closed or multi-unit rack assembly, the
operating ambient temperature of the rack environment may be greater than room
ambient. Verify that 0to 50 is maintained.
Reduced Air Flow - Installation of the equipment in a rack should be such that the amount
of air flow required for safe operation of the equipment is not compromised. Verify that
0to 50 is maintained.
Reliable Grounding - Reliable earth ground of rack-mounted equipment should be
maintained.
To Perform a Rack Mount Installation:
1. Pick a location for the rack, while observing the Rack Mount Considerations on page 2-17.
2. Disconnect the grounding wire on the controller.
3. Mount the unit with either 10/32 or 12/24 hardware.
4. Connect Ethernet, as required, to the Ethernet port(s).
5. Reconnect the grounding wire to the controller.
6. Secure the power inputs with zip-ties to maintain minimum safe distance for electrical
safety. Install in accordance with local and national regulations.
NOTE
Use a service loop when connecting the cables.
NOTE
The iSTAR Ultra must be installed in a UL-listed rack mount.
 Loading...